VSX-819H-S/-K
IMPORTANT THE MOULDED PLUG
Operating Environment
Thank you for buying this Pioneer product
For Taiwan exclusively
Taiwanese two pin flat-bladedplug
1996-2007DTS, Inc. All Rights Reserved
Information to User
03 Connecting up
Contents
06 The System Setup menu
07 Using the MULTI-ZONEfeature
10 Controlling the rest of your system
11 Other connections
12 Additional information
Before you start
Installing the receiver
Before you start
Chapter
025 minute guide Chapter
5 minute guide
Introduction to home theater
Listening to Surround Sound
5 minute guide
Automatically setting up for surround sound MCACC
English Français
Italiano Nederlands Español Deutsch
7Confirm the speaker configuration
025 minute guide
5Follow the instructions on-screen
6Wait for the test tones to finish
Other problems when using the Auto MCACC Setup
Better sound using Phase Control
5 minute guide
English Français
03Connecting up Chapter
Connecting up
Making cable connections
HDMI cables
About video outputs connection
Connecting up
Analog audio cables
Digital audio cables
03Connecting up
Español Deutsch 15
Connecting the multichannel analog outputs
Connecting up
English Français
03Connecting up
Connecting up
Connecting other audio components
English Français
Italiano Nederlands Español Deutsch
03Connecting up
Español Deutsch
Connecting up Using the component video jacks
English Français
Italiano Nederlands
Connecting to the front panel video terminal
Connecting antennas
03Connecting up
To improve FM reception
Using external antennas
To improve AM reception
Italiano Nederlands Español Deutsch 21
03Connecting up Connecting the speakers
Connecting up
Bare wire connections
English Français
Italiano Nederlands Español Deutsch
03Connecting up
Placing the speakers
5.1 channel surround system
6.1 channel surround system
Switching the speaker system
Connecting an IR receiver
Español Deutsch
Connecting up
2Plug the other end into a power outlet
03Connecting up Plugging in the receiver
Controls and displays Chapter
Controls and displays
Front panel
Italiano
04Controls and displays
Operating range of remote control
Display
Controls and displays
Italiano Nederlands Español
Deutsch
15UP MIX indicator
14SIGNAL SELECT indicators DIGITAL
04Controls and displays
2PLllx
Controls and displays Remote control
ADV SURR
04Controls and displays
Controls and displays
English Français
Italiano Nederlands Español Deutsch
05Listening to your system Chapter
Listening to your system
Auto playback
Listening in surround sound
Listening to your system
Using the Advanced surround effects
English Français
Italiano Nederlands Español Deutsch
05Listening to your system Listening in stereo
Using Front Stage Surround Advance
Using the Sound Retriever
Listening to your system Using Stream Direct
Using surround back channel processing
Listening with Acoustic Calibration EQ
05Listening to your system
Setting the Up Mix function
1Switch the receiver into standby
• Press RECEIVER, then press SB CH
Nederlands Español Deutsch 39
Setting the Audio options
Setting
Listening to your system
05Listening to your system
Setting
What it does
Options
Using the headphone
Choosing the input signal
Listening to your system Playing other sources
Selecting the multichannel analog inputs
06The System Setup menu Chapter
The System Setup menu
Using the System Setup menu
Manual speaker setup
Speaker Setting
The System Setup menu
English Français
Italiano Nederlands Español Deutsch
06The System Setup menu
Crossover Network
Channel Level
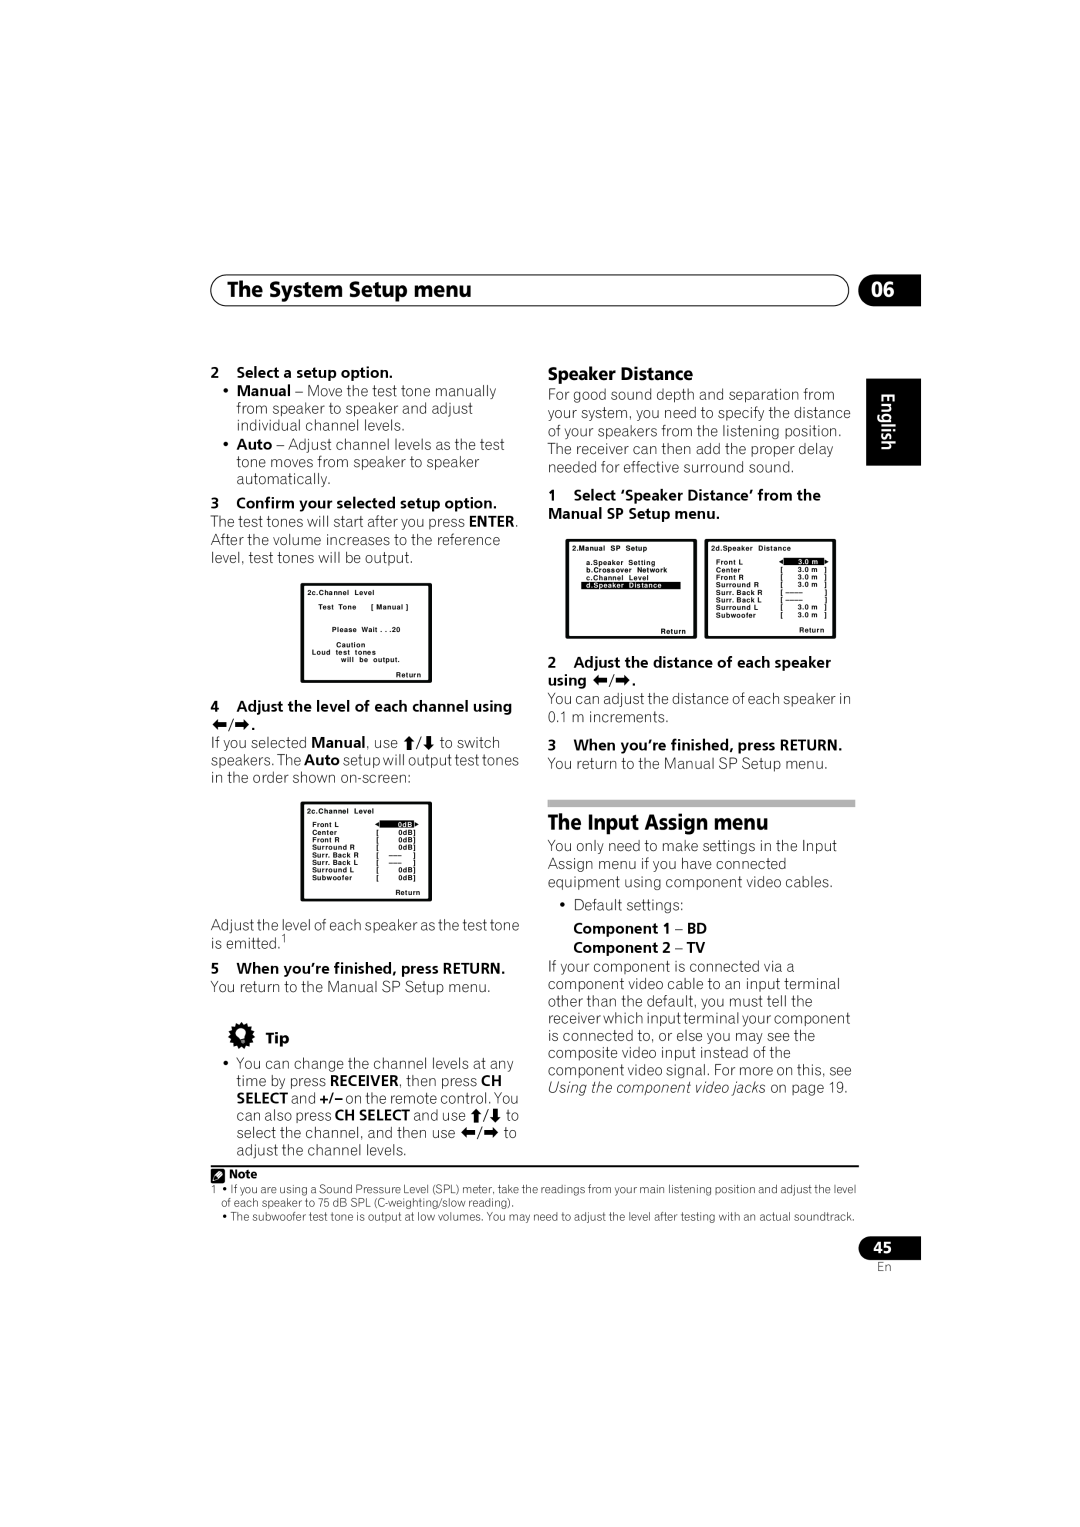
Speaker Distance
The Input Assign menu
The System Setup menu
English Français
2Select ‘Input Assign’ from the System Setup menu
06The System Setup menu
6When you’re finished, press RETURN
4Select the number of the component
Using the MULTI-ZONEfeature Chapter
Using the MULTI-ZONEfeature
Basic MULTI-ZONEsetup ZONE
MULTI-ZONElistening
07Using the MULTI-ZONEfeature
Using the MULTI-ZONEcontrols
MULTI-ZONEremote controls
Using the tuner Chapter
Using the tuner
Saving station presets
Listening to the radio
Listening to station presets
08Using the tuner
Naming preset stations
Changing the frequency step
Making recordings Chapter
Making recordings
Making an audio or a video recording
Français Italiano Nederlands Español
Selecting preset codes directly
Setting the remote to control other components
Clearing all the remote control settings
Controlling the rest of your system
Controls for TVs
Controlling the rest of your system
Italiano Nederlands Español Deutsch 53
English Français
Controls for other components
10Controlling the rest of your system
Buttons Function
Components
Controlling the rest of your system
Italiano Nederlands Español Deutsch 55
English Français
Buttons
Preset Code List
10Controlling the rest of your system
Manufacturer Code
Controlling the rest of your system
Italiano Nederlands Español Deutsch 57
English Français
Manufacturer Code
Nokia
10Controlling the rest of your system
Controlling the rest of your system
Italiano Nederlands Español Deutsch
English Français
Manufacturer Code
Mitsubishi
10Controlling the rest of your system
Connecting your iPod to the receiver
Connecting an iPod
Other connections
Other connections Chapter
iPod playback
11Other connections
Finding what you want to play
Basic playback controls
Other connections
Watching photos and video content
About iPod
English Français
11Other connections Connecting a USB device
Connecting your USB device to the receiver
Basic playback controls
Other compatibility information
Compressed audio compatibility
About MPEG-4AAC
About WMA
Additional information
Troubleshooting
12Additional information Chapter
ProblemRemedy
Italiano Nederlands Español Deutsch
Additional information
Problem
English Français
12Additional information
Configuration1
HDMI
Symptom
USB messages
iPod messages
Italiano Nederlands Español Deutsch 69
Symptom
Resetting the main unit
Changing the TV format setting
Specifications
Audio section
Integrated control section
Cleaning the unit
Miscellaneous
Furnished Parts
D3-4-2-2-2a A ChH
D3-4-2-1-1_A1_Zhtw
For Taiwan exclusively
and worldwide patents issued & pending
Dolby Laboratories
Manufactured under license under U.S
02五分鐘指南
01使用前
03連接設備
05聆聽您的系統
10控制您系統的其他設備
Italiano Franais Deutsch Nederlands Espaol
11其他連接
12其他資訊
清點包裝內容物
01使用前 第 1 章:
裝入電池
安裝接收器
五分鐘指南 第 2 章:
五分鐘指南
家庭劇院介紹
聆聽環繞音效
環繞音效的自動設定(MCACC)
02五分鐘指南
1打開接收器及電視機。 2將麥克風連接至前面板的 MCACC SETUP MIC 插孔。
•可隨時按下 SETUP 按鍵退出系統設定選 單。3
5遵循螢幕上指示。
五分鐘指南
•確定麥克風接上。 •請確實將重低音的電源打開並將音量調高。
6等待測試音完成測試。
使用相位控制獲得更佳音效
Auto MCACC 設定使用時的其他問題
02五分鐘指南
連接設備 第 3 章:
連接設備
HDMI 連接線
關於 HDMI
類比音訊線
03 連接設備
數位音訊線
色差視訊線
連接至電視機、Blu-rayDisc 播放機或 DVD 播放器
連接設備
本頁為說明如何將 BD/DVD 播放器及電視機連接至本接收器上。
English
連接多聲道類比輸出
03連接設備
請使用標準 RCA 視訊線2 及立體聲 RCA 音源 線連接。
如此便可播放來自電視機內建調諧器的聲音。 連接時請使用立體聲 RCA 音源線。
衛星、有線接收器及地面數位電視調諧器,均稱為 「機上盒」設備。
連接設備 連接衛星接收器或其他數位機上盒
1如果您的機上盒有 HDMI 輸出,請將它連
以下範例說明DIGITAL OPTICAL IN 2 AUX 輸 入的光纖連接方式。1
您可能會需要在沒有數位輸出的情況下連接設
03連接設備 連接其他音訊設備
備,或想經由數位設備進行錄製。此時請依照
圖中方式使用立體聲 RCA 音源線連接。
1 如果您的視訊設備有 HDMI 輸出,請將其
連接設備 連接硬碟 (HDD) /DVD 錄影機、VCR 及其他視訊來源
2 將錄影機的音訊/視訊輸出組連接至本接
如果您的視訊設備沒有 HDMI 音訊輸出,但有
請使用三向色差視訊線連接。
03連接設備 使用色差視訊插孔
只有在未依以下預設值連接時,才需如此做:
詳情請參閱第 44 頁的輸入指定選單 乙節。
連接設備 連接至前面板視訊端子
連接天線
Español
改善 FM 接收效果
使用外部天線
改善 AM 接收效果
03連接設備
將裝置接上 AC 電源前,請務必完成所有的接 線工作。
連接設備 連接揚聲器
English Français EspañolItaliano Nederlands
Español Deutsch
裸露金屬線之連接方式
使用 PRE OUT 輸出連接後環繞揚聲器
03連接設備
A揚聲器端子:
連接設備
揚聲器之擺設
5.1聲道環繞系統:
6.1聲道環繞系統:1
切換揚聲器系統
連接 IR 接收器
Up Mix 功能 乙節)。
03連接設備
連接設備 插上接收器電源
請勿使用不是本機隨附的其他電源線。 請勿將電源線用於非下列所述之範圍。
1將隨附的電源線插入接收器背面的 AC IN 插座內。 2將另一端插入電源輸出插座內。
04控制與顯示 第 4 章:
控制與顯示
遙控器的操作範圍
控制與顯示
和 Neo 6 選項 (第 33 頁)。
用於切換揚聲器系統 (第 24 頁)。
字元顯示幕
04控制與顯示 顯示
睡眠定時器指示燈
調諧器預設指示燈
偵測到含 Dolby Digital Plus 解碼音訊訊號 時會亮起。
控制與顯示
偵測到含 Dolby TrueHD 解碼音訊訊號時 會亮起。
乙節)。
04控制與顯示 遙控器
可顯示 Blu-rayDisc 的光碟選單。
2Pro Logic II (第 33 頁)。
顯示 HOME MENU 畫面。
控制與顯示
04控制與顯示
聆聽您的系統 第 5 章:
聆聽您的系統
自動播放
使用環繞音效聆聽
05聆聽您的系統
使用先進環繞聲效果
多聲道來源在連接後環繞揚聲器並已選取 SB
使用前場前環繞聲
聆聽您的系統 以立體聲聆聽
道來源均會縮混成立體聲。
•聆聽來源時,按下STEREO/A.L.C. 進行立體 聲播放。
使用聲音修正器功能
05聆聽您的系統 使用直流
使用音場補正等化功能聆聽
使用後環繞聲道處理模式
設定 Up Mix 功能
聆聽您的系統
FL SWC
FL SWC
05聆聽您的系統
設定音訊選項
1按下遙控器上的 RECEIVER 按鍵,然後按下
3使用 / 依所需設定。 請參照下表各項設定值可供使用的選項。
設定值 功能選項
聆聽您的系統
English
LFEATT 10 -10dB LFEATT ** OFF
選擇輸入訊號
05聆聽您的系統 播放其他來源
選擇多聲道類比輸入
使用耳機
系統設定選單 第 6 章:
系統設定選單
使用系統設定選單
手動揚聲器設定
揚聲器設定
06系統設定選單
2選取要調整的設定值。
效的自動設定 (MCACC)中所完成的設定值
聲道位準
系統設定選單
1從 Manual SP Setup 選單中選取 「Crossover Network」。
3操作完成,按下 RETURN。
揚聲器間距
輸入指定選單
06系統設定選單
2選取設定選項。
系統設定選單
1.Auto MCACC 2.Manual SP Setup 3.Input Assign
1按下遙控器上的 RECEIVER,然後按下
5選取與連接至該輸入相應的設備。
07使用 MULTI-ZONE 功能
使用 MULTI-ZONE 功能
第 7 章:
MULTI-ZONE 聆聽
使用 MULTI-ZONE 控制
使用 MULTI-ZONE 功能
閱以下的 MULTI-ZONE 遙控控制 乙節。
MULTI-ZONE 遙控控制
08使用調諧器 第 8 章:
使用調諧器
收聽收音機
儲存預設電台
切換頻率間隔
使用調諧器
收聽預設電台
命名預設電台
09進行錄製 第 9 章:
進行錄製
錄音或錄影
1選擇要錄製的來源。
控制您系統的其他設備 第 10 章:
控制您系統的其他設備
設定遙控器控制其他設備
直接選取預設代碼
10控制您系統的其他設備 電視機控制功能
控制您系統的其他設備 其他設備控制功能
10控制您系統的其他設備
控制您系統的其他設備 預設代碼清單
English
製造商代碼
製造商代碼
10控制您系統的其他設備
控制您系統的其他設備10
10控制您系統的其他設備
製造商代碼
Provision 0037,
Tatung 1000, 1001,
控制您系統的其他設備10
Tensai 1000, 1005,
Toshiba 1001, 1006,
11其他連接 第 11 章:
其他連接
連接 iPod
將您的 iPod 連接至接收器上
iPod 播放
其他連接
搜索您要播放的內容
基本播放控制
關於 iPod
11其他連接
觀賞相片與視訊內容
按鍵 功能
將您的 USB 裝置連接至接收器上
其他連接 連接 USB 裝置
基本播放控制
聲道音訊。1 請按照以下步驟連接 USB 大量儲 存裝置。2
其他相容性資訊
壓縮音訊之相容性
關於 MPEG-4AAC
Apple 及 iTunes 均是 Apple Inc. 於美國及其
其他資訊 第 12 章:
其他資訊
疑難排解
解決辦法
解決辦法
12其他資訊
LD 或 DVD 播放器。
在使用 Auto MCACC 設定
關於 HDMI 連接線的重要資訊
其他資訊
HDMI
問題狀況
USB 訊息
iPod 訊息
12其他資訊
問題狀況
重新設定主機
其他資訊 切換電視機格式設定值
整合的控制區段
清潔主機
其他資訊
隨附配件
Zhtw
其他資訊
ADVERTENCIA
IMPORTANTE
ADVERTENCIA
ADVERTENCIA
PRECAUCIÓN PARA LA VENTILACIÓN
Selector de tensión
ADVERTENCIA
1996-2007DTS, Inc. Todos los derechos reservados
Índice
06 El menú System Setup
01 Antes de comenzar
02 Guía rápida
11 Otras conexiones
10 Control de otros componentes del sistema
12 Información adicional
English Español
Capítulo
Antes de comenzar
Comprobación del contenido de la caja
Instalación de las pilas
Introducción al cine en casa
Guía rápida
Reproducción con sonido envolvente
English Español 7
1Encienda el receptor y su televisor
Importante
Precaución
English Español
Sonido mejorado con Phase Control
Conexiones de los cables
Conexiones
Cables HDMI
Acerca de HDMI
Cables de audio analógico
Acerca de la conexión de salidas de vídeo
Cables de audio digital
Cables de vídeo
English
Televisor
Reproductor Blu-ray/DVD
Conexión de las salidas analógicas multicanal
Este receptor
English Español
Conexión de otros componentes de audio
ala entrada DIGITAL OPTICAL IN 2 AUX.1
English Español
Importante
Uso de conectores de vídeo de componentes
•COMPONENT VIDEO IN 1 – BD/DVD
COMPONENT VIDEO IN 2 - TV/SAT
Conexión al terminal de vídeo del panel frontal
Conexión de antenas
English Español
Uso de antenas exteriores
Para mejorar la recepción en FM
Para mejorar la recepción en AM
English Español
Conexión de los altavoces
Conexiones de cables pelados
A-Terminalesde altavoces
B-Terminalesde altavoces
English
Disposición de los altavoces
Sistema de sonido envolvente de 5.1 canales
Sistema de sonido envolvente de 6.1 canales
Cambio del sistema de altavoces
Conexión de un receptor de infrarrojos
English Español 25
Conexión del receptor
Controles e indicadores
Panel frontal
Capítulo
13 Conector MCACC SETUP MIC
Alcance operativo del mando a distancia
ADVANCED SURROUND
STANDARD SURROUND
Pantalla
2PLllx
English Español 29
13 ADV.S
14Indicadores de selección de señal DIGITAL
Mando a distancia
ADV SURR
English Español
HDD*, DVD*, VCR
Reproducción automática
Uso del sistema
Capítulo
Reproducción con sonido envolvente
Uso de los efectos de sonido envolvente avanzados
Reproducción estéreo
Uso de Front Stage Surround Advance
English Español 35
Uso de Stream Direct
Uso de Sound Retriever
Reproducción automática en la página
English Español
Ajuste de la función Up Mix
• Pulse RECEIVER y, a continuación, SB CH
canal trasero envolvente
consulte Selección de las entradas
Ajuste de las opciones de Audio
analógicas multicanal en la página
Ajuste
Ajuste
English Español
Qué hace
Opciones
Selección de la señal de entrada
Reproducción de otras fuentes
Uso de los auriculares
Selección de las entradas analógicas multicanal
Uso del menú System Setup
El menú System Setup
Configuración manual de los altavoces
Capítulo
Ajuste de altavoz
Nivel de canales
Red divisora de frecuencias
English Español
Sugerencia
Distancia de altavoces
El menú Input Assign
English Español
2Seleccione ‘Input Assign’ en el menú System Setup
Uso de la función MULTIZONA
Configuración MULTIZONA básica ZONE
Escucha en MULTIZONA
Conexiones MULTIZONA
Controles a distancia MULTIZONA
Uso de los controles MULTIZONA
English
Español
Recepción de radio
Uso del sintonizador
Presintonización de emisoras
Cómo mejorar el sonido estéreo en FM
Cómo sintonizar emisoras memorizadas
Cambio del paso de frecuencia
Asignación de nombres a las estaciones
English Español
Grabación
Cómo hacer una grabación de audio o vídeo
Capítulo
Selección directa de códigos de preajuste
Control de otros componentes del sistema
Capítulo
English Español
Botónes
Controles para televisores
Función
Componentes
English Español
Controles para otros componentes
Botónes
Función
Función
Botónes
Componentes
Púlselo para ver la información
English Español 55
Lista de códigos de preajuste
Fabricante Código
Fabricante Código
Alaron
English Español 57
Fabricante Código
Siesta Silva Silver
English Español 59
Conexión de un iPod
Otras conexiones
Este receptor
Cable iPod
Búsqueda del elemento que desea reproducir
Reproducción del iPod
Controles de reproducción básica
English Español
Acerca de iPod
Visionado de fotos y vídeos
Botón
Qué hace
Conexión de un dispositivo USB al receptor
Conexión de un dispositivo USB
Controles de reproducción básica
English
Información de otras compatibilidades
Compatibilidad de sonido comprimido
Acerca de MPEG-4AAC
Acerca de WMA
Información adicional
Solución de problemas
English Español 65
Problema
Solución
Problema
• Conecte una antena exterior consulte la página
señal de entrada en la página
HDMI
Configuración1
English Español
Síntoma
Mensajes USB
Mensajes de iPod mensajes
Síntoma
Causa
Especificaciones
Cambio del ajuste de formato de TV
Sección de audio
Sección del sintonizador
Sección de control integrado
Limpieza del equipo
Otros
Accesorios suministrados
PIONEER ELECTRONICS USA INC
PIONEER CORPORATION
PIONEER ELECTRONICS OF CANADA, INC
PIONEER EUROPE NV