Operating Instructions
Important the Moulded Plug
Ventilation Caution
Operating Environment
Contents
Using other functions
System and the other setup
Controlling the rest of your system
Advanced Mcacc menu
Flow of settings on the receiver
Before you start
Features
Before you start Chapter
Installing the receiver
Operating range of remote control unit
Before you start
Checking what’s in the box
Remote control
Controls and displays
Controls and displays Chapter
Receiver
Controls and displays
Controls and displays Front panel
STANDBY/ON
Enter
Speakers
Controls and displays Display
Sleep
Mstr
Connecting your equipment Chapter
Connecting your equipment
Rear panel
Connecting your equipment
Other speaker connection
1ch surround & Zone 2 connection Multi Zone
1ch surround connection Simple connection & Best surround
1ch surround & Speaker B connection
Connecting your equipment Placing the speakers
THX speaker system setup
Bare wire connections
Connecting the speakers
Some tips for improving sound quality
Connecting your equipment Installing your speaker system
Standard 5.1/6.1/7.1-channel surround connections
Bi-wiring your speakers
Bi-amping your speakers
High
Low
Connecting your equipment Selecting the Surr Back system
Zone 2 setup
Speaker B setup
Bi-Amping setup
Connecting your equipment About the video converter
Connecting using Hdmi
Select one
Connecting your DVD player with no Hdmi output
Video S-VIDEO
Connecting your TV with no Hdmi input
DVD player, etc Select one
About HDMI1
Front panel
HDD/DVD recorder, VCR, etc
Connecting the multichannel analog inputs
Connecting other audio components
Connecting additional amplifiers
About the WMA9 Pro decoder
Connecting your equipment Connecting AM/FM antennas
Connecting external antennas
Connecting your equipment MULTI-ZONE setup
Analog audio signals Audio Zone 2 OUT. a
Zone 2 OUT signals can be output
Making MULTI-ZONE connections
Secondary MULTI-ZONE setup Zone
Basic MULTI-ZONE setup Zone
MULTI-ZONE setup using speaker terminals Zone
Connecting your equipment Connecting an IR receiver
Grounding purposes
Connecting a PC for Advanced Mcacc output
1 in 2 OUT Total 50 mA MAX
Connecting a USB device
Connecting your equipment Connecting an iPod
Switch the receiver into standby then use
Connecting your equipment Plugging in the receiver
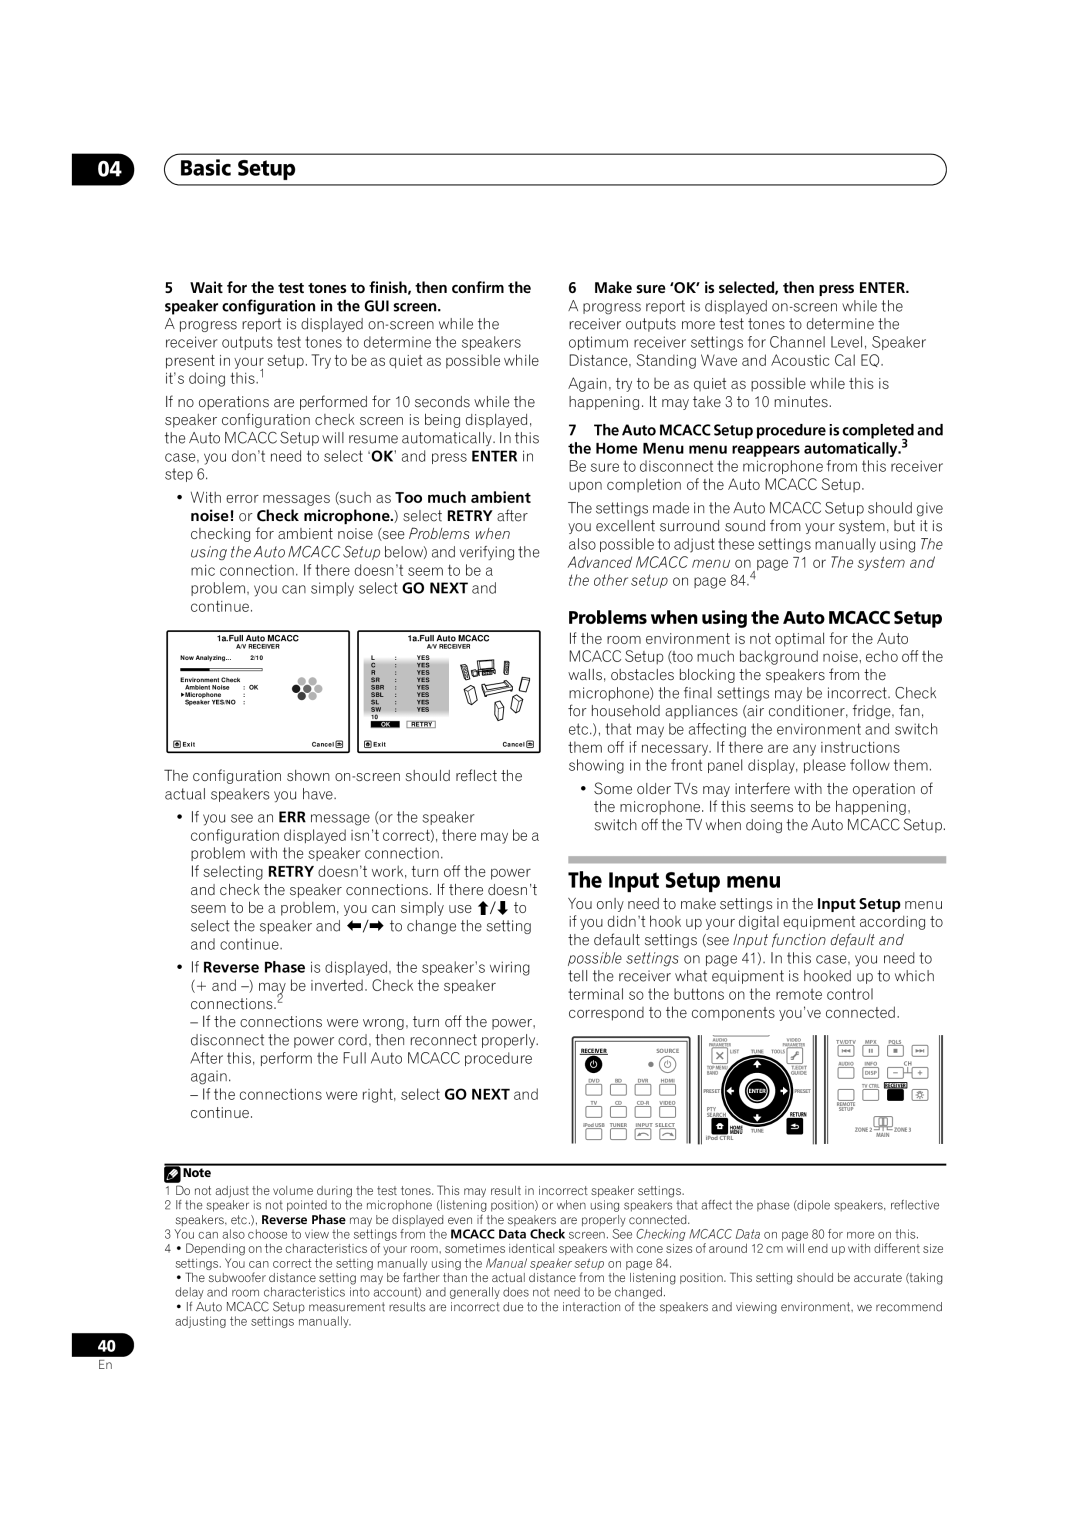
Basic Setup
Basic Setup Chapter
Switching the speaker impedance
Changing the OSD display language OSD Language
1a.Full Auto Mcacc
Input Setup menu
Basic Setup
Problems when using the Auto Mcacc Setup
Input function default and possible settings
SystemSetup 4b.Input Setup
BDb
HDMI-4b IPod/USB
Basic playback
Basic playback Chapter
Playing a source
Playing a source with Hdmi connection
Basic playback
Playing an iPod
Selecting the multichannel analog inputs
Finding what you want to play
Switching the iPod controls2
Press iPod Ctrl to switch the iPod controls.3
Basic playback controls
Navigation through categories on your iPod looks like this
Basic playback Playing a USB device
Playing back audio files stored on a USB memory device
Use / to select ‘Music’ from the USB Top menu
Want to play, then press to start playback
Slideshow Setup
Playing back photo files stored on a USB memory device1
About playable file formats
Music files
Photo files
MP3 a
Basic playback Listening to the radio
Listening to station presets
An introduction to RDS
Searching for RDS programs
Displaying RDS information
Listening to your system
Listening to your system Chapter
Listening in surround sound
Auto playback
Using the Home THX modes
Using the Advanced surround effects
Listening to your system
PRO LOGIC+THX Cinema
Listening in stereo
Using Front Stage Surround Advance
Then
Using surround back channel processing
Listening to your system Using Stream Direct
Using the Virtual Surround Back mode
Listening to your system Setting the Up Mix function
Selecting Mcacc presets
Press Enter to confirm
Up Mix OFF
Listening to your system Choosing the input signal
Better sound using Phase Control
Phase Control OFF
Phase Control on
Phase Control indicator on the front panel lights
Kuro Link
Making the Kuro Link connections
When you’re finished, press Home Menu
Kuro Link Setup
You will finish to Home Menu
Setting the Pqls function
Before using synchronization
Synchronized amp mode
Synchronized amp mode operations
Using other functions
Using other functions Chapter
Setting the Audio options
Press Return to confirm and exit the menu
Using other functions
Setting the Video options
Progressive
Using other functions Switching the speaker system
Using the MULTI-ZONE controls
MULTI-ZONE remote controls
Reducing the level of an analog signal
Making an audio or a video recording
Using other functions Using the sleep timer
Switching the Hdmi output
Checking your system settings
Dimming the display
Using other functions Resetting the system
Default system settings
Display shows Reset no
Display shows RESET? OK
Setting the remote to control other components
Selecting preset codes directly
Controlling the rest of your system
Controlling the rest of your system Chapter
Default preset codes
Controls the components
HDD Red
Controlling the rest of your system
CH +
Sacd Setup a
+10
Clear b
OPEN/CLOSE b
Making receiver settings from the Advanced Mcacc menu
Select the setting you want to adjust
Advanced Mcacc menu
Advanced Mcacc menu Chapter
Advanced Mcacc menu Automatic Mcacc Expert
Select the parameters you want to set
Use / to select the item, then use / to set
1b.Auto Mcacc
Advanced Mcacc menu
Manual Mcacc setup
Adjust the level of the left channel
Fine Channel Level
Fine Speaker Distance
Select ‘Manual MCACC’ from the Advanced Mcacc menu
Select ‘Fine SP Distance’ from the Manual Mcacc setup menu
Select ‘Standing Wave’ from the Manual Mcacc setup menu
Adjust the parameters for the Standing Wave Control
Standing Wave
Acoustic Calibration EQ Adjust
How to use Acoustic Calibration EQ Professional
How to interpret the graphical output
Acoustic Calibration EQ Professional
Using Acoustic Calibration EQ Professional
Channel frequencies/sounds
Select ‘EQ Professional’, then press Enter
Select an option and press Enter
1c5a.Reverb Measurement
1c5c.Adv.EQ Setup
1c5b.Reverb View
Speaker Setting
Advanced Mcacc menu Checking Mcacc Data
Channel Level
Speaker Distance
When ‘Ch’ is highlighted, use / to select the channel
Acoustic Cal EQ
Output PC
Select ‘Standing Wave’ from the Mcacc Data Check menu
Copying Mcacc preset data
Renaming Mcacc presets
Advanced Mcacc menu Data Management
Clearing Mcacc presets
3c.MCACC Memory Clear
System and the other setup
System and the other setup Chapter
Making receiver settings from the System Setup menu
Manual speaker setup
System and the other setup
Surround back speaker setting
Select ‘Speaker Setting’ from the Manual SP Setup menu
Select ‘Surr Back System’ from the Manual SP Setup menu
Select ‘Channel Level’ from the Manual SP Setup menu
Select a setup option
Confirm your selected setup option
Adjust the level of each channel using /
THX Audio Setting
Select ‘Speaker Distance’ from the Manual SP Setup menu
Select ‘THX Audio Setting’ from the Manual SP setup menu
4a.Manual SP Setup 4a4.Speaker Distance
Other Setup menu
Select either on or OFF for THX Loudness Plus setting
Flicker Reduction Adjusts the way the GUI screen looks
4a6.THX Audio Setting
Multi Channel Input Setup
Zone Audio Setup
Power on Level Setup
Volume Limit Setup
Remote Control Mode Setup
Flicker Reduction Setup
Additional information
Speaker Setting Guide
Additional information Chapter
Troubleshooting
Power
Additional information
Positional relationship between speakers and monitor
Advanced Mcacc
No sound
AMP Overheat
Other audio problems
Software is played back No sound when using
Sound is produced from
Analog components, but not
Settings
Video
Display
Professional Calibration EQ graphical output
Digital or DTS does not
Remote control
SBch Auto setting, EX or ES
Configuration a
Configuration B
Hdcp Error shows
Important information regarding the Hdmi connection
USB interface
Additional information Surround sound formats
Dolby
About iPod
Windows Media Audio 9 Professional
Additional information About THX
About Neural THX Surround
Multichannel signal formats
Stereo 2 channel signal formats
DTS +Neo6
Category Preset code Manufacturer
Additional information Preset code list
General
Plasma television
Maxent
Rear Projection TV
TV/DVD Combination
TV/PVR Combination
TV/VCR Combination
DVD
VCR/PVR Combination
Gateway Germatic Global Link Global Solutions Global Sphere
Blu-ray
DVD/PVR Combination
Satellite Set Top Box
DVD/VCR Combination
SAT/PVR Combination
Elap Elbe
Video Accessory
Additional information Cable Set Top Box
Laser Disc Player
Cassette Deck
Cleaning the unit
Additional information Specifications
Our philosophy
Additional information Index Numerics
Remote control 8, 9, 67-70, 90, 97, 105 Reset
THX 17, 72, 87
Tuner 30
USB 36, 45-47
Pioneer Corporation