ENCODE
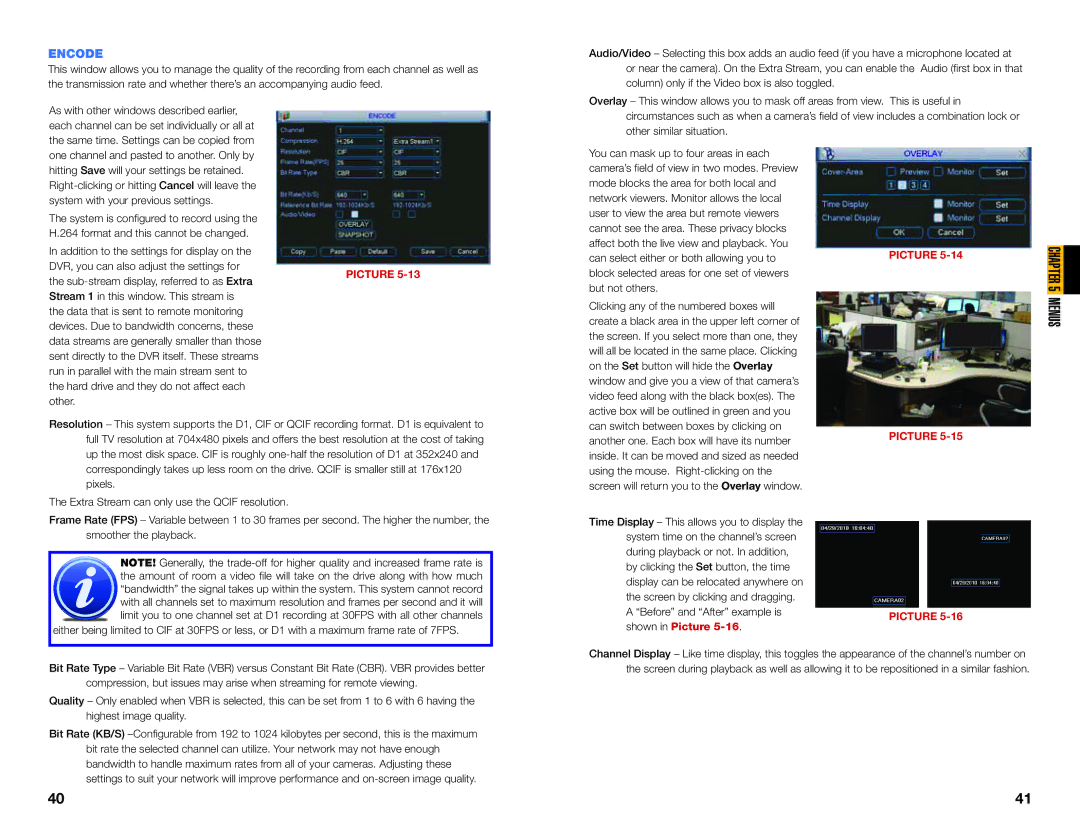
This window allows you to manage the quality of the recording from each channel as well as the transmission rate and whether there’s an accompanying audio feed.
As with other windows described earlier, each channel can be set individually or all at the same time. Settings can be copied from
Audio/Video – Selecting this box adds an audio feed (if you have a microphone located at or near the camera). On the Extra Stream, you can enable the Audio (first box in that column) only if the Video box is also toggled.
Overlay – This window allows you to mask off areas from view. This is useful in circumstances such as when a camera’s field of view includes a combination lock or other similar situation.
one channel and pasted to another. Only by hitting Save will your settings be retained.
The system is configured to record using the H.264 format and this cannot be changed.
In addition to the settings for display on the
DVR, you can also adjust the settings for
the
the data that is sent to remote monitoring devices. Due to bandwidth concerns, these data streams are generally smaller than those sent directly to the DVR itself. These streams run in parallel with the main stream sent to the hard drive and they do not affect each other.
Resolution – This system supports the D1, CIF or QCIF recording format. D1 is equivalent to full TV resolution at 704x480 pixels and offers the best resolution at the cost of taking up the most disk space. CIF is roughly
The Extra Stream can only use the QCIF resolution.
Frame Rate (FPS) – Variable between 1 to 30 frames per second. The higher the number, the smoother the playback.
NOTE! Generally, the
the amount of room a video file will take on the drive along with how much “bandwidth” the signal takes up within the system. This system cannot record with all channels set to maximum resolution and frames per second and it will limit you to one channel set at D1 recording at 30FPS with all other channels
either being limited to CIF at 30FPS or less, or D1 with a maximum frame rate of 7FPS.
You can mask up to four areas in each camera’s field of view in two modes. Preview mode blocks the area for both local and network viewers. Monitor allows the local user to view the area but remote viewers cannot see the area. These privacy blocks affect both the live view and playback. You can select either or both allowing you to block selected areas for one set of viewers but not others.
Clicking any of the numbered boxes will create a black area in the upper left corner of the screen. If you select more than one, they will all be located in the same place. Clicking on the Set button will hide the Overlay window and give you a view of that camera’s video feed along with the black box(es). The active box will be outlined in green and you can switch between boxes by clicking on another one. Each box will have its number inside. It can be moved and sized as needed using the mouse.
Time Display – This allows you to display the system time on the channel’s screen during playback or not. In addition, by clicking the Set button, the time display can be relocated anywhere on the screen by clicking and dragging. A “Before” and “After” example is shown in Picture
PICTURE
PICTURE
PICTURE
CHAPTER 5 MENUS
Bit Rate Type – Variable Bit Rate (VBR) versus Constant Bit Rate (CBR). VBR provides better compression, but issues may arise when streaming for remote viewing.
Quality – Only enabled when VBR is selected, this can be set from 1 to 6 with 6 having the highest image quality.
Bit Rate (KB/S)
bit rate the selected channel can utilize. Your network may not have enough bandwidth to handle maximum rates from all of your cameras. Adjusting these settings to suit your network will improve performance and
Channel Display – Like time display, this toggles the appearance of the channel’s number on the screen during playback as well as allowing it to be repositioned in a similar fashion.
40 | 41 |