QH32DVR4C
QH32DVR4C User’s Manual
QH32DVR4C User’s Manual
Website Customer Service
Storage Functions
Product Introduction
Others
Preview & Playback Functions
Network Functions
Checking the DVR and Its Accessories
Installation
Hard Drive HDD Installation
Installation Notice Installation Tools
QSC26404 Rear Panel
System Setup
Rear Panel Description
Front Panel
Operational Instructions
Front Panel Form 3-1 Items on Front Panel
Index Type Name Description
【 】【 】
Index Name Description
IR Remote Control
Starting the Remote Control
Loading the Batteries Into the Remote Control【 】
Disabling the Remote Control
Powering Down the DVR
Form 3-3 List of Menu Options
Menu Description Menu Options
Main Menu Description
How to Enter Into Menu Mode
Menu Operation
You can use To select one
Key to select number, upper case, lower case or symbols
Key to enter into
Edit status, you can input text in the box
Input Text
How to Exit Menu
Key to exit menu and return to preview mode
Light is off, please do the following
Basic Operation Guide Power On
Light is green. On the monitor or VGA display
Key to display or hide the camera status bar
Icon Icon Color Status Description
Recording status Form 4-1 Camera record status
Key to switch to multi-screen view
Alarm status
Login
User Name and Password
Change Password
Input password
Keys. As .6 shows
Change users’ password
PTZ Control Interface
PTZ Pan, Tilt, Zoom Control
Select Channel
Adjust Preset Description
PTZ Control Keys Description
Press Key to select the PTZ camera on channel
【Exit PTZ Control】 Mode
Start/Stop Auto in PTZ Control Mode
Press ESC or Enter to exit and return to preview mode
Manual【 】Record【 】
Description
Playback
10 Playback interface
To select recorded file type. The file type options are
List box. You can use
To pause/continue playback. If played frame by
Open/Close sound
Frame, Press
Copy segment Edit Stop copy
Control Bar Functions
Playback With Mouse Attached
Bar stays at the file you want to backup, press Edit
Backup Recorded Files
Playback interface, you can backup the recorded files
Again to stop selecting. This segment is selected
12 Playback list
Please refer to Chapter
Shutting Down the DVR
Administrator and Password
Parameters Setup Guide
Enter into administrator menu
Password Modification
User management
Enter into User Management interface
Add and Delete Users
Steps are as follows
Add User
Add new user name
Setup the password for new user
Save the new user’s password and rights
Setup the rights for new user
User rights description Local
Press Cancel or ESC to abort deleting. As shown in fig
Remote through network or internet
MAC Address
Unit Name and Device ID
Effective. Press Cancel button or ESC
Confirm button and press
Key to abort modification
Press Confirm button to save or Cancel to abort
Video Output Standard and VGA Setup
VGA setup
Device ID
Camera Name Position
To save the change
Camera Name
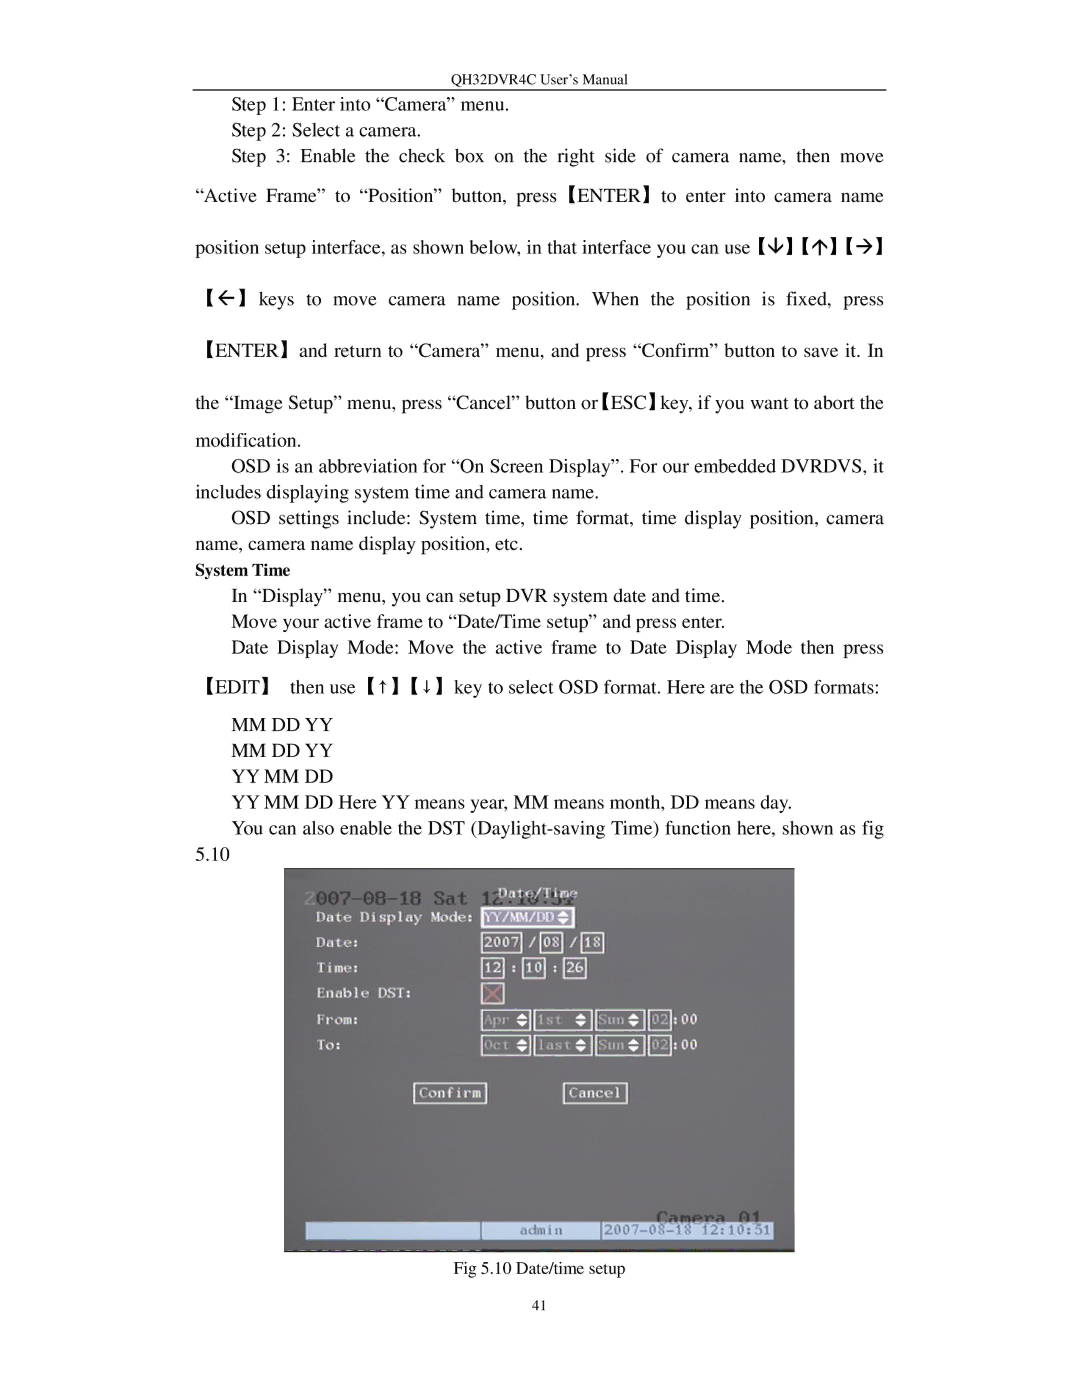
Move your active frame to Date/Time setup and press enter
Display menu, you can setup DVR system date and time
Return to Camera menu, and press Confirm button to save it.
Then use Key to select OSD format. Here are the OSD formats
Date OSD Position
Video Parameters Setup
To abort modification
Select camera Please use
Satisfied with the real time video image, press Enter
22*18 panels 22*15 for NTSC, you can use Keys to move
Mask Area Setup
Here is an example of the mask area function shown as fig
Disabling the mask check box cancels the mask area
Select sensitivity
View Tampering Alarm
Enter into Camera menu Select camera Please use
Enter into Camera menu
Video Loss Alarm
After your setup, press Confirm button
Save alarm setup
Enter into Camera menu Select camera Use
Motion Detection
Clear all motion areas Press
Clear motion area
】 【
Preview Properties
QH32DVR4C User’s Manual
Recording menu description
Recording Setup
Bit Rate Type
All day recording setup Enter into recording schedule menu
Select a day and enable all day recording option
Setup time period and record type
Select one day and disable all day recording option
Record type
Copy to other days
External alarm input setup
External Alarm Input and Relay Output
Alarm type
Enter into Alarm in Handling sub menu
Schedule for alarm handle method
Alarm trigger record channel setup
Alarm handle method
Save setup
PTZ Linkage
Select delay time
Alarm relay output setup Alarms menu, use
Enter into alarm out schedule
Setup alarm out schedule
Exceptions
Network menu description
Network Parameters
Advanced setup description
PPPoE DVR supports PPPoE dail-up function
Accessing the DVR over a network
Accessing the DVR from a remote computer
PTZ menu description
PTZ Pan, Tilt, Zoom
Preset setup
Iris FOCUS+ FOCUS- ZOOM+
Sequence setup
Cruise setup
Utilities
Restore Parameters
Upgrade
Reboot
Stop Alarm Out
Power Off
Hard Disk Management
View Log
By Type&Date
For example The steps of viewing alarm log
By Time
System Information
FTP Server Setup
Firmware Upgrade
Setup username
Upgrade Mode
Single click the left key
Drag the left key
Right click
Moving
Scroll wheel forward
Click the right key
= d i ⎟ 8 ⋅ 3600 ⎟1024
Appendix B HDD Capacity Calculation
RJ45 introduction Pin definition
Appendix C DVR Connect Cable Definition
Material and tool
QH32DVR4C User’s Manual
Appendix D DVR Specifications
Models QOCDC60 QOCDC36
Appendix D Camera Specifications
Failure Possible reasons
Appendix E Troubleshooting
Appendix F Product Service & Warranty
Appendix G Customer Information Card
Website Customer Service