INSTALLATION

CONVERTING

MASONRY CHIMNEY

Important: The existing masonry flue open- ing needs to have an area of at least a 36 sq. in. to insure proper intake/exhaust flow.

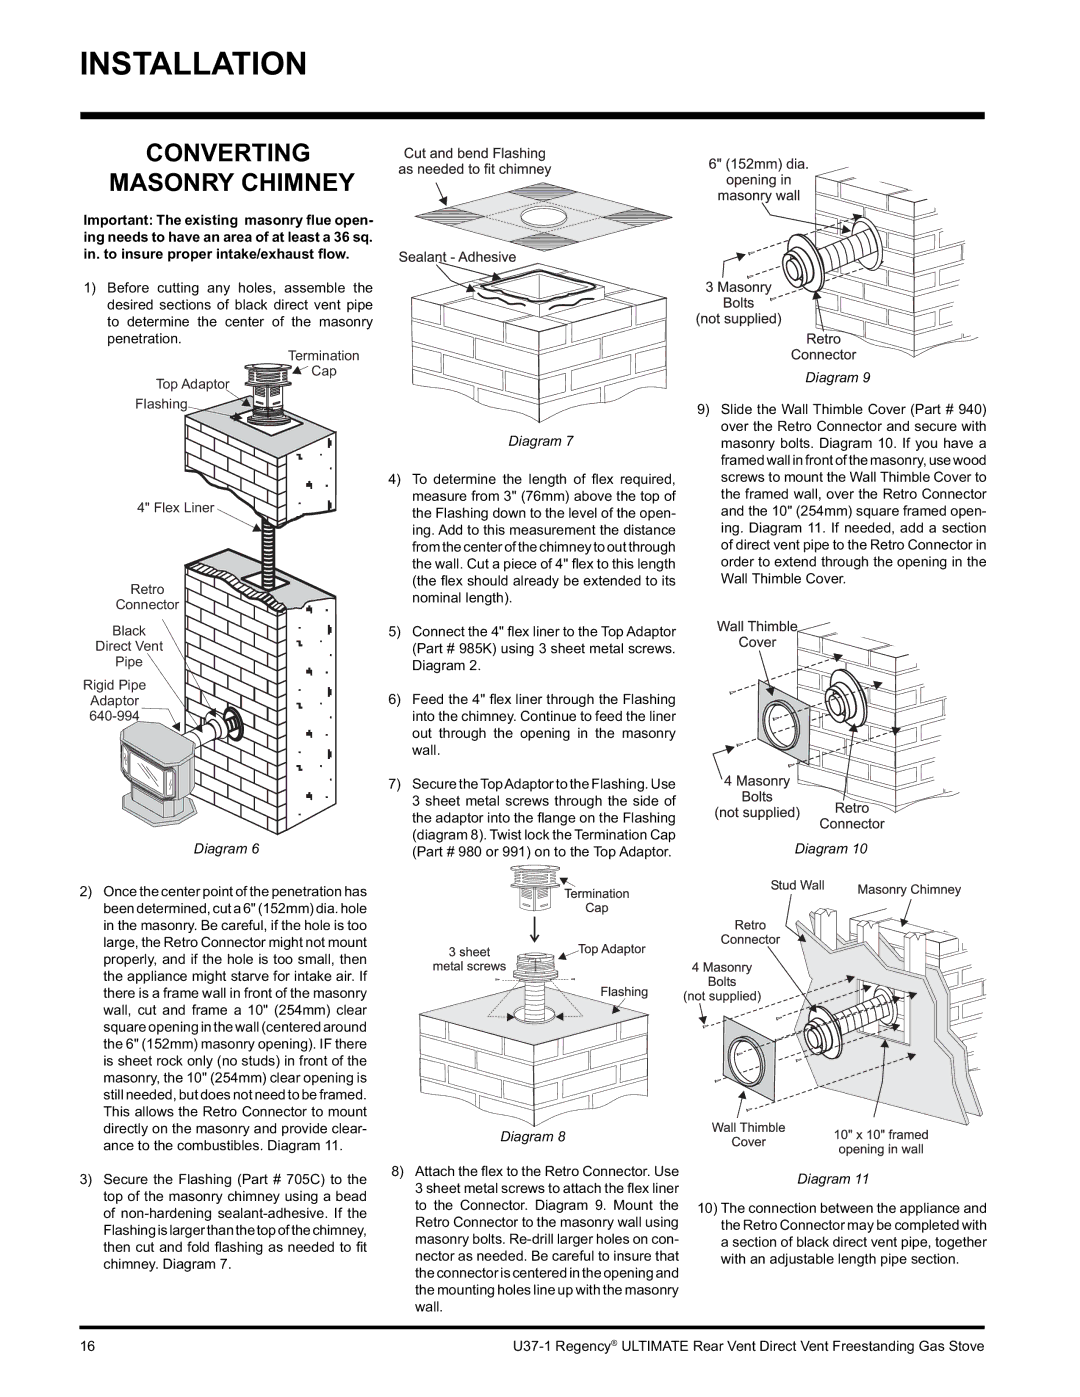
1)Before cutting any holes, assemble the desired sections of black direct vent pipe to determine the center of the masonry penetration.

Termination

Cap

Top Adaptor

Flashing

4" Flex Liner

Retro

Connector

Black

Direct Vent

Pipe

Rigid Pipe

Adaptor

640-994

Diagram 6

2)Once the center point of the penetration has been determined, cut a 6" (152mm) dia. hole in the masonry. Be careful, if the hole is too large, the Retro Connector might not mount properly, and if the hole is too small, then the appliance might starve for intake air. If there is a frame wall in front of the masonry wall, cut and frame a 10" (254mm) clear square opening in the wall (centered around the 6" (152mm) masonry opening). IF there is sheet rock only (no studs) in front of the masonry, the 10" (254mm) clear opening is still needed, but does not need to be framed. This allows the Retro Connector to mount directly on the masonry and provide clear- ance to the combustibles. Diagram 11.

3)Secure the Flashing (Part # 705C) to the top of the masonry chimney using a bead of non-hardening sealant-adhesive. If the Flashing islargerthan thetopof the chimney, then cut and fold fl ashing as needed to fi t chimney. Diagram 7.

Diagram 7

4)To determine the length of fl ex required, measure from 3" (76mm) above the top of the Flashing down to the level of the open- ing. Add to this measurement the distance from the center of the chimney to out through the wall. Cut a piece of 4" fl ex to this length (the fl ex should already be extended to its nominal length).

5)Connect the 4" fl ex liner to the Top Adaptor (Part # 985K) using 3 sheet metal screws. Diagram 2.

6)Feed the 4" fl ex liner through the Flashing into the chimney. Continue to feed the liner out through the opening in the masonry wall.

7)Secure the TopAdaptor to the Flashing. Use 3 sheet metal screws through the side of the adaptor into the fl ange on the Flashing (diagram 8). Twist lock the Termination Cap (Part # 980 or 991) on to the Top Adaptor.

Diagram 8

8)Attach the fl ex to the Retro Connector. Use 3 sheet metal screws to attach the fl ex liner to the Connector. Diagram 9. Mount the Retro Connector to the masonry wall using masonry bolts. Re-drill larger holes on con- nector as needed. Be careful to insure that the connector is centered in the opening and the mounting holes line up with the masonry wall.

Diagram 9

9)Slide the Wall Thimble Cover (Part # 940) over the Retro Connector and secure with masonry bolts. Diagram 10. If you have a framed wall in front of the masonry, use wood screws to mount the Wall Thimble Cover to the framed wall, over the Retro Connector and the 10" (254mm) square framed open- ing. Diagram 11. If needed, add a section of direct vent pipe to the Retro Connector in order to extend through the opening in the Wall Thimble Cover.

Diagram 10

Diagram 11

10)The connection between the appliance and the Retro Connector may be completed with a section of black direct vent pipe, together with an adjustable length pipe section.

16

U37-1 Regency® ULTIMATE Rear Vent Direct Vent Freestanding Gas Stove

Page 16
Image 16
Regency U37-LP1, U37-NG1 installation manual Converting Masonry Chimney

U37-LP1, U37-NG1 specifications

The Regency U37-NG1 and U37-LP1 are two innovative models that showcase advanced technology and superior engineering in the realm of HVAC (heating, ventilation, and air conditioning) systems. These units are designed to deliver optimal comfort while maximizing energy efficiency, making them ideal for both residential and commercial applications.

One of the standout features of the U37-NG1 is its use of a high-efficiency burner system, which ensures that every unit is capable of delivering substantial heating output while consuming minimal gas. This not only translates to lower utility bills for users but also aligns with sustainability goals by reducing carbon emissions. In terms of design, the U37-NG1 is compact and can be installed in a variety of settings, making it a versatile choice for many different environments.

The U37-LP1, on the other hand, is tailored for propane applications, making it perfect for areas where natural gas is inaccessible. It features a similar high-efficiency heating output, ensuring that it meets the demands of users without compromising on performance. The dual-fuel capability of the U37 series enhances its adaptability, allowing it to be used in a range of scenarios.

Both models are equipped with advanced control technologies, including programmable thermostats and smart connectivity features. Users can easily manage their heating systems through mobile apps, allowing for remote adjustments and real-time monitoring. This technology not only enhances user convenience but also promotes energy conservation by allowing users to adjust settings based on their lifestyle and preferences.

In terms of durability, the Regency U37 series boasts a robust construction designed to withstand various environmental conditions. With quality materials and expert craftsmanship, these units are built to last, reducing the need for frequent repairs or replacements.

Overall, the Regency U37-NG1 and U37-LP1 models combine cutting-edge technology with practical features to deliver an exceptional heating experience. Their commitment to energy efficiency, adaptability, and user-friendly controls positions them as leading options in the HVAC market, making comfortable living spaces more accessible while promoting environmentally responsible practices. Whether for home use or commercial properties, these systems offer reliability and performance tailored to the needs of modern users.