Command No.


Command Description


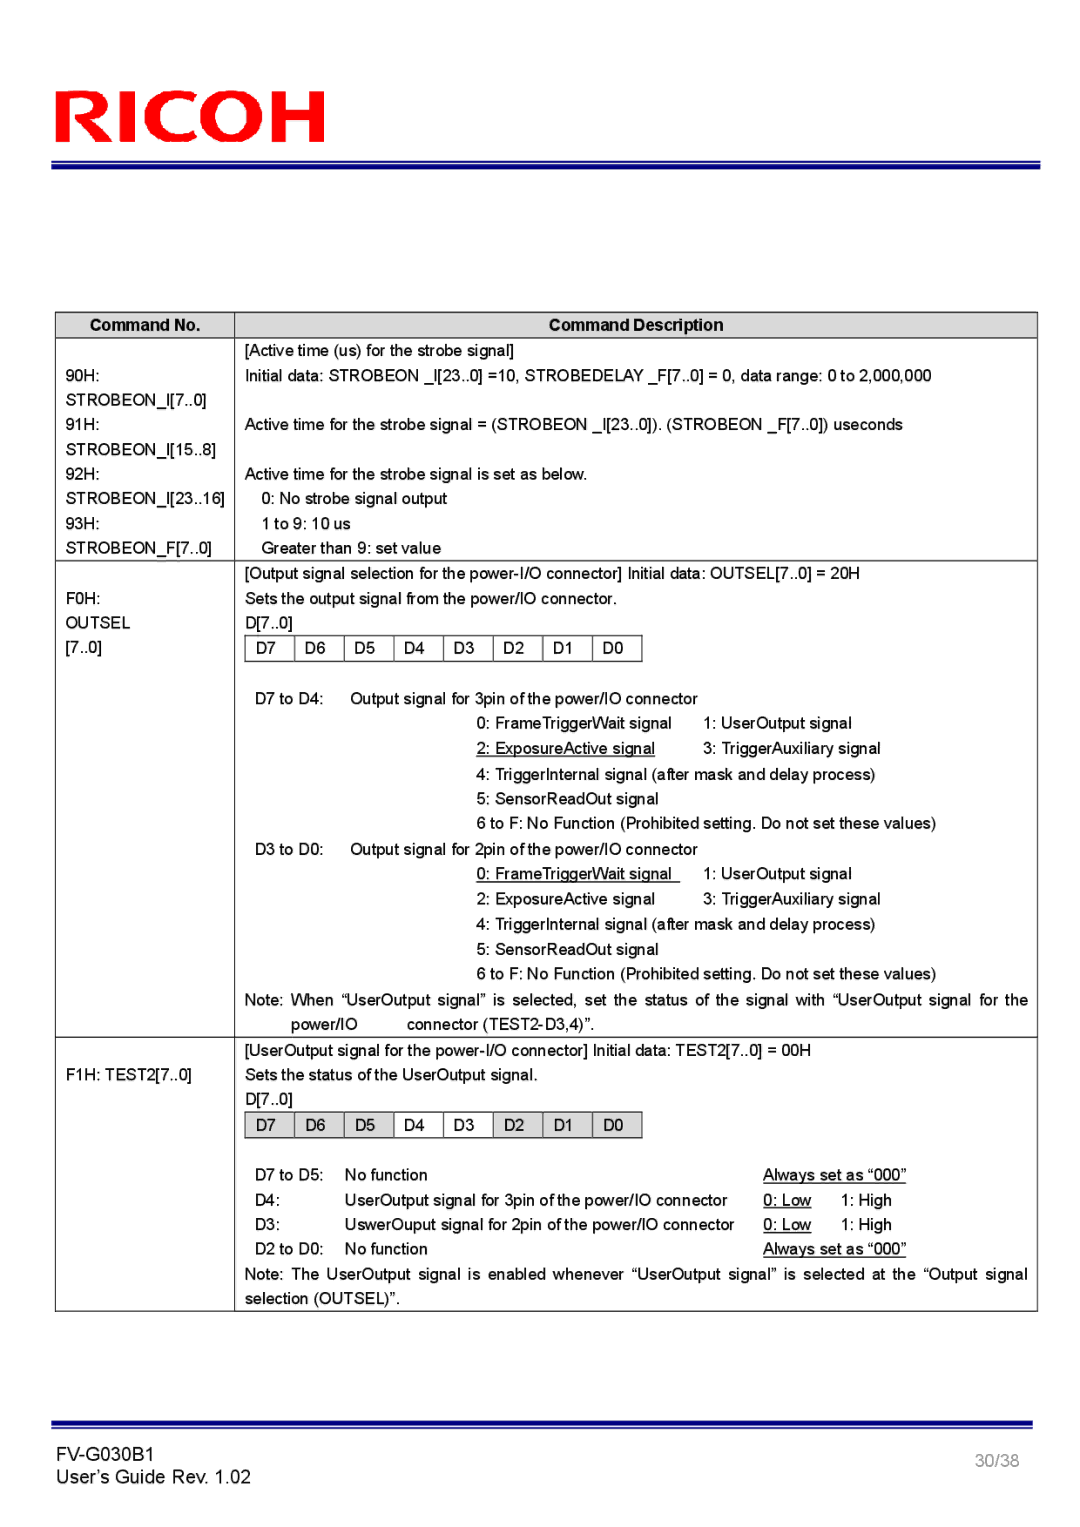
[Active time (us) for the strobe signal]


90H:


Initial data: STROBEON _I[23..0] =10, STROBEDELAY _F[7..0] = 0, data range: 0 to 2,000,000

STROBEON_I[7..0]


91H:


Active time for the strobe signal = (STROBEON _I[23..0]). (STROBEON _F[7..0]) useconds

STROBEON_I[15..8]


92H:

Active time for the strobe signal is set as below.


STROBEON_I[23..16]


0: No strobe signal output


93H:


1 to 9: 10 us


STROBEON_F[7..0]


Greater than 9: set value


[Output signal selection for the power-I/O connector] Initial data: OUTSEL[7..0] = 20H

F0H:


Sets the output signal from the power/IO connector.


OUTSEL


D[7..0]


[7..0]


D7

D6

D5


D4


D3


D2

D1


D0


D7 to D4:

Output signal for 3pin of the power/IO connector


0: FrameTriggerWait signal

1: UserOutput signal


2: ExposureActive signal

3: TriggerAuxiliary signal


4: TriggerInternal signal (after mask and delay process)


5: SensorReadOut signal


6 to F: No Function (Prohibited setting. Do not set these values)


D3 to D0:

Output signal for 2pin of the power/IO connector


0: FrameTriggerWait signal

1: UserOutput signal


2: ExposureActive signal

3: TriggerAuxiliary signal


4: TriggerInternal signal (after mask and delay process)


5: SensorReadOut signal


6 to F: No Function (Prohibited setting. Do not set these values)


Note: When “UserOutput signal” is selected, set the status of the signal with “UserOutput signal for the


power/IO

connector (TEST2-D3,4)”.


[UserOutput signal for the power-I/O connector] Initial data: TEST2[7..0] = 00H


F1H: TEST2[7..0]


Sets the status of the UserOutput signal.


D[7..0]


D7


D6

D5


D4


D3


D2

D1


D0


D7 to D5:

No function


Always set as “000”


D4:


UserOutput signal for 3pin of the power/IO connector

0: Low

1: High


D3:


UswerOuput signal for 2pin of the power/IO connector

0: Low

1: High


D2 to D0:

No function


Always set as “000”


Note: The UserOutput signal is enabled whenever “UserOutput signal” is selected at the “Output signal


selection (OUTSEL)”.


FV-G030B1

30/38

User’s Guide Rev. 1.02


Page 30
Image 30
Ricoh FV-G030B1 manual 30/38

FV-G030B1 specifications

The Ricoh FV-G030B1 is an innovative visualizer that caters to the needs of educators, business professionals, and content creators alike. This advanced document camera is designed to enhance presentations, lectures, and meetings by providing high-quality visual representations of documents, objects, and 3D items. With its impressive features and cutting-edge technologies, the FV-G030B1 is a powerful tool for anyone looking to engage their audience more effectively.

One of the standout features of the Ricoh FV-G030B1 is its high-resolution imaging capability. With a 12-megapixel camera, it captures sharp and detailed images, ensuring that every document and object is presented clearly. This high resolution allows for the magnification of small text and intricate details without losing clarity, making it ideal for educational settings where precision is key.

The FV-G030B1 also boasts a flexible and easy-to-use design. The camera can be adjusted for various angles and heights, allowing users to capture images from different perspectives. This flexibility is particularly useful in classroom environments, where instructors may want to display various materials simultaneously or highlight specific features of an object.

Connectivity options are another major advantage of the Ricoh FV-G030B1. It features multiple connectivity options, including USB and HDMI ports, making it simple to connect to laptops, projectors, and other display devices. This versatility allows users to share content seamlessly, fostering a collaborative environment in both educational and professional settings.

Advanced imaging technologies enhance the FV-G030B1's functionality. It supports various formats, including JPEG and PNG for still images, with the ability to record videos in high definition. This feature is particularly valuable for creating instructional materials or capturing presentations for later review.

Moreover, the FV-G030B1 is equipped with built-in annotation features that allow users to draw or highlight key points directly on the display. This interactivity encourages audience participation and makes presentations more engaging.

In summary, the Ricoh FV-G030B1 is a versatile and powerful visualizer that stands out with its high-resolution imaging, flexible design, and enhanced connectivity. Its advanced technologies and user-friendly features make it an essential tool for educators, business professionals, and anyone aiming to deliver impactful presentations. Whether you are showcasing documents, objects, or engaging in interactive discussions, the FV-G030B1 facilitates a richer visual experience.