Data Projector
Safety Precautions
USA only
Before Using
Source of Light
Power Sources
Ventilation
Cleaning
Power Cord Protection
Heat
Water and Moisture
Important Safety Instructions
Accessories
Damage Requiring Service
Sales representative for Repair service
If glass components
Safety Check
Replacement Parts
Do not use the product in a closed installation Location
Moisture Condensation
Place and Manner of Installation
Avoid Volatile Liquid
Important Precautions LCD Panel
Copyrights
Disposal
Following information is only for EU-member states
Other Information Trademarks
Notational Conventions Used in This Manual
Contents
Network/USB memory
Maintenance
Others
Checking the package contents
Names of each part on the main unit
Preparations
Names of each part on the control panel and remote control
Remote Control
Buttons. Either is usable. p.20 p.65
Names of the terminals on the rear panel
91011
Loading dry-cell batteries into the remote control
Preparing and using the remote control
Operating the remote Control
Connecting a computer
Operating a computer
Placement
Placement Styles
Placement
Projection Distance and Size
PJ X3241N
Screen As seen from above
PJ WX3231N Screen As seen from above As seen from the side
Connection
Before connection
Preparations
Turning the power on and off
Connect the power cord
Turn the power on
Remove the lens cap
Turn the power off
Precautions
Press the ON/STANDBY button again
Replace the lens cap
Turn on the power
Basic operations
Activate the connected device
Press the Input button
Adjust projector placement angle
Adjust the screen size and focus
Adjust the volume with the buttons
To fine adjust the angle, twist the foot adjuster
Basic operations
LCD Panels
Using handy features
Using auto setting For computer input only
Press the remote control’s Auto SET button
Adjusting Keystone distortion Manually
Using handy features
Press the remote control’s Resize button
To zoom out, press the remote control’s Resize Button
Resizing image
Changing picture mode
Press the remote control’s Screen Size button
Cutting off the picture and sound temporarily Mute
Changing screen size
Press the remote control’s Freeze button
Setting the password How to change password
Freezing the image Freeze
How to operate when password is On
How to set password from Off to On
How to set password from On to Off
Using the menus
Setup using the Setting display
The image adjustment menu
Contrast
Using the menus
Frequency
The display setting menu
Blackboard mode
Precaution
Detailed description Screen size
Up/down shift
Display style
Reset logo
Logo confirmation
The default setting menu
Detailed description Auto input search
Network input detection
Input select menu Computer
Power on
Lamp power
Detailed description Fan mode
Voice guide
Key lock
Remote control code setting for remote control
Closed Caption
Displaying Information Status display
Before connecting via a network
Connection using the Network Projector Windows Vista or
Connection using the Network Utility
Functions
Communication mode
Caution when using the wireless LAN functions
Ad hoc communication mode
Infrastructure communication mode
How to use the USB terminal
Connecting USB device
Disconnecting USB device
Plug in the USB device
USB memory devices
Backing up data
Supported files
The USB terminal
Projector settings Be sure to read this subsection
Control setting Slideshow setup Status display
Setting up the Network Projector/Network Utility
LAN
Character entry mode
Items using characters, numbers, and symbols
Character entry
Number only
Details on individual items
Security for wireless LAN settings Network authentication
Network key When you have set Encryption to WEP
When you have set Encryption to TKIP/AES
Setting initialization
Wired LAN settings
Computer settings
The control setting menu
Detailed description
Projector name
PJLink
Setting slideshow options
Wireless network
Details on individual items Still Image
Movie Image
Status display
Checking the projector status
Common
Using the Network Projector
Setting up the projector
Setting up the computer
Turn the projector power on Switch the input to Network
Installing the applications
How to install
System Requirements
Application Types and Major Functions
How to uninstall
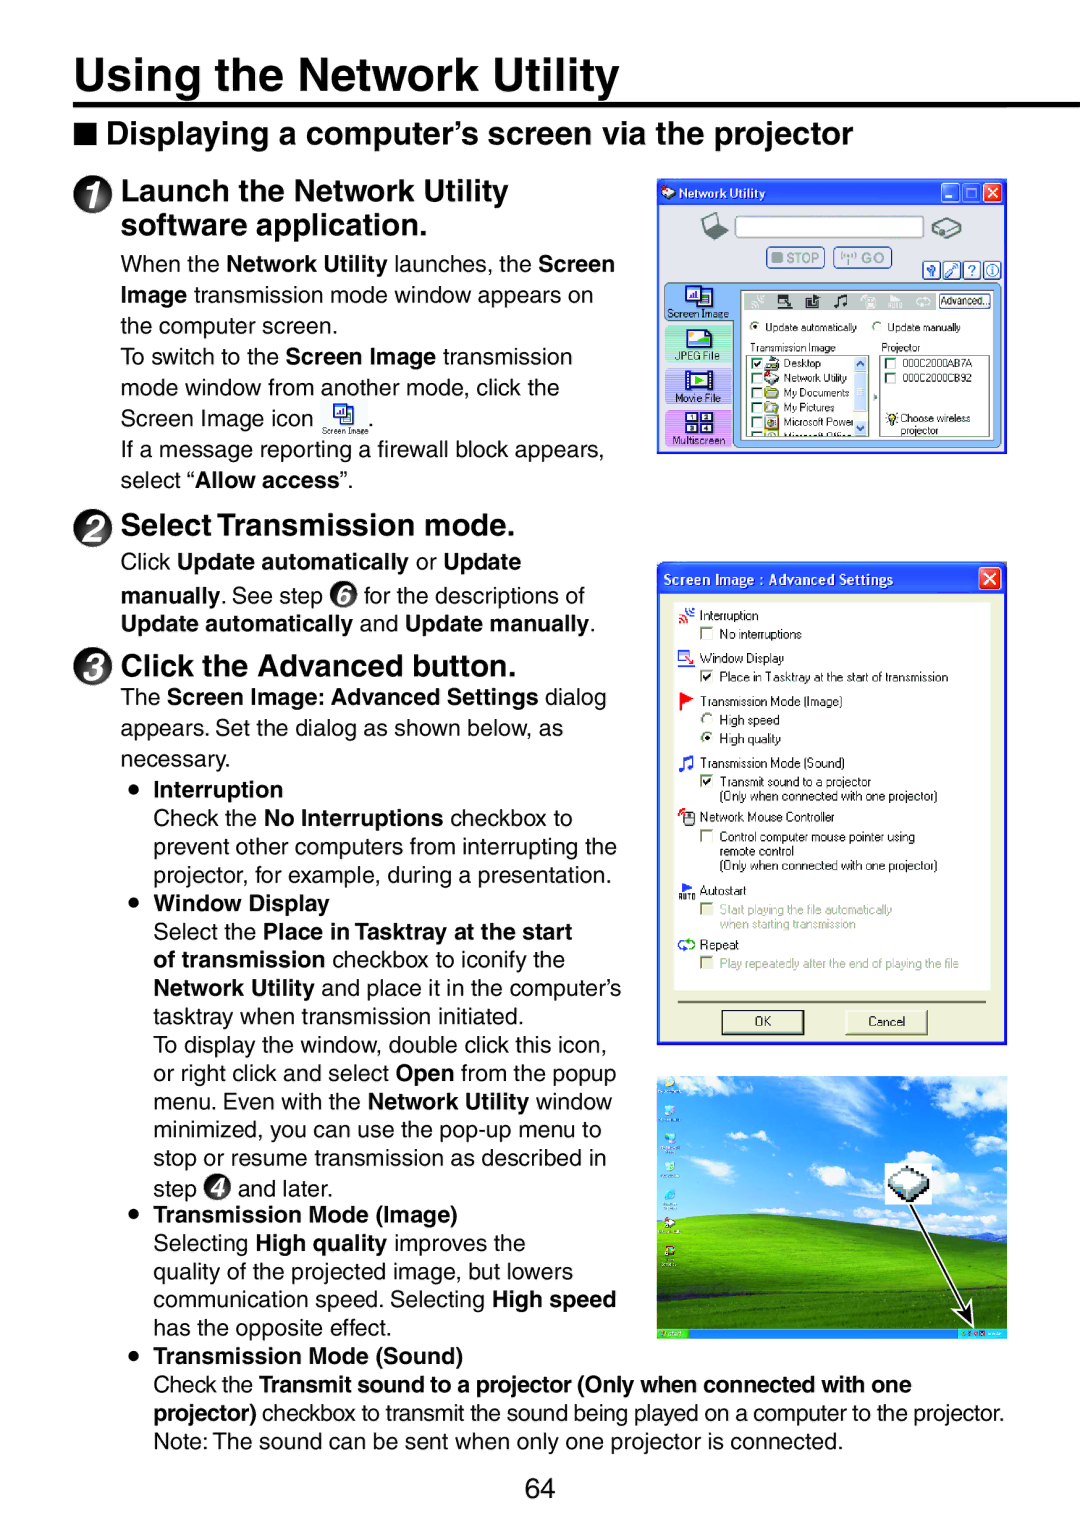
Using the Network Utility
Select Transmission mode
Launch the Network Utility software application
Click the Advanced button
Select the projector to be transmitted
Click the button
Click the Jpeg File icon
Using the Network Utility
Click the Browse button, and select the file to send
Click Movie File icon
Click the Advanced button
Click the Browse button and select the file to send
Play the video file via the Control window
Select the projector to transmit to
Mute
Launch the Network Utility software application
Click the Multiscreen icon
Layout.Arrange the virtual display
Multiscreen Usage Examples
Example
USB memory
Using the Network Utility
Wireless LAN Settings Utility dialog box appears
Easy Connect utility
Launch the Network Utility software application
Click the Tool button
Copying the computer settings to the projector
Unplug the USB memory device from the computer
Modifying the computer settings using the projector settings
Unplug the USB memory device
Advanced setting
Switching settings automatically at start-up
WEB browser
Registering profile automatically
Click the Remote Control button
Click the Remote Control window’s buttons
To quit, click the button on the Remote Control window
Operating the projector
Symbols in the thumbnail list
Playing a slide show from a thumbnail list
Plug a USB memory device
Searching for a target file
For Jpeg files Displaying slides
Changing slides
For Mpeg files Displaying video
Fast-forwarding and rewinding video images
Launching the Jpeg Conversion Tool
How to use the Jpeg Conversion Tool
Converting an image file
Converting files created with Microsoft PowerPoint
How to use the Jpeg Conversion Tool
Conversion Method field, select Converting PPT file
Making a presentation with converted Jpeg files
Playing a slide show from a thumbnail list
Conversion Method field, select Creating screen capture
Jpeg file has been created
Setting up the projector using a Web browser
How to use the Projector Configuration Tool
Setting up the projector using a Web browser
Select items from the menu on the left
Details on major items Settings
Status display
Page
Lamp replacement
Lamp replacement
Reset the lamp time
About lamp replacement messages
Replace the inner lamp cover
Replace the outer lamp cover
Air filter cleaning
Unplug power cord Remove the air filter
Clean the filter
Replace the air filter
Lens cleaning
Lens and main unit cleaning
Main unit cleaning
No power
Power went out during use
Power went out during use, or power won’t come on
Trouble indications
Troubleshooting
Troubleshooting
Specifications
List of general specifications
Specification
Separately sold product
Specifications
List of supported signals Computer input
List of supported signals Video, S-Video input
List of supported signals Y/PB/PR input
List of supported signals Hdmi input
Control terminal
Pin assignment
Main Commands
Interface format
EN US EN GB Y007-6300