Maintenance and Lubrication
Maintenance
Do not allow pitch to accumulate on the tables, the fence, the cutter guard, the cutterhead or the knives. Clean them with an appropriate solvent.
Apply a thin coat of paste type wax to the tables and the fence so that the wood slides easily while feeding. This also deters rusting.
Do not allow chips to accumulate on the underside of the jointer/planer.
If power cord is worn, cut, or damaged in any way, have it replaced immediately.
Disassembly of the motor should only be done by an Authorized Service Center. Disregarding this may void your tools warranty.
NOTE: The speed of this motor cannot be regulated or changed.
Motors used on woodworking tools are particularly sus- ceptible to the accumulation of sawdust and wood chips and should be blown out or “vacuumed” frequently to pre- vent interference with normal motor ventilation.
Lubrication
![]() WARNING: Unplug the jointer/planer. Unit could start suddenly. You could be badly hurt.
WARNING: Unplug the jointer/planer. Unit could start suddenly. You could be badly hurt.
The ball bearings in this machine are packed with grease at the factory. They required no further lubrication.
The following parts should be oiled occasionally with SAE No. 20 or No. 30 engine oil.
1.Dovetail spacer and dovetail slide.
2.Elevation screw (first clean if necessary).
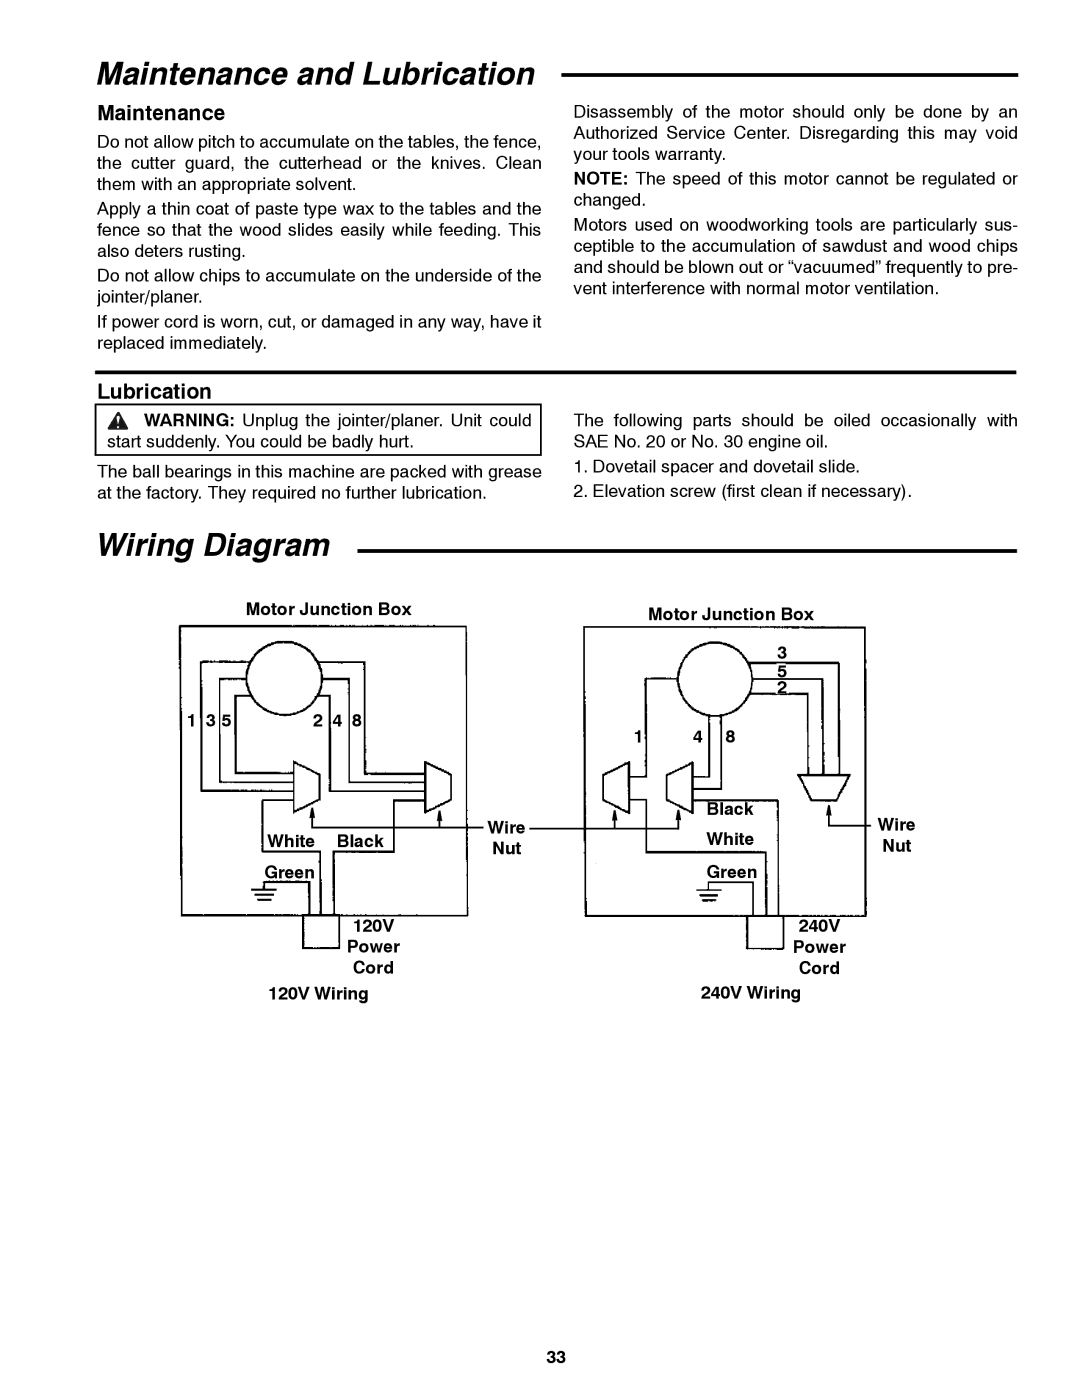
Wiring Diagram
| Motor Junction Box |
|
|
|
| Motor Junction Box |
| ||||||
|
|
|
|
|
|
|
|
|
|
| 3 |
|
|
|
|
|
|
|
|
|
|
|
|
| 5 |
|
|
|
|
|
|
|
|
|
|
|
|
| 2 |
|
|
1 3 5 | 2 4 8 |
|
| 1 | 4 | 8 |
|
| |||||
|
|
|
|
|
|
| |||||||
|
|
|
|
| Wire |
|
|
|
|
| Black | Wire | |
|
|
|
|
|
|
|
|
|
|
|
| ||
| White Black | Nut |
|
| White | Nut | |||||||
| Green |
|
|
|
|
|
| Green |
| ||||
|
| 120V |
|
|
|
|
|
| 240V |
| |||
|
| Power |
|
|
|
|
|
| Power |
| |||
|
| Cord |
|
|
|
|
|
| Cord |
| |||
| 120V Wiring |
|
|
|
|
| 240V Wiring |
| |||||
33