ASSEMBLY
SQUARING THE BLADE TO THE MITER TABLE
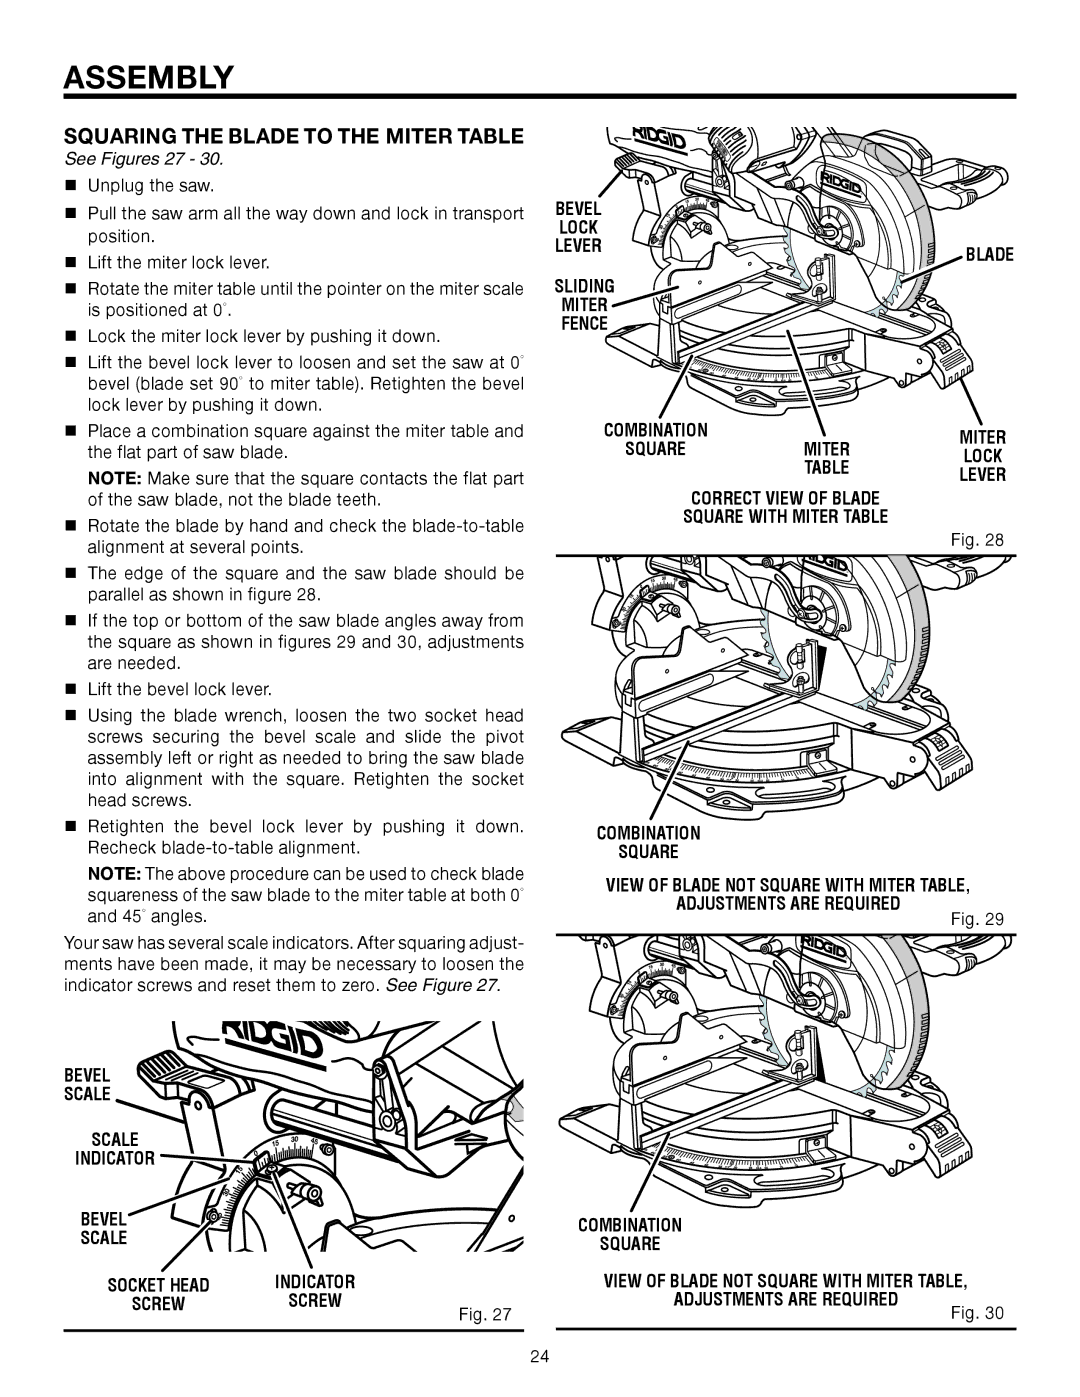
See Figures 27 - 30.
Unplug the saw. |
Pull the saw arm all the way down and lock in transport |
position. |
Lift the miter lock lever. |
Rotate the miter table until the pointer on the miter scale |
is positioned at 0°. |
Lock the miter lock lever by pushing it down. |
Lift the bevel lock lever to loosen and set the saw at 0° |
bevel (blade set 90° to miter table). Retighten the bevel |
lock lever by pushing it down. |
Place a combination square against the miter table and |
the flat part of saw blade. |
NOTE: Make sure that the square contacts the flat part |
of the saw blade, not the blade teeth. |
Rotate the blade by hand and check the |
alignment at several points. |
The edge of the square and the saw blade should be |
parallel as shown in figure 28. |
If the top or bottom of the saw blade angles away from |
the square as shown in figures 29 and 30, adjustments |
are needed. |
Lift the bevel lock lever. |
Using the blade wrench, loosen the two socket head |
screws securing the bevel scale and slide the pivot |
assembly left or right as needed to bring the saw blade |
into alignment with the square. Retighten the socket |
head screws. |
Retighten the bevel lock lever by pushing it down. |
Recheck |
NOTE: The above procedure can be used to check blade |
° |
| ® |
BEVEL |
|
LOCK |
|
LEVER | BLADE |
|
SLIDING
MITER
FENCE
COMBINATION | MITER | ||
SQUARE | MITER | ||
LOCK | |||
| TABLE | ||
| LEVER | ||
|
| ||
| CORRECT VIEW OF BLADE |
| |
SQUARE WITH MITER TABLE |
| ||
|
| Fig. 28 | |
| ® |
| |
COMBINATION
SQUARE
VIEW OF BLADE NOT SQUARE WITH MITER TABLE,
squareness of the saw blade to the miter table at both 0 |
and 45° angles. |
Your saw has several scale indicators. After squaring adjust- ments have been made, it may be necessary to loosen the indicator screws and reset them to zero. See Figure 27.
BEVEL
SCALE
SCALE
INDICATOR 


BEVEL
SCALE
ADJUSTMENTS ARE REQUIRED
®
COMBINATION
SQUARE
Fig. 29
SOCKET HEAD | INDICATOR |
VIEW OF BLADE NOT SQUARE WITH MITER TABLE,
SCREW | SCREW | Fig. 27 |
|
|
ADJUSTMENTS ARE REQUIRED
Fig. 30
24
