INSTALLATION

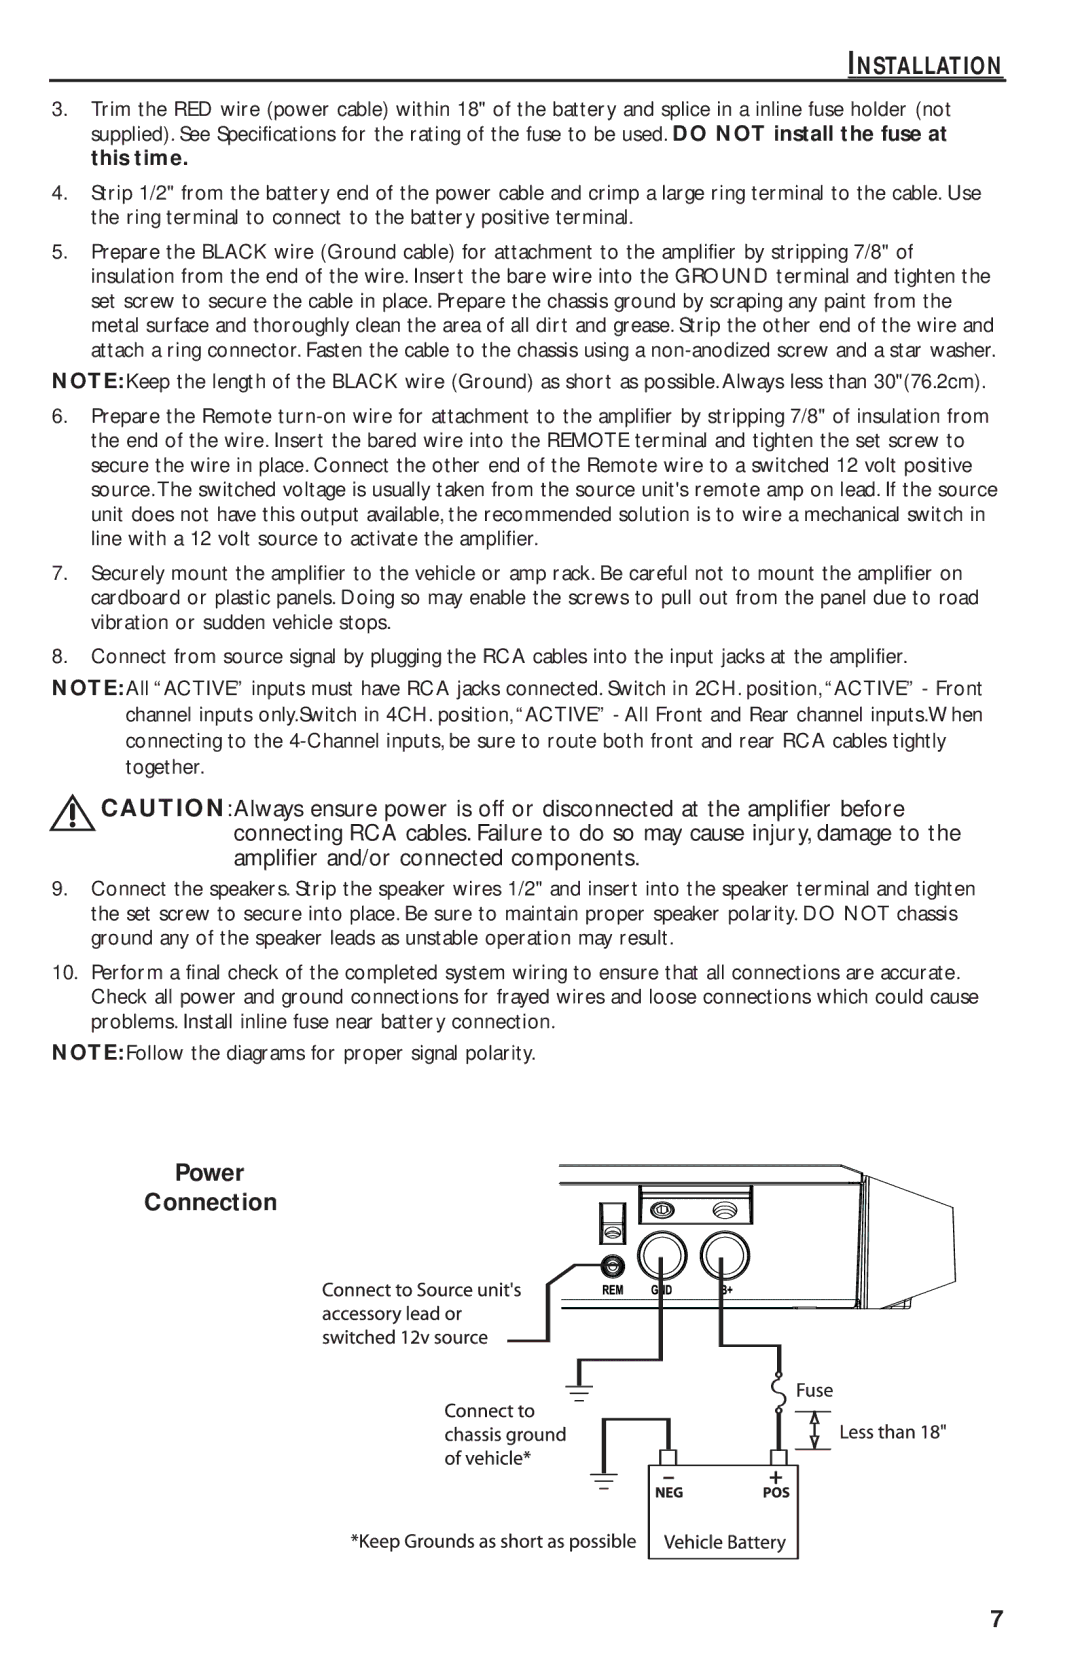
3. Trim the RED wire (power cable) within 18" of the battery and splice in a inline fuse holder (not supplied). See Specifications for the rating of the fuse to be used. DO NOT install the fuse at this time.

4. Strip 1/2" from the battery end of the power cable and crimp a large ring terminal to the cable. Use the ring terminal to connect to the battery positive terminal.

5. Prepare the BLACK wire (Ground cable) for attachment to the amplifier by stripping 7/8" of insulation from the end of the wire. Insert the bare wire into the GROUND terminal and tighten the set screw to secure the cable in place. Prepare the chassis ground by scraping any paint from the metal surface and thoroughly clean the area of all dirt and grease. Strip the other end of the wire and attach a ring connector. Fasten the cable to the chassis using a non-anodized screw and a star washer.

NOTE:Keep the length of the BLACK wire (Ground) as short as possible. Always less than 30"(76.2cm).

6. Prepare the Remote turn-on wire for attachment to the amplifier by stripping 7/8" of insulation from the end of the wire. Insert the bared wire into the REMOTE terminal and tighten the set screw to secure the wire in place. Connect the other end of the Remote wire to a switched 12 volt positive source.The switched voltage is usually taken from the source unit's remote amp on lead. If the source unit does not have this output available, the recommended solution is to wire a mechanical switch in line with a 12 volt source to activate the amplifier.

7. Securely mount the amplifier to the vehicle or amp rack. Be careful not to mount the amplifier on cardboard or plastic panels. Doing so may enable the screws to pull out from the panel due to road vibration or sudden vehicle stops.

8. Connect from source signal by plugging the RCA cables into the input jacks at the amplifier. NOTE:All “ACTIVE” inputs must have RCA jacks connected. Switch in 2CH. position,“ACTIVE” - Front

channel inputs only.Switch in 4CH. position,“ACTIVE” - All Front and Rear channel inputs.When connecting to the 4-Channel inputs, be sure to route both front and rear RCA cables tightly together. :Always ensure power is off or disconnected at the amplifier before

CAUTION connecting RCA cables. Failure to do so may cause injury, damage to the amplifier and/or connected components.

9. Connect the speakers. Strip the speaker wires 1/2" and insert into the speaker terminal and tighten the set screw to secure into place. Be sure to maintain proper speaker polarity. DO NOT chassis ground any of the speaker leads as unstable operation may result.

10. Perform a final check of the completed system wiring to ensure that all connections are accurate. Check all power and ground connections for frayed wires and loose connections which could cause problems. Install inline fuse near battery connection.

NOTE:Follow the diagrams for proper signal polarity.

Power

Connection

7

Page 7
Image 7
Rockford Fosgate T1000-4 manual Installation, Power Connection

T1000-4 specifications

The Rockford Fosgate T1000-4 is a powerful and versatile amplifier designed to deliver high-performance audio output in car audio systems. As part of Rockford Fosgate's Punch series, this amplifier exemplifies the brand’s commitment to quality and innovation, catering to enthusiasts seeking exceptional sound quality and reliability.

One of the standout features of the T1000-4 is its 1000-watt power output, which is capable of driving multiple speakers or subwoofers with ease. It provides flexibility for users looking to build a robust audio system, whether for daily driving or competitive environments. The amplifier is designed with a full-range architecture, allowing it to effectively power a wide range of speakers with great clarity and detail.

The T1000-4 employs a Class AD amplification technology, which combines the efficiency of Class D amplifiers with the sound quality characteristics of Class A/B amplifiers. This design results in lower heat generation and improved energy efficiency, making it ideal for extended listening sessions without the risk of overheating.

Additionally, the amplifier features a variable 12 dB/octave high-pass and low-pass crossover, enabling users to tailor their audio experience according to personal preferences and speaker requirements. The built-in equalizer allows for fine-tuning sound profiles, ensuring that every note and nuance is heard distinctly.

The T1000-4 also boasts a compact design, incorporating advanced heatsinking for effective thermal management. This not only aids in enhancing performance but also facilitates easier installation in various vehicle setups. The amplifier is equipped with high-level inputs, allowing it to connect seamlessly with factory-installed audio systems without requiring additional modifications.

Durability is another hallmark of the T1000-4, featuring a rugged build quality designed to withstand the rigors of automotive environments. The amplifier's connectors are also designed to minimize installation complexity while ensuring a secure connection, contributing to the overall reliability of the system.

In summary, the Rockford Fosgate T1000-4 amplifier stands out for its robust power output, Class AD technology, customizable crossover and equalization settings, along with its compact, durable design. This amplifier is an excellent choice for car audio enthusiasts aiming to achieve a powerful, clear, and dynamic sound experience on the road.