VX-44d VX-55d
OW N E R ’S OP E R A T I N G MA N U A L
Page
TWO YEAR LIMITED WARRANTY
WHAT IS COVERED UNDER THE TERMS OF THIS LIMITED WARRANTY
WHAT IS NOT COVERED UNDER THE TERMS OF THIS LIMITED WARRANTY
For Projectors, Video Processors and Controllers
EFFECTIVE WARRANTY DATE
IMPORTANT - WARRANTY REGISTRATION
CONTACT A RUNCO AUTHORIZED SERVICE CENTER TO OBTAIN SERVICE
COPYRIGHT AND TRADEMARKS
ADDITIONAL INFORMATION
RUNCO INTERNATIONAL, INC Attn Customer Service Department
RUNCO VIDEO-PRODUCT INFORMATION
RETAIN THIS INFORMATION FOR YOUR RECORDS
Safety Precautions
Table of Contents
TWO YEAR LIMITED WARRANTY
Safety Precautions
Installation
Remove Projector Front Feet CineWide with AutoScope
Maintenance and Troubleshooting
Specifications
Operation
Serial Communications
Runco VX-44d/-55d Owner’s Operating Manual
List of Figures
Runco VX-44d/-55d Owner’s Operating Manual
Installing A New Lamp
VX-44d/-55d Dimensions
List of Figures
5-1. Removing the Lamp Door
A carriage return must be used after each command or string
1. Introduction
1.1 About This Manual
Esc and Tab
1.2 Using This Manual
certain features
DANGER appears when a given action can cause severe injury or
DANGER
1.3 Description, Features and Benefits
format screen
Optional Accessories
2. Controls and Functions
2.1 VX-44d/-55d at a Glance
Figure 2-1. VX-44d/-55d Top/Rear/Front View
Runco VX-44d/-55d Owner’s Operating Manual
6. REAR FOOT Stationary 7. POWER INPUT 100 to 240 VAC
11. ADJUSTABLE FEET
2.2 VX-44d/-55d Input Panel
1. TOP IR SENSOR 2. BUILT-IN KEYPAD
1. RS232 IN
2. RS232 OUT Not used 3. RS422 Not used 4. GPIO Not used 5. REMOTE
6. ETHERNET
7. INPUT 3 Video / INPUT 4 S-Video
2. POWER BUTTON
6. AUTO SETUP
2.3 VX-44d/-55d Rear-Panel Keypad
Figure 2-3. VX-44d/-55d Rear-Panel Keypad 1. LED STATUS DISPLAY
9. Menu Navigation Buttons UP BUTTON
LEFT BUTTON
DOWN BUTTON
RIGHT BUTTON
2.4 DHD Controller Front Panel
Figure 2-4. DHD Controller Front Panel 1. RUNCO ICON
3. IR SENSOR
4. VACUUM FLUORESCENT DISPLAY
Note functional only when an analog source HD/RGB, SD Component
7. ENTER BUTTON
8. DOWN BUTTON
9. RIGHT BUTTON
4. COMPONENT VIDEO RCA connectors
2.5 DHD Controller Rear Panel
Figure 2-5. DHD Controller Rear Panel
Inputs 2. HDMI 1 / HDMI 2 Digital
When an external remote control or infrared receiver is connected
13. MAIN POWER SWITCH
8. ComLink RS-232 OUTPUT
9. IR
2.6 VX-44d/-55d Remote Control Unit
Figure 2-6. DHD Controller/VX-44d/-55d Remote Control
Controls and Functions
Runco VX-44d/-55d Owner’s Operating Manual
1. IR OUTPUT INDICATOR
2. ON / OFF
3. ENTER
4. Cursor Buttons
13. Memory Preset Buttons ISF NIGHT
9. Aspect Ratio Selection Buttons
ANA Anamorphic
4X3 Standard 43
3. Installation
3.1 Remote Control
3.2 Quick Setup
Table 3-1. Installation Overview
Installation should be performed by a qualified custom video
installation specialist
3.3 Installation Considerations
Table 3-2. Projector Installation Options
Table 3-3. VX-44d/-55d Lens Options and Throw Ratios
Figure 3-1. Estimating Throw Distance
Ceiling Installation
Floor Installation
Figure 3-2. Projector Placement
Figure 3-3. Vertical Lens Shift
Figure 3-4. Horizontal Lens Shift
Installation
Runco VX-44d/-55d Owner’s Operating Manual
Screen Width W
Installation
Table 3-4. Vertical and Horizontal Lens Shift Limits
Runco VX-44d/-55d Owner’s Operating Manual
Figure 3-5. Folded Optics
Screen Mirror
3.4 Installing the Projection Lens
Figure 3-6. Lens Assembly Front View
3.5 Installing the Optional CineWide Lens Mount
1. Do not install the CineWide lens yet, only the mounting plate or
DO NOT OVER-TIGHTEN THE SCREWS
AutoScope stand used for floor-mounted projector
Install Projector Stand CineWide with AutoScope, Floor-Mount
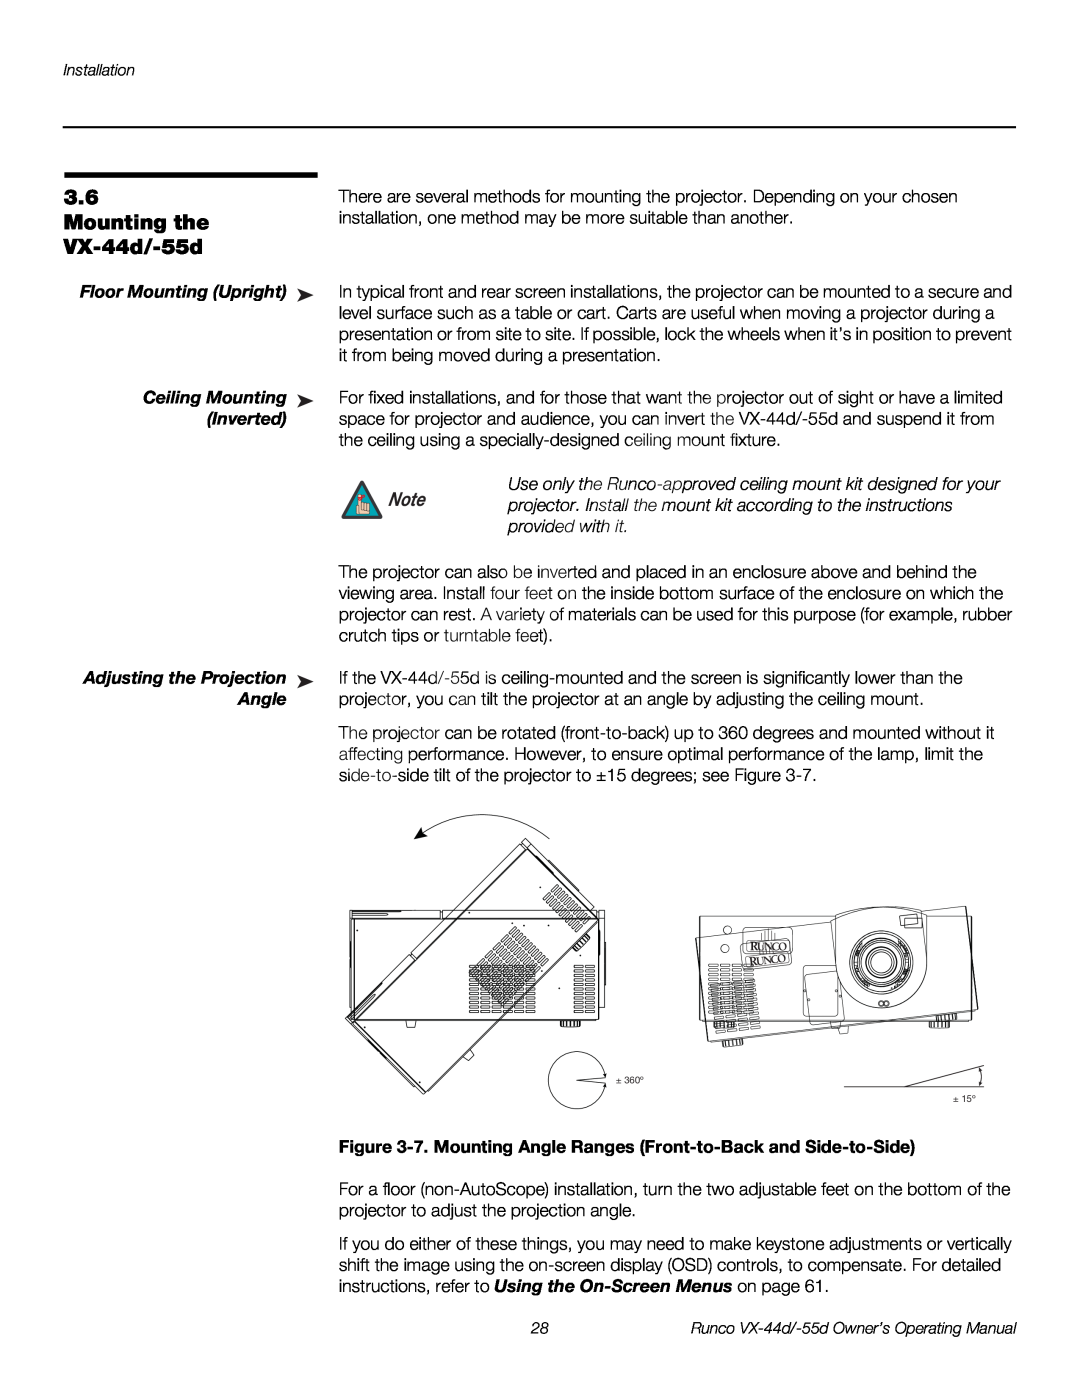
projector. Install the mount kit according to the instructions
Mounting the
VX-44d/-55d
Use only the Runco-approved ceiling mount kit designed for your
Figure 3-8. Connecting the VX-44d/-55d to the DHD Controller
3.7 Connections to the VX-44d/-55d and DHD Controller
video quality because the signal is carried in the digital domain
throughout the entire signal path, from source component output
HDMI Connections See Figure
into the projector
Digital DTV RGB or Component Video Connections See Figure
DTV or Progressive Component YPbPr Source
Figure 3-10. Digital DTV RGB or Component Video Connections
Installation
Analog Computer RGB Connections See Figure
Figure 3-11. Analog RGB Connections
Installation
Runco VX-44d/-55d Owner’s Operating Manual
Composite/S-Video/Component Video Connections See Figure
Figure 3-12. Composite, S-Video and Component Video Connections
Installation
Runco VX-44d/-55d Owner’s Operating Manual
Figure 3-13. RS-232 Control System Connection
Connecting 12-Volt
RS-232 Controller
Connection
Figure 3-14. Connecting 12-Volt Trigger Outputs
DHD Controller Rear Panel
Figure 3-15. External IR Receiver Connection
Installation
The input voltage to the AutoScope lens motor must be between
built-in IR sensor on the DHD Controller is disabled
100 to 240 VAC
3.8 Turning on the Power
Component SD NTSC
480i
AnamorphicVx44/55
3.9 Adjusting the Picture Orientation 3.10 Primary Lens Adjustments
Focus Zoom Vertical and Horizontal Lens Shift
3.11 Installing and Adjusting the CineWide Anamorphic Lens
If this is an AutoScope installation, leave enough space between
Horizontal Position X Adjustment
Skip this step if you are installing a fixed CineWide anamorphic lens
ENTER
There may be some pincushion distortion even after the lens is
Too Low Correct position Too High
Anamorphic Lens Top View
Geometry
Wrong Position
3.12 Calibrating Projector Input 2 DVI
Runco calibrates both the VX-44d/-55d and DHD Controller at the
Figure 3-16. TheaterMaster Remote Control for VX-44d/-55d
MAIN
Installation
Runco VX-44d/-55d Owner’s Operating Manual
POWER Button
FUNCS Button
BACKLIGHT Button
LCD Display
1. Size and Position 2. Picture Quality 3. Channel Setup
4. Installation 5. Lamp Adjust
6. System Info 7. PIP and Switching 8. Test Patterns Off
are disabled
pDig
iDig
4x3 nt
Lbx nt
You cannot use Auto Setup with a locked channel you must unlock
Channel Edit
Name
Number
anamorphic lens in the light path, the aspect ratio is
Figure 3-19. Resize Presets No Resizing
No Resizing
An anamorphic 169 image fills the whole screen
Adjust “Pixel Tracking” before “Pixel Phase.”
The values shown represent where the approximate center of the
recommended see below
Picture Quality Menu
1. The White Balance controls are of limited use with digital signals
Decoder Adjust This sub-menu is not applicable to the VX-44d/-55d
1. There must be at least two consecutive white pixels present in
2. Uncheck this item before exiting this menu
8. Auto Color Enable
0. Clipping Detector Color Enable Red
Figure 3-20. Adjusting Input Levels Using the Clipping Detector
gray field before adjustment or extreme crushing
readjust when absolutely necessary
to using LumaCal
LumaCal lamp calibration takes approximately two minutes
Installation Menu
power cycles
To enable OptiCal 1. Select Installation from the Main Menu
Note enabled
3.13 Working With the Lamp
1. It is recommended that the Lamp Message check box remain
originally expected may no longer be possible
The Intensity value is not the actual lumen output, but rather a
Use the lamp mode that best suits your brightness needs
2. Intensity can be set only if the lamp is in “Intensity” mode
more easily maintained as the lamp ages
3. Intensity cannot exceed the output of Max Brightness mode
4.1 Using the On-Screen Menus
4. Operation
ISF Presets
Service
Input Source
Aspect Ratio
Note resolution
The aspect ratio selection is automatically saved for each input and
Main Menu
Input Source
Table 4-1. Aspect Ratio Settings
Operation
Operation
Table 4-1. Aspect Ratio Settings continued
Runco VX-44d/-55d Owner’s Operating Manual
Table 4-1. Aspect Ratio Settings continued
When you change a picture quality setting, save the change to a
Picture
Figure 4-2. Typical PLUGE Pattern for Adjusting Brightness
Figure 4-3. Typical Gray Bar Pattern for Adjusting Contrast
gray
yellow
cyan
gray
yellow
cyan
green
and resolution
Figure 4-5. Typical Test Pattern for Adjusting Sharpness
Input Position
ISF Presets
Information
should be used by ISF-certified technicians only
You must enter a passcode to access the Calibration menu
Calibration
You must enter a passcode to access the Service menu
ISF Day - Display Color Refer to ISF Night - Display Color
ISF Day - Input Image Refer to ISF Night - Input Image
ISF Day - Input Color Refer to ISF Night - Input Color
The button takes you from top to bottom in the left column, then
Do not change the “Type” setting in this menu
17. You can change these codes if either
Vertical Keystone Correction
Figure 4-6. Keystone Correction
To configure a trigger to activate when the system is turned on
used only for aspect ratio control and input selection
HD/RGB 1 and HD/RGB 2 Color Space Select Auto, RGB or YUV
assign that trigger to all aspect ratios
Page
Operation
Runco VX-44d/-55d Owner’s Operating Manual
5. Maintenance and Troubleshooting
5.1 Lamp and Filter Replacement
Figure 5-1. Removing the Lamp Door
Figure 5-2. Unlocking the Lamp
Figure 5-4. Installing A New Lamp
Figure 5-3. Removing the Lamp
Lamp Adjust
1. Lamp Message 2. Lamp Limit 3. Lamp Mode Power 4. Power
Lamp S/N
Intensity
5.2 Lens Replacement
Figure 5-6. Removing the Primary Lens
5.3 Troubleshooting Tips
Table 5-1. Troubleshooting Chart
Maintenance and Troubleshooting
Runco VX-44d/-55d Owner’s Operating Manual
Table 5-1. Troubleshooting Chart continued
Maintenance and Troubleshooting
Configure Lens Motor
Trigger CineWide with
Table 5-2. VX-44d/-55d Error Codes
Error Codes
Table 5-2. VX-44d/-55d Error Codes continued
Maintenance and Troubleshooting
Power and Cooling
Code
Table 5-2. VX-44d/-55d Error Codes continued
Maintenance and Troubleshooting
Code
Description
Maintenance and Troubleshooting
Table 5-2. VX-44d/-55d Error Codes continued
Unable to program the optional module
6.1 RS-232 Connection and Port Configuration
6.2 Serial Command Syntax
Table 6-1. Serial Commands
6. Serial Communications
Table 6-1. Serial Commands continued
Serial Communications
Table 6-1. Serial Commands continued
Serial Communications
Runco VX-44d/-55d Owner’s Operating Manual
ISF Day, ISF Night, Custom 1 or Custom
Serial Communications
Table 6-1. Serial Commands continued
Sets the value for output horizontal position
Table 6-1. Serial Commands continued
Serial Communications
Runco VX-44d/-55d Owner’s Operating Manual
Assigns trigger to currently-selected aspect
Serial Communications
Table 6-1. Serial Commands continued
Stored?
7. Specifications
7.1 VX-44d/-55d Specifications
Table 7-1. VX-44d/-55d Specifications
Runco VX-44d/-55d Owner’s Operating Manual
Table 7-1. VX-44d/-55d Specifications continued
Specifications
Table 7-1. VX-44d/-55d Specifications continued
Specifications
Limited Warranty
Specifications are subject to change without notice
Table 7-2. DHD Controller Specifications
7.2 DHD Controller Specifications
Specifications
7.3 VX-44d/-55d Dimensions
Figure 7-1. VX-44d/-55d Dimensions
Specifications
Runco VX-44d/-55d Owner’s Operating Manual
Specifications
Runco VX-44d/-55d Owner’s Operating Manual
Page
RUMA-011195
Runco CL-810 Owner’s Operating Manual
SERIAL NUMBER