Canada
Web Site Address
A Only
Other countries
United States 1-800-SAMSUNG
User Instructions
Contents
Ferrite Core
List of Features
Accessories
General Information
Viewing the Control Panel
Service 2 For service only
Viewing the Connection Panel
Hdmi in 1
Remote Control
Connections
Installing Batteries in the Remote Control
Connecting VHF and UHF Antennas
If the remote control doesn’t work, check the following
Connect this cable to a two-way splitter
Connecting Cable TV
Connecting to a Cable Box that Descrambles All Channels
Terminal on the RFA/B switch
Set-Top Box
What is HDMI?
Connect an Hdmi Cable
Jack on the DVD Player or
Each Camcorder has a different back panel configuration
Connecting a Camcorder
Connect Audio Cables Between the Audio OUT
Connecting a VCR
Connecting an Amplifier / DVD Home Theater
Video Connection
Connecting a Digital Audio System
Connecting a PC
Using the HDMI/DVI Cable
Operation
Plug & Play Feature
It may take a while when your TV starts
Press the Power button on the remote control
Plug & Play Auto Program in Progress
Setting the Clock Automatically
Changing Channels
Viewing the Display
Adjusting the Volume
Using the Volume Buttons
Using the Mute Button
Memorizing the Channels
Using the Tools Button
Selecting the Video Signal-source
Easy Setting
Storing Channels in Memory Automatic Method
TV begins memorizing all available stations
Auto Program
Tools Option Displays the Edit Name and Information menus
Using the Color buttons on the remote with the Source list
To Select the Source
To Edit the Input Source Name
Changing the Picture Standard
Customizing the Picture Settings
Mode Standard
Picture Control
Activating Dynamic Contrast
Adjusting the Detailed Settings
Detailed Settings is available in Standard or Movie mode
Activating Black adjust
Customizing the Color Space
Changing the Color Space
Activating Edge Enhancement
Activating White Balance
Flesh Tone
You can emphasize the pink flesh tone in the picture
Activating Picture Options
Configuring Picture Options
Adjusting the Color Tone
Activating xvYCC
Changing the Screen Size
After selecting Zoom1, Zoom2 or Wide Fit
Input Source Picture Size
Digital Noise Reduction
DNIe Digital Natural Image engine
Setting the Hdmi Black Level
Setting the Blue Only Mode
Setting the Film Mode
Side Gray
Reducing the Effects of Screen Burn
All White
Scrolling
TV/AV/Component/HDMI
Preventing Screen Burn-in
Activating Picture-in-Picture
Resetting the Picture Settings to the Factory Defaults
PIP Settings Main picture Sub picture
Viewing Picture-in-Picture
Changing the PIP Channel
Air Air antenna signal Cable Cable antenna signal
Changing the Position of the PIP Window
Air/Cable
Customizing the Sound
Mode Custom
Sound Control
Changing the Sound Standard
Resetting the Equalizer Settings to the Factory Defaults
Setting the TruSurround XT
You want, then press the Enter button
Choosing the Preferred Language
Choosing a Multi-Channel Sound MTS Track Analog
Button
Sound output from the TV speakers is muted
Automatic Volume Control
Setting the TV Speakers On/Off
Press the Exit button to exit
Listening to the Sound of the Sub PIP Picture
Resetting the Sound Settings to the Factory Defaults
You can select this option when PIP is set to On. See
You can restore the Sound settings to the factory defaults
Viewing All Channels
Using the Color buttons on the Remote with the Channel List
Channel Control
Managing Channels
Erasing and Adding Channels
Press the button to select Added Channels
Tools button. Press the Enter button to select Add
Press the Tools button on the remote control
Setting Your Favorite Channels
Digital Program Guide and Viewing Reservation
Reserving a Program Time Viewing
Enter button Reservation modification is applied
Canceling a reservation
Confirming a Viewing Reservation
Modifying a viewing reservation
Storing Channels in Memory Auto Program
Labeling Channels Analog
Clear Scrambled Channel
Fine Tuning Analog Channels
Clearing Scrambled Channels Digital
Press the button to select Yes, then press the Enter button
PC Display
Checking the Digital-Signal Strength
Using Your TV as a Computer PC Display
Setting Up Your PC Software Based on Windows XP
Time Setting
Setting the Time
Time
DST
Antenna Select Air or Cable
Auto Power Off
To cancel the set sleep timer
Function Description
Selecting a Menu Language
Language English
Chip
Using the V-Chip
Chipfunction is not available in Hdmi or Component mode
Setting Up Your Personal ID Number PIN
Chip
How to Enable/Disable the V-Chip
TV Parental Guidelines Allow All Block All
Mpaa Rating Allow All Block All
How to Set up Restrictions Using Canadian English
How to Set up Restrictions Using Canadian French
Using the V-Chip for Digital channels
V-Chipscreen will appear. Press the or button to select
Downloadable U.S. Rating, then press the Enter button
Mpaa R/A/K/T
Viewing Closed Captions On-Screen Text Messages Digital
Digital Captions function operates on digital channels
Caption
On or Off
Viewing Closed Captions On-Screen Text Messages Analog
Melody does not play
Adjusting the TV On/Off Melody Sound
TV power on/off melody sound volume can be adjusted
External Settings
Enter button
Setting the Entertainment mode
Using the Energy Saving Feature
Entertainment setting
Upgrading the Software
SW Upgrade
To connect to a Home Theater
What is Anynet+?
Connecting Anynet+ Devices
About Anynet
Scanning and Switching between Anynet+ Devices
Setting Up Anynet+
TV Remote Control Buttons Available in Anynet+ Mode
Recording
, operations may differ depending on the device
Listening through a Receiver Home theater
Troubleshooting for Anynet+
Appendix
Securing the TV to the Wall
To avoid the TV from falling
Problem Possible Solution
Troubleshooting
� Press the Blue button
Auto Wall-mount adjustment Sold separately
Entering the menu
Remembering the Position
Preparing before installing Wall- Mount on the wall
Installing Samsung Wall-Mount
Case a Case B
Product Family Inch Vesa Spec. a * B Standard Screw Quantity
Wall Mount Kit Specifications Vesa
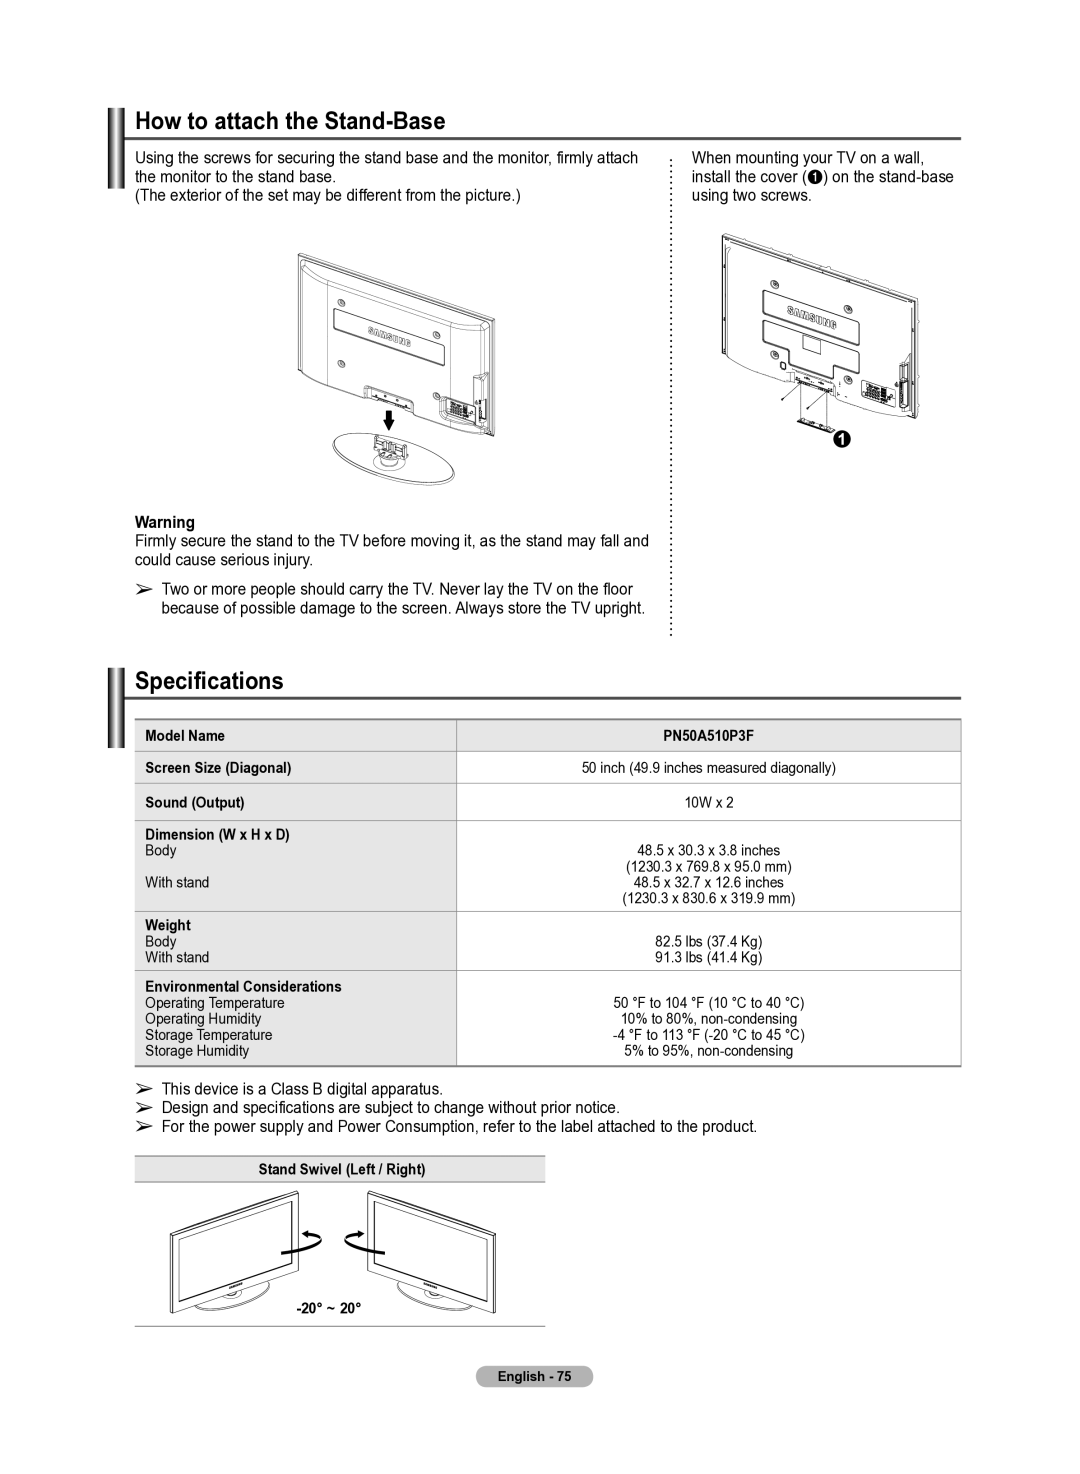
Specifications
How to attach the Stand-Base
Jack Panel Detail 7.2 x 3.7 inches
Dimensions
GNU General Public License GPL
Version 2, June
Preamble
English
How to Apply These Terms to Your New Programs
No Warranty
Version 2.1, February
GNU Lesser General Public License Lgpl
English
English
No Warranty
END of Terms and Conditions
How to Apply These Terms to Your New Libraries
This page is intentionally Left blank
Otros países
Sólo EE.UU
Instrucciones para el usuario
Índice
Núcleo de ferrita
Información general
Características
Accesorios
Aspecto general del panel de control
DVI in Hdmi 2 AUDIO-R/L
Aspecto general del panel de conexiones
Sólo para servicio
EX-LINK
Mando a distancia
DMA Adaptador digital multimedia
@ SRS
Antenas con cables coaxiales de 75 Ω
Conexiones
Instalación de las pilas en el mando a distancia
Conexión de las antenas de VHF y UHF
Conexión de TV por cable
Cable sin decodificador de cable
Conecte este cable al separador de señales de dos vías
Del ancho de banda
HD.. .N 1
¿Qué HD..? HD.., . .......z .u
HD.. y DV qu HD.. .. .á qu.ñ. y
NEN. .N
Conexión a una videocámara
NEN
NEN. .N 1
Conexión de un amplificador/DVD para Home Cinema
Conexión de un aparato de vídeo
Uso del cable HDMI/DVI
Conexión de un sistema de audio digital
Conexión a un PC
¿Qué quiere decir OPTICAL?
Funcionamiento
Encendido y apagado del televisor
Función Plug & Play
Ajuste automático del reloj
Se muestra el mensaje Configurar fechay hora catuales
Uso del botón
Cambio de canales
Si desea reiniciar esta función
Utilización de los botones numéricos
Ajuste del volumen
Visualización de la pantallla
Visualización de los menús
Selección del origen de la señal de vídeo
Configuración sencillla
Uso del botón Tools
Memorización de los canales
Prog. Auto
Editar Nombre
Para seleccionar la fuente
Para editar el nombre de la fuente de entrada
Pulse el botón Exit para salir
Control de la imagen
Cambio del formato de la imagen
Modo Normal
Activación del contraste dinámico
Ajuste de la configuración detalllada
Activación de la configuración detalllada
Activación del ajuste del negro
Magenta
Cambio del espacio de color
Personalización del espacio de color
Personal
Activación del balance de blanco
Tono de la piel
Activación de la mejora de perfiles
Configuración de las opciones de la imagen
HD alta definición 169 1080i/1080p 1920x1080, 720p
Cambio del tamaño de la pantallla
Pulse el botón Enter Pulse el botón Exit para salir
Después de seleccionar Zoom1, Zoom2 o Ajuste ancho
Reducción digital del ruido
169 Zoom1 Zoom2
Ajuste ancho Sólo buscar
DNIe motor digital de imágenes naturales
Configuración del nivel de negro Hdmi
Configuración de la función del modo de película
Configuración de la función del modo sólo azul
1080i y HDMI1080i
Lateral gris
Reducción de los efectos de una pantallla quemada
Todo blanco
Desplazamiento
Condición óptima para cambio de píxel
Prevención del desgaste de la pantallla
Activación del modo de imagen sobre imagen
Configuración de PIP
Visualización de imagen sobre imagen
Cambio del formato de la imagen. consulte la página
Cambio de la posición de la ventana PIP
Aire/Cable
Cambio del canal PIP
Modo Favorito
Control del sonido
Cambio del estándar de sonido
Personalización del sonido
Trusurround SRS XT Apagado
Ajuste de TruSurround XT
Estéreo o SAP
Elección del idioma preferido
Selección de una pista de sonido multicanal MTS Analógico
Idioma preferido
Vol. Auto Apagado
Control automático de volumen
Reinicio del sonido en el menú Sonido
Altavoz TV se ajusta en Apagado
Audición del sonido de la imagen secundaria PIP
Sel. Sonido
Principal
Lista de canales
Control de los canales
Gestión de los canales
Pulse. el. botón para seleccionar. Canales agregados
Supresión y adición de canales
KBS D-2
Ajuste de los canales favoritos
Guía de programas digitales y reserva de visualización
Reserva de un programa visualización de la hora
Modificación de una reserva de visualización
Cancelación de una reserva
Confirmación de una reserva de visualización
Puede ver las reservas de programas
El botón Enter
Etiquetado de canales analógicos
Nuevo nombre y pulse el botón Tools
Botón Enter
Pulse el botón Enter para seleccionar Detener
Supresión de los canales codificados digitales
Sintonización fina de los canales analógicos
Para detener la búsqueda de canales codificados
Modos de visualización
Pantallla del PC
Comprobación de la potencia de la señal digital
Utilización del televisor como pantallla del PC
Tiempo
Configuración de la hora
Ajuste de la hora
Opción 1 Ajuste manual del reloj
Opción 2 Ajuste automático del reloj
Apagado automático
Activación y desactivación del temporizador
Ajuste del temporizador de desconexión
Para cancelar el temporizador
Descripción de las funciones
Selección del idioma de los menús
Idioma Español
Configuración del código de identificación personal PIN
Uso del V-Chip
Chip
Aparece la pantalla V-Chip
Activación/desactivación de V-Chip
De las subclasificaciones
Chip Bloqueo V-Chip
Inglés Canadiense Perm. todo Bloq. todo
18 ans+ Programación restringida para adultos
Clasificación U.S Descargable siempre lo verá en inglés
Pulse el botón Enter para seleccionar Aceptar
Subtítulo
Visión de subtítulos mensajes de texto en pantallla Digital
Texto1~Texto4 y, a continuación, pulse el botón Enter
La función digital Subtítulo funciona en canales digitales
Apagado
Configuración externa
Ajuste de la melodía de encendido y apagado del televisor
La melodía no se reproduce
Ahorro energía Apagado
Configuración del modo Entretenimiento
Uso de la función de ahorro de energía
Entretenimiento Apagado
Continuación, pulse el botón Enter
Actualización del software
Para conectar al sistema Home Cinema
¿Qué es Anynet?+?
Conexión de dispositivos Anynet+
Para conectar al televisor
Como Encendido On
Configuración de Anynet+
Se muestra el mensaje Configurando la conexión Anynet+
Búsqueda y cambio de dispositivos Anynet+
Menú Anynet+
Grabación
Escucha a través de un receptor sistema Home Cinema
Solución de problemas de Anynet+
Apéndice
Fijación del televisor a la pared
Para impedir que el televisor se caiga
Problema Posible solución
Resolución de problemas
Memorización de la posición
Configuración externa y, a
Ajuste de montaje mural automático se vende por separado
Acceso al menú
Caso a Caso B
Preparación para instalar el montaje mural
Cantidad
Especificaciones del equipo de montaje mural Vesa
Cómo montar el soporte base
Especificaciones
Advertencia
Detalle DEL Panel DE Terminales 7.2 x 3.7 pulgadas
Dimensiones
Esta página se ha dejado en Blanco expresamente
Esta página se ha dejado en Blanco expresamente