Ajuste de montaje mural� automático (se vende por separado)
Una vez instal�ado el� montaje mural� automático, l�a posición del� tel�evisor se puede ajustar fácil�mente.
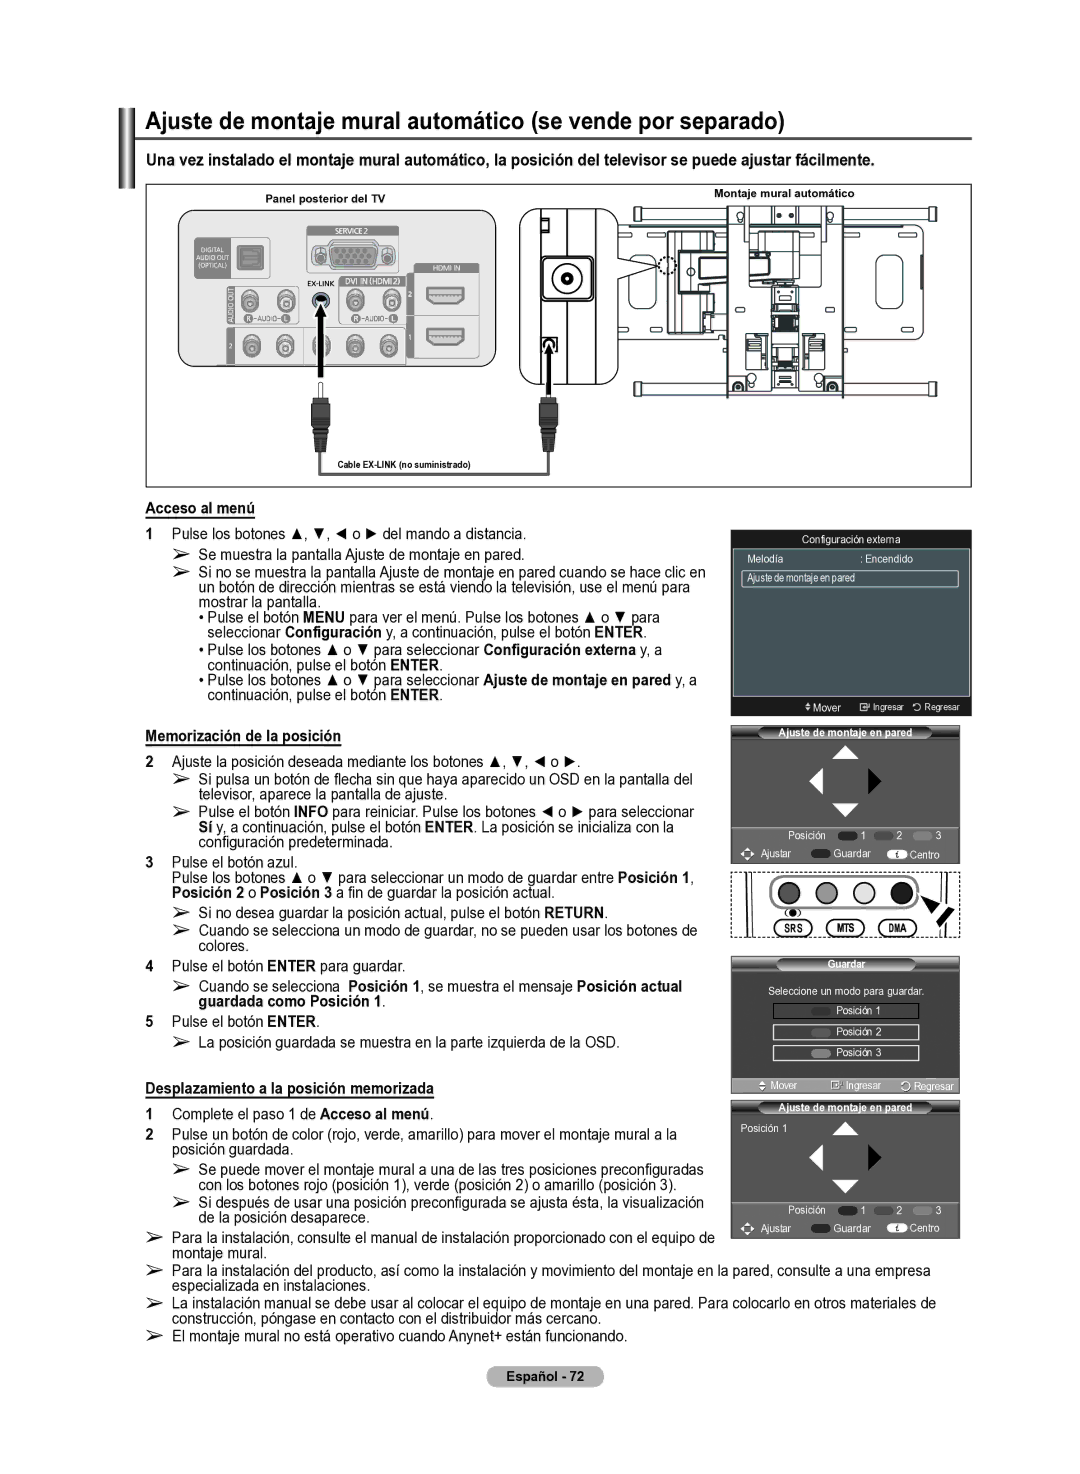
Panel� posterior del� TV |
|
|
|
|
| Montaje mural� automático | |||
|
|
|
|
|
| ||||
|
|
|
|
|
|
|
|
|
|
|
|
|
|
|
|
|
|
|
|
|
|
|
|
|
|
|
|
|
|
|
|
|
|
|
|
|
|
|
|
|
|
|
|
|
|
|
|
|
|
|
|
|
|
|
|
|
|
|
|
|
|
|
|
|
|
|
|
|
|
|
|
|
|
|
|
|
|
|
|
|
|
|
|
|
|
|
|
|
|
Cabl�e EX��LINK (no suministrado)
Acceso al� menú
1 Pu | ▲, ▼, ◄ . ► |
➢Se muestra la pantalla Ajuste de montaje en pared.
➢Si no se muestra la pantalla Ajuste de montaje en pared cuando se hace clic en un botón de dirección mientras se está viendo la televisión, use el menú para mostrar la pantalla.
•Pulse el botón MENU .... v.. ... ...ú. Pu.... .... ....... ▲ . ▼ ....
seleccionar Configuración y, a continuación, pulse el botón ENTER.
• Pu | ▲ . ▼ | Configuración externa y, a |
continuación, pulse el botón ENTER. | Ajuste de montaje en pared y, a | |
• Pu | ▲ . ▼ | |
continuación, pulse el botón ENTER. |
| |
Memorización de l�a posición |
| |
� .ju | ▲, ▼, ◄ . ►. | |
➢Si pulsa un botón de flecha sin que haya aparecido un OSD en la pantalla del televisor, aparece la pantalla de ajuste.
➢ Pulse el botón INFO | Pu | ....... ◄ . ► .... | ............ | |
| Sí y, a continuación, pulse el botón ENTER. La posición se inicializa con la | |||
| configuración predeterminada. |
|
|
|
� Pulse el botón azul | u | u | Posición 1, | |
Pu | .... .... ....... ▲ . ▼ .... | |||
Posición � o Posición � a fin de guardar la posición actual. |
| |||
➢Si no desea guardar la posición actual, pulse el botón RETURN.
➢Cuandocolores. se selecciona un modo de guardar, no se pueden usar los botones de
4Pulse el botón ENTER para guardar.
➢Cuando se selecciona Posición 1, se muestra el mensaje Posición actual� guardada como Posición 1.
5Pulse el botón ENTER.
➢La posición guardada se muestra en la parte izquierda de la OSD.
Configuración externa
........: E........
Ajuste de montaje en pared
![]() ..v..
..v.. ![]() Ingresar
Ingresar ![]() Regresar
Regresar
Ajuste de montaje en pared
Posición | 1 | 2 | 3 |
Ajustar | Guardar |
| Centro |
SRS
Guardar
Seleccione un modo para guardar.
![]() Posición 1
Posición 1
Despl�azamiento a l�a posición memorizada | ..v.. | Ingresar | Regresar | |
1 | Complete el paso 1 de Acceso al� menú. | Ajuste de montaje en pared |
| |
Posición 1 |
|
| ||
� | Pulse un botón de color (rojo, verde, amarillo) para mover el montaje mural a la |
|
| |
| posición guardada. |
|
|
|
➢Se puede mover el montaje mural a una de las tres posiciones preconfiguradas con los botones rojo (posición 1), verde (posición 2) o amarillo (posición 3).
➢ Si después de usar una posición preconfigurada se ajusta ésta, la visualización | Posición | 1 | 2 | 3 | |
de la posición desaparece. | |||||
Ajustar | Guardar |
| Centro | ||
➢ Para la instalación, consulte el manual de instalación proporcionado con el equipo de |
| ||||
|
|
|
| ||
montaje mural. |
|
|
|
|
➢Para la instalación del producto, así como la instalación y movimiento del montaje en la pared, consulte a una empresa especializada en instalaciones.
➢La instalación manual se debe usar al colocar el equipo de montaje en una pared. Para colocarlo en otros materiales de construcción, póngase en contacto con el distribuidor más cercano.
➢El montaje mural no está operativo cuando Anynet+ están funcionando.
Español� �� ��