Collegamento a una sorgente di alimentazione

ATTENZIONE

Prima di collegare l'adattatore o inserire un qualsiasi cavo, controllare che l'inserimento venga effettuato secondo le istruzioni. Evitare di forzare l'inserimento, ciò potrebbe danneggiare la macchina fotografica.

Se il LED di ricarica dell'adattatore non si accende né lampeggia dopo aver inserito la batteria ricaricabile, verificare che la batteria sia stata inserita correttamente.

In caso di ricarica con la fotocamera accesa, non è possibile caricare completamente la batteria. Spegnere la fotocamera durante le operazioni di carica.

LED di caricamento sull'adattatore


LED di caricamento


In carica

Il LED rosso è acceso


Il caricamento è terminato

Il LED verde è acceso


Errore di caricamento

Il LED rosso è spento o lampeggia


In scaricamento

Il LED arancio è acceso

(utilizzando l'adattatore)


Quando si inserisce la batteria completamente scarica per ricaricarla, non accendere contemporaneamente la fotocamera. La fotocamera potrebbe non accendersi a causa della carica insufficiente della batteria. Ricaricare la batteria per più di 10 minuti per poter usare la fotocamera.

Non usare frequentemente il flash e non filmare dopo aver ricaricato solo per breve tempo una batteria completamente scarica. Anche se il caricabatterie è inserito, la fotocamera potrebbe spegnersi perché la batteria ricaricabile è di nuovo scarica.

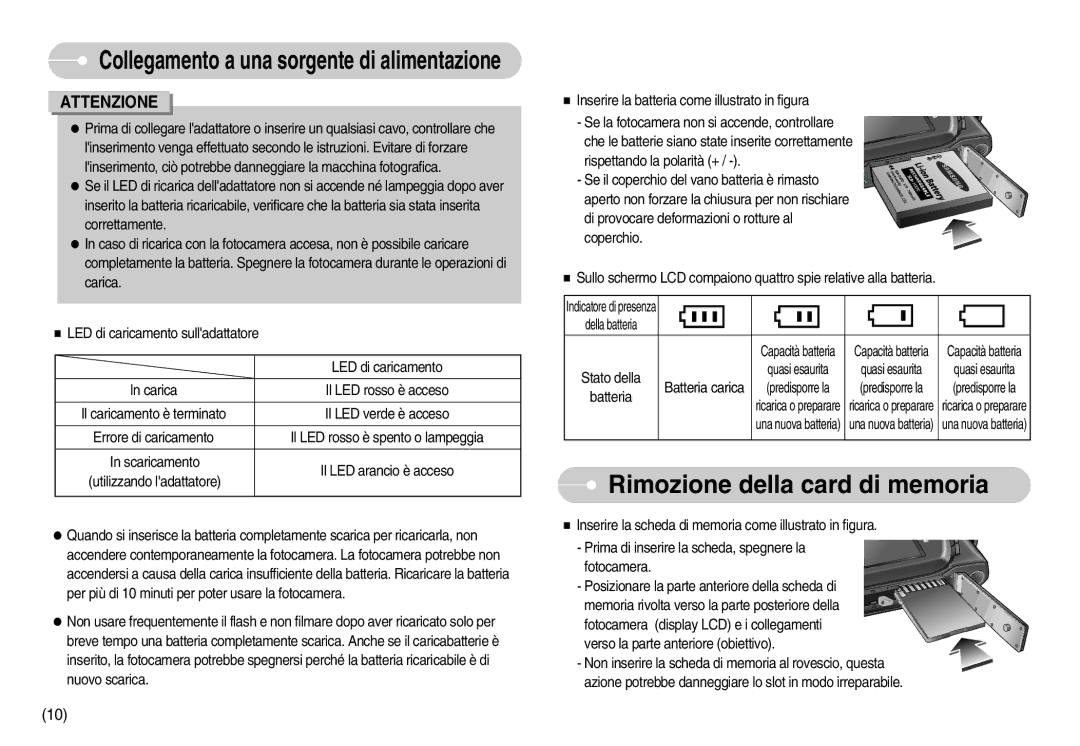
Inserire la batteria come illustrato in figura

- Se la fotocamera non si accende, controllare che le batterie siano state inserite correttamente rispettando la polarità (+ / -).

- Se il coperchio del vano batteria è rimasto aperto non forzare la chiusura per non rischiare di provocare deformazioni o rotture al coperchio.

Sullo schermo LCD compaiono quattro spie relative alla batteria.

Indicatore di presenza

della batteria


Capacità batteria

Capacità batteria

Capacità batteria

Stato della


quasi esaurita

quasi esaurita

quasi esaurita

Batteria carica

(predisporre la

(predisporre la

(predisporre la

batteria


ricarica o preparare

ricarica o preparare

ricarica o preparare


una nuova batteria)

una nuova batteria)

una nuova batteria)

Rimozione della card di memoria

Inserire la scheda di memoria come illustrato in figura.

- Prima di inserire la scheda, spegnere la fotocamera.

- Posizionare la parte anteriore della scheda di memoria rivolta verso la parte posteriore della fotocamera (display LCD) e i collegamenti verso la parte anteriore (obiettivo).

- Non inserire la scheda di memoria al rovescio, questa azione potrebbe danneggiare lo slot in modo irreparabile.

(10)

Page 11
Image 11
Samsung EC-I7ZZZSBB/E1, EC-I7ZZZBBA/DE, EC-I7ZZZSBB/DE, EC-I7ZZZBBA/IT, EC-I7ZZZSBB/IT manual Rimozione della card di memoria

EC-I7ZZZBBB/IT, STW-I7S, EC-I7ZZZSBB/IT, EC-I7ZZZSBB/E1, EC-I7ZZZBBA/DE specifications

The Samsung EC-I7ZZZ series of digital cameras encompasses a range of models, including the EC-I7ZZZSBB/DE, EC-I7ZZZBBA/FR, EC-I7ZZZSBA/DK, EC-I7ZZZBBA/DK, and EC-I7ZZZBBA/NL. Each of these cameras combines cutting-edge technology with user-friendly features, making them ideal for both novice photographers and more experienced users seeking to enhance their photography skills.

One of the standout features of the Samsung EC-I7ZZZ series is its impressive image sensor, which provides exceptional image quality. With a resolution of 16 megapixels, these cameras capture sharp, detailed photographs even in challenging lighting conditions. The powerful built-in lens offers a versatile zoom range, allowing users to get close-up shots or wide-angle views with ease.

Another key characteristic of the EC-I7ZZZ series is its advanced optical image stabilization technology. This feature effectively reduces the effects of camera shake, resulting in clearer images, especially when shooting in low light or at longer focal lengths. Whether capturing spontaneous moments or scenic landscapes, users can trust that their photos will be crisp and vibrant.

Additionally, the Samsung EC-I7ZZZ cameras incorporate smart technologies that streamline the photography process. The user-friendly interface includes a variety of automatic modes, making it easy for anyone to achieve great results without extensive knowledge of camera settings. Moreover, the integrated Wi-Fi connectivity allows users to quickly share their images on social media or transfer them to other devices.

The camera body design is both stylish and ergonomically friendly, ensuring that it remains comfortable to hold during extended shooting sessions. With a range of color options available, users can choose a model that best suits their personal style.

In terms of video capabilities, the EC-I7ZZZ series supports full HD video recording, enabling users to capture high-quality footage with ease. This feature is perfect for those who want to complement their photography with engaging videography.

Overall, the Samsung EC-I7ZZZ series represents a solid investment for anyone looking to advance their photography skills while still enjoying the convenience of modern technology. With its powerful features, versatile options, and sleek design, this series stands out in the crowded digital camera market.