Owner’s Instructions
Page
User Instructions
Table of Contents
Picture Quality Adjustment Image Reset
Connecting a PC and Operation
Connecting a PC
113
Page
General Information
Source button
Power button
∏ Remote Control Sensor
´ Menu button
3903-000144
PC Cable PC Audio Cable Optical Cable Coaxial Cable
ANT 75Ω
HDMI/DVI
’ Anynet
Remote Control Buttons
Remote Control
Remote Control Operation Range
¿ P.MODE button
Wall Installation Instructions
How to assemble the Wall Mount Bracket
Fixing the TV panel to the wall attachment panel bracket
How to Adjust Mounting Angle
How to assemble the Stand-Base
Page
480p, 720p Connecting a Digital TV Set-Top Box 480p, 720p
Connections
Connecting VHF and UHF Antennas
Connecting Cable TV
Cable without a Cable Box
Page
Videotape Playback
Connecting a VCR
Power cord Audio cable Video cable
Connecting a Camcorder
Viewing Tapes
Jacks on the DVD player using a audio cable
Power cord
On the DVD player using a component cable
To Play DVD
To Watch DTV
Audio cable HDMI/DVI cable
Power cord Hdmi cable
Using an Hdmi cable
From cable or Antenna
Set-Top Box using an audio cable
Using an HDMI/DVI cable
Hdmi in jack is not compatible with PC
Connecting a Digital Audio System
You use the optical digital output on the TV
Power cord Audio cable
You must hook them up to an amplifier
Operation
Turning the TV On and Off
Plug & Play Feature
Turning the TV On and Off
STD HRC IRC
Plug & Play
If you want to reset this feature
Setup, then press the Enter button
Viewing the Menus
Displaying Status Information
Memorizing the Channels
Channel, then press the Enter button
Storing Channels in Memory
Adding and Erasing Channels
Changing Channels
Adjusting the Volume
Using Mute
Using the Button
KYW-HD
Setting Up Your Remote Control
Remote Control Codes
VCR Codes Cable Box Codes DVD Codes
Setting the Signal Source
Press the Menu button
Assigning Names to External input mode
Page
Picture Control
Changing the Picture Standard
Or button
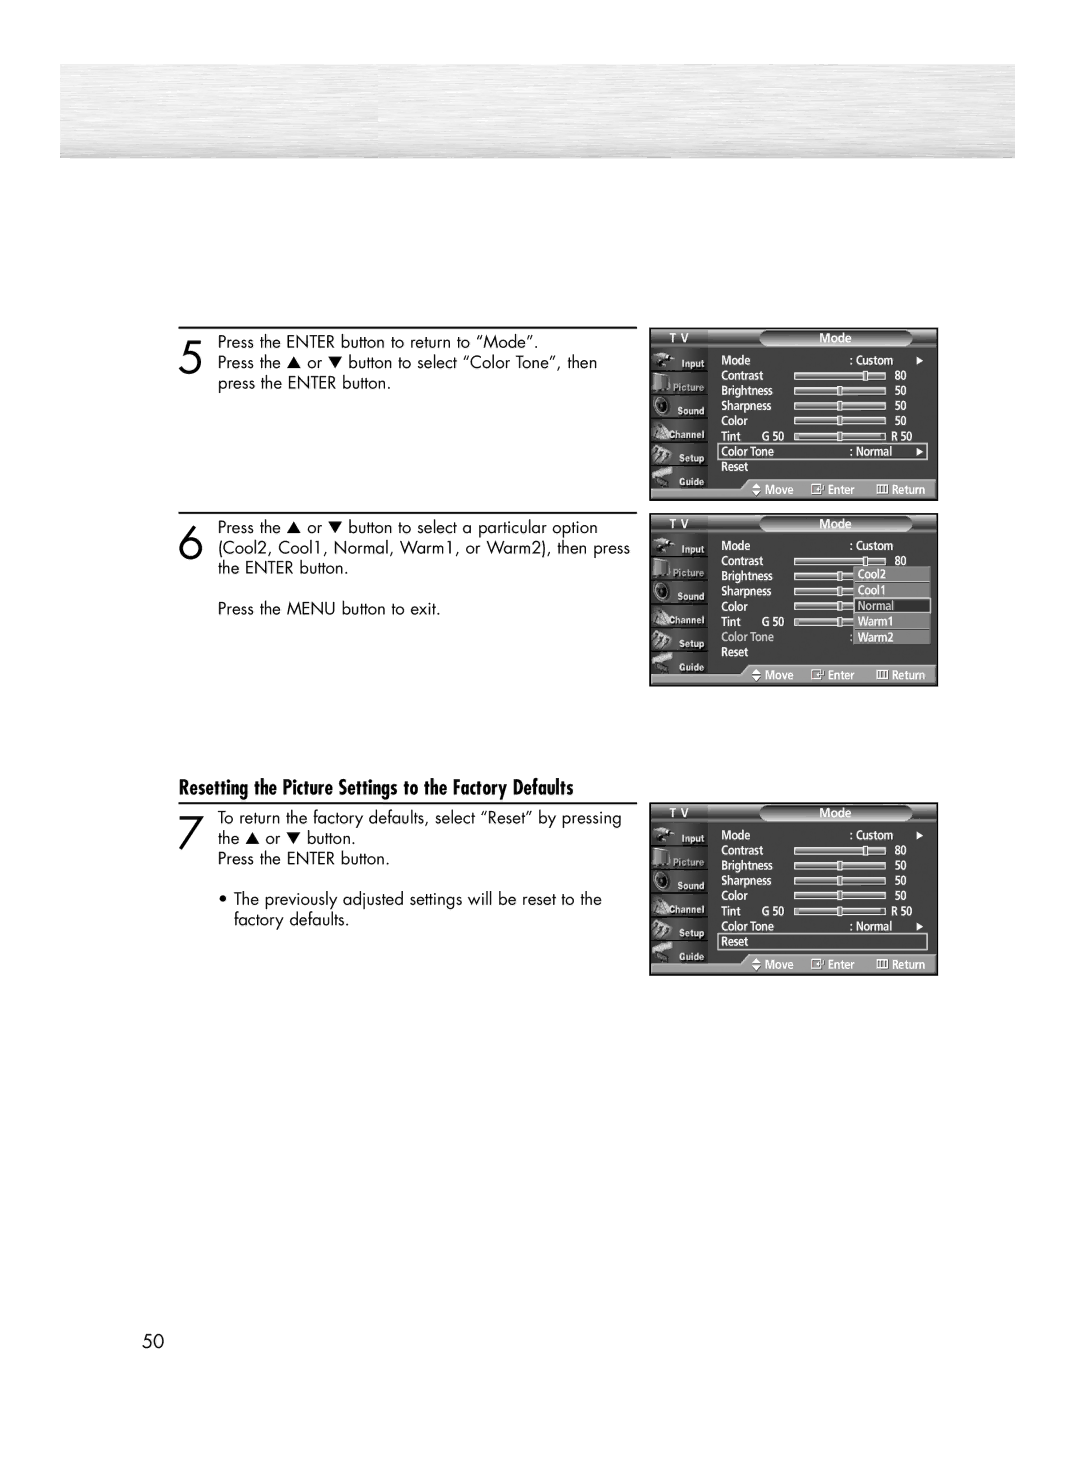
Press the Enter button to select Mode
Picture, then press the Enter button
Resetting the Picture Settings to the Factory Defaults
To return the factory defaults, select Reset by pressing
Viewing the DNIe Demonstration
Changing the Screen Size
Press the or button to select Size, then press Enter button
Screen size when the Zoom1 screen is vertically enlarged
Converts regular 43 aspect ratio screen to wide screen
Viewing the Picture-in-Picture
Selecting the PIP Screen
Selecting an External Signal
PC is not available in PIP picture.55
Swapping the Contents of the PIP and Main Image
Changing the Size of the PIP Window
Changing the Location of the PIP Image
Changing the PIP Channel
Selecting the Sound Source
Setting the My Color Control Mode
Press the Menu button to exit the menu
Emphasizes Clear Blues
My Color Control Mode Characteristics
Standard Picture
Emphasizes Whites Emphasizes Reds
My Color Control Custom Settings
Red Green Blue Yellow Pink White Reset Move Enter
Sound Control
Press the œ or √ button to select a particular frequency
Customizing the Sound
Sound, then press the Enter button
Using Automatic Sound Settings
Setting the TruSurround XT
Choosing a Multi-Channel Sound MTS track Digital
Choosing a Multi-Channel Sound MTS track Analog
Using the Auto Volume
Choosing a Digital Sound Format
Setting the On/Off Melody
Selecting the Internal Mute
Channel Control
Selecting the Antenna
To Store Your Favorite Channels
To View Your Favorite Channels
Labeling the Channels
Viewing the Channel Lists
Alternate method
Editing the Channel Lists
Fine Tuning Analog Channels
Checking the Digital-Signal Strength
LNA Low Noise Amplifier
Press the or button to select LNA, then press Enter button
Page
Connecting a PC and Operation
To watch the PC screen
Connecting a PC
Power cord Audio cable PC cable
Setting up Your TV Plug and Play
How to Set up Your PC Software Windows only
Display Dialog-Box will be displayed
Vertical Horizontal
Compatible
Changing the Position of the Image
Press the Source button to select PC
Picture Quality Adjustment
Picture Automatic Adjustment
Coarse Adjustment
Fine Tuning Fine
Image Reset
Time Setting
Or button to select Manual, then press the Enter button
Setting the Clock
Option 1 Setting the Clock Manually
Option 2 Setting the Clock Automatically
DST
Setting the On/Off Timer
Auto Power Off
Setting the Sleep Timer
Page
Function Description
Selecting a Menu Language
Digital Noise Reduction
Selecting the Film Mode
Setting the Blue Screen
Using the Color Weakness Enhancement Option
Viewing Closed Captions On-Screen Text Messages Analog
Viewing Closed Captions On-Screen Text Messages Digital
Caption On
Menu Transparency Level
Using the Energy Saving Feature
Illumination
Preventing Screen Burn-in
Reducing the Effects of Screen Burn
Setting the Function Help
Press the button to select On, then press the Enter Button
Using the V-Chip for USA
Setting Up Your Personal ID Number PIN
How to Enable/Disable the V-Chip
General audience
Young children
TV-Y7 Children 7 and over
Parental guidance
118
119
120
Using the V-Chip for Canada
122
123
124
125
Canadian English
127
128
Electronic Program Guide
Viewing the Electronic Program Guide
Using the Electronic Program Guide
Viewing Information about a Single Channel
Channels
Red button
Information for one channel and all
Up to 8 programs can be reminded
Remind List
Viewing the Remind List
To view the Remind List
To remove the scheduled programs
Appendix
Turn the TV off and on
Troubleshooting
Problem Possible Solution
Temperature
Care and Maintenance
Identifying Problems
Liquids
Specifications
Dimensions HP-R4252C
Jack Panel Detail 2 1/4H x 18 3/4W @ 5 3/4 UP from Bottom
140
Dimensions HP-R5052C
142
Memo
BN68-00835N-01

![]() Move
Move ![]() Enter
Enter ![]() Return
Return