Getting Started
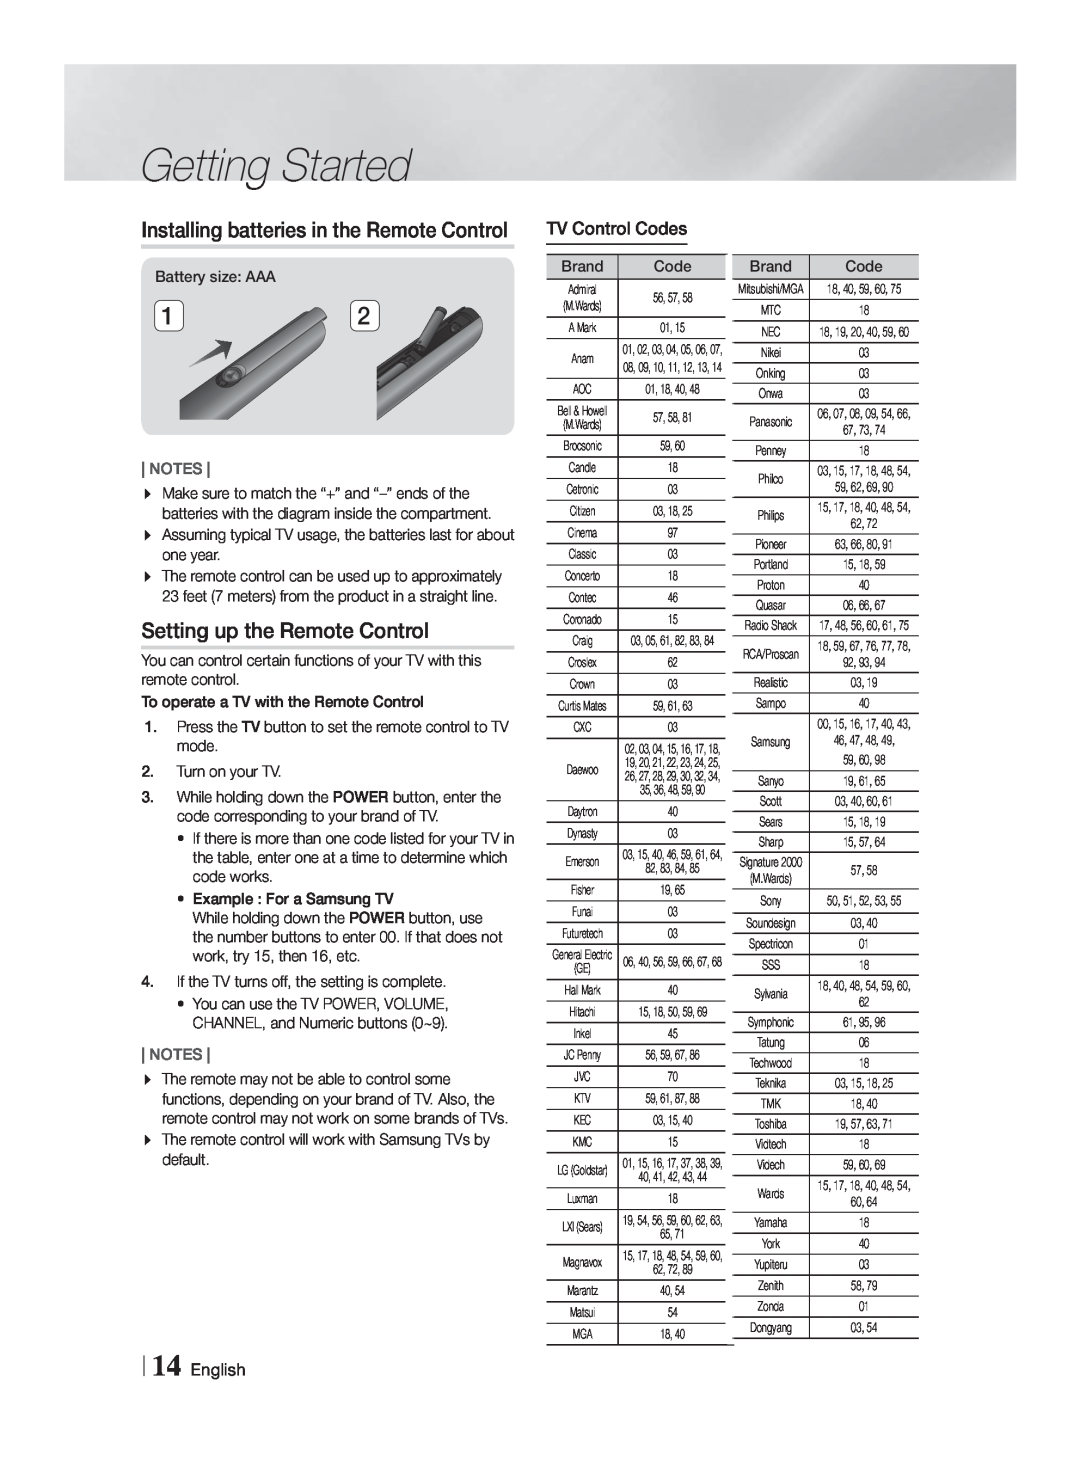
Installing batteries in the Remote Control
Battery size: AAA
1![]() 2
2
NOTES
Make sure to match the “+” and
The remote control can be used up to approximately 23 feet (7 meters) from the product in a straight line.
Setting up the Remote Control
You can control certain functions of your TV with this remote control.
To operate a TV with the Remote Control
1.Press the TV button to set the remote control to TV mode.
2.Turn on your TV.
3.While holding down the POWER button, enter the code corresponding to your brand of TV.
•If there is more than one code listed for your TV in the table, enter one at a time to determine which code works.
•Example : For a Samsung TV
While holding down the POWER button, use the number buttons to enter 00. If that does not work, try 15, then 16, etc.
4.If the TV turns off, the setting is complete.
•You can use the TV POWER, VOLUME, CHANNEL, and Numeric buttons (0~9).
NOTES
The remote may not be able to control some functions, depending on your brand of TV. Also, the remote control may not work on some brands of TVs. The remote control will work with Samsung TVs by default.
TV Control Codes
Brand | Code |
|
Admiral | 56, 57, 58 |
|
(M.Wards) |
| |
|
| |
A Mark | 01, 15 |
|
Anam | 01, 02, 03, 04, 05, 06, 07, |
|
08, 09, 10, 11, 12, 13, 14 |
| |
|
| |
AOC | 01, 18, 40, 48 |
|
Bell & Howell | 57, 58, 81 |
|
(M.Wards) |
| |
Brocsonic | 59, 60 |
|
Candle | 18 |
|
Cetronic | 03 |
|
Citizen | 03, 18, 25 |
|
Cinema | 97 |
|
Classic | 03 |
|
Concerto | 18 |
|
Contec | 46 |
|
Coronado | 15 |
|
Craig | 03, 05, 61, 82, 83, 84 |
|
Croslex | 62 |
|
Crown | 03 |
|
Curtis Mates | 59, 61, 63 |
|
CXC | 03 |
|
| 02, 03, 04, 15, 16, 17, 18, |
|
Daewoo | 19, 20, 21, 22, 23, 24, 25, |
|
26, 27, 28, 29, 30, 32, 34, |
| |
| 35, 36, 48, 59, 90 |
|
Daytron | 40 |
|
Dynasty | 03 |
|
Emerson | 03, 15, 40, 46, 59, 61, 64, |
|
82, 83, 84, 85 |
| |
Fisher | 19, 65 |
|
Funai | 03 |
|
Futuretech | 03 |
|
General Electric | 06, 40, 56, 59, 66, 67, 68 |
|
(GE) |
| |
Hall Mark | 40 |
|
Hitachi | 15, 18, 50, 59, 69 |
|
Inkel | 45 |
|
JC Penny | 56, 59, 67, 86 |
|
JVC | 70 |
|
KTV | 59, 61, 87, 88 |
|
KEC | 03, 15, 40 |
|
KMC | 15 |
|
LG (Goldstar) | 01, 15, 16, 17, 37, 38, 39, |
|
40, 41, 42, 43, 44 |
| |
Luxman | 18 |
|
LXI (Sears) | 19, 54, 56, 59, 60, 62, 63, |
|
65, 71 |
| |
Magnavox | 15, 17, 18, 48, 54, 59, 60, |
|
62, 72, 89 |
| |
Marantz | 40, 54 |
|
Matsui | 54 |
|
MGA | 18, 40 |
|
Brand | Code | |
Mitsubishi/MGA | 18, 40, 59, 60, 75 | |
MTC | 18 | |
NEC | 18, 19, 20, 40, 59, 60 | |
Nikei | 03 | |
Onking | 03 | |
Onwa | 03 | |
Panasonic | 06, 07, 08, 09, 54, 66, | |
67, 73, 74 | ||
Penney | 18 | |
Philco | 03, 15, 17, 18, 48, 54, | |
59, 62, 69, 90 | ||
Philips | 15, 17, 18, 40, 48, 54, | |
62, 72 | ||
Pioneer | 63, 66, 80, 91 | |
Portland | 15, 18, 59 | |
Proton | 40 | |
Quasar | 06, 66, 67 | |
Radio Shack | 17, 48, 56, 60, 61, 75 | |
RCA/Proscan | 18, 59, 67, 76, 77, 78, | |
92, 93, 94 | ||
Realistic | 03, 19 | |
Sampo | 40 | |
Samsung | 00, 15, 16, 17, 40, 43, | |
46, 47, 48, 49, | ||
| 59, 60, 98 | |
Sanyo | 19, 61, 65 | |
Scott | 03, 40, 60, 61 | |
Sears | 15, 18, 19 | |
Sharp | 15, 57, 64 | |
Signature 2000 | 57, 58 | |
(M.Wards) | ||
| ||
Sony | 50, 51, 52, 53, 55 | |
Soundesign | 03, 40 | |
Spectricon | 01 | |
SSS | 18 | |
Sylvania | 18, 40, 48, 54, 59, 60, | |
62 | ||
Symphonic | 61, 95, 96 | |
Tatung | 06 | |
Techwood | 18 | |
Teknika | 03, 15, 18, 25 | |
TMK | 18, 40 | |
Toshiba | 19, 57, 63, 71 | |
Vidtech | 18 | |
Videch | 59, 60, 69 | |
Wards | 15, 17, 18, 40, 48, 54, | |
60, 64 | ||
| ||
Yamaha | 18 | |
York | 40 | |
Yupiteru | 03 | |
Zenith | 58, 79 | |
Zonda | 01 | |
Dongyang | 03, 54 |
