Channel Channel DVR
Channel Channel DVR
Important Safety Instructions
Overview
Overview
Before Start
Operating Temperature
Contents
Search & play Web viewer
Backup viewer
Appendix
Features
Package Contents
Overview Remote Control Remote Control Battery AAA x
SDH-V5100
Remote Control Remote Control Battery AAA x
SDH-P4040
SDH-P4080
Part Names and Functions Front
Part Names and Functions Rear
Skip Backward by unit time
Number 0~+10
Up/Down/Left/Right$% +/ENTER
Using the Numeric buttons
Press each button between 1 to
Temperature Unit ºC
Checking the Installation Environment
Life Unit Hours
Connecting External Devices
Ec ther htodevi wig in ct conne
Connecting with other device
Connecting the RS-485 Device
Ec ther htodevi wig in ct conne SDC-8340BU
SDC-5340BC
12V Cable pin information Provided
Name
CVBS+ Cvbs Audio GND
SDC-8340BU SDC-5340BC
Adjusting the Camera Bracket
Broadband Router
RJ-45 Ethernet Cable Direct Cable Hub/Switcher
Windows Network Viewer Hub/Switche
XDSL or Cable Modem
Connecting to Network through PPPoE
Getting Started
Starting the system
Shutting Down the System
Login
Live Click Login Login dialog appears
You will see the context sensitive menu as in the right
JJ``
Locking All Buttons
Live Screen Configuration
Icons on the Live Screen
Error Information
Live Screen Menu
Record/Stop Starts/stops the standard recording Play
Split Mode Menu
Login/Logout You can log in or out Live
Shutdown Turns down the DVR
Menu Functions Full Screen
Single Mode Menu
Single mode menu is available only in Single Mode
Channel
View the Launcher Menu
PTZ
Switching the screen mode
Live Mode
PIP
Auto Sequence
Switching the split mode
13-16
If pressing the right + button in 4-split mode
Manual Switching
10-16
Channel Setting
Switching to Single Mode
Audio ON/OFF
Audio ON/OFF in Single mode
Zoom
Freeze
Event Monitoring
Performed
Setting the Date/Time/Language
System Setup
Date/Time/Language
Setting Holiday
Using the Calendar
Using Virtual Keyboard
Setting the Administrator
Permission Management
Setting the Group
To set the group authority
Log in with your account
To change the user password
To restrict the user permissions
Select User Menu
Setting the User
Setting Permissions
System Management
Checking the System Information
System Upgrade
Log Information
Settings
System Log
Backup Log
Event Log
Camera
Setting the Device
Setting the Camera
Audio
To set the privacy zone
When the camera setup is done, press OK
When completing the privacy zone settings, click OK
Clear All Selected cell is removed from the Privacy Region
Setting the PTZ
When the PTZ setup is done, press OK
Storage Device
Confirming Devices
Select Format
Formatting
You can format a storage device
Use direction buttons + to select a device to be formatted
Remote Devices
HDD Alarm
Select HDD Alarm
Their durations appears
Screen Setup
Setting the Monitor
Monitor
Setting the Screen Mode
You can configure the Live screen and Split Screens
Setting the Recording
Recording Schedule
Select Standard When the recording setup is done, press OK
REC Quality / Resolution
Setting Standard Recording Properties
Event Record Duration
Record Option
Setting Event Recording Properties
Disk End Mode If selected Overwrite, recording will
Full
Setting the Event
Motion Detection
To set the area using Individual selection
Setting the Motion Detection Area
When the motion detection setup is done, press OK
Video Loss Detection
Tampering Detection
Alarm Schedule
Backup
Setting the Backup
Backup Channel Sets the channel to backup
Backup window appears
Press the Enter button
Setting the Connection
Network Configuration
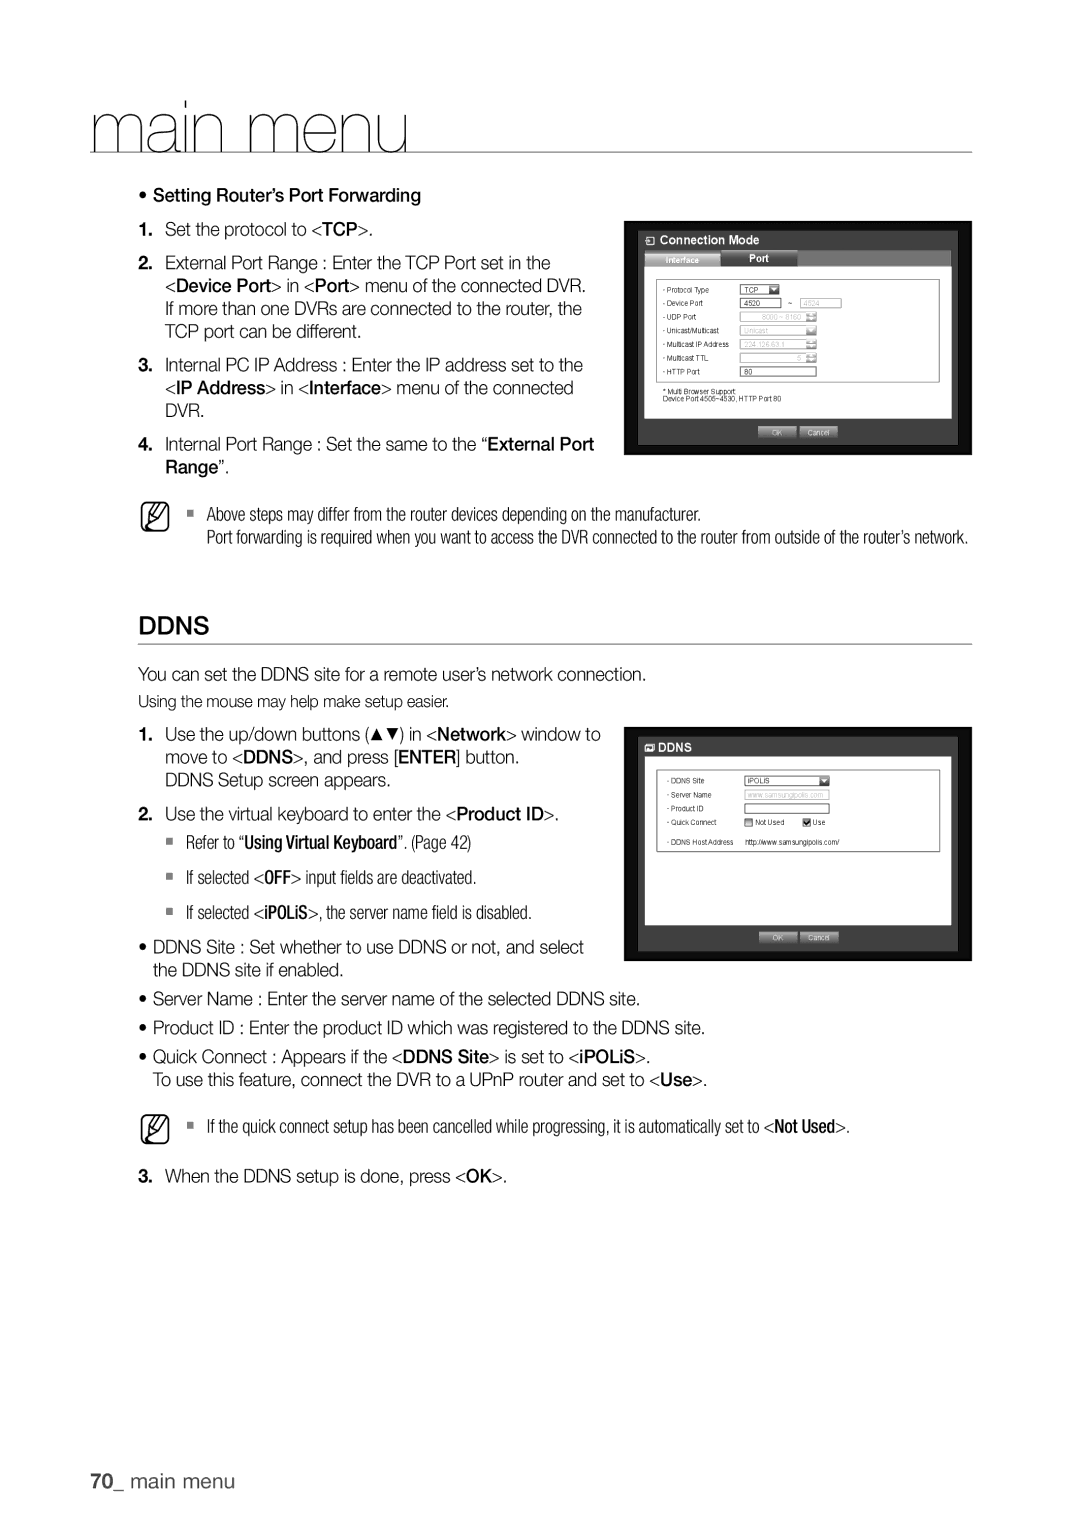
Connection Mode
You can set the network connection route and protocol
Setting the Port
UDP
Connecting and Setting the Network
When no router is used
When a router is used
DVR
Ddns Setting
Live Transfer
Mailing Service
Smtp Setting
Event Setting
Group Setting
Recipient Setting
When the recipient setup is done, press OK
PTZ Device
Controlling a PTZ device
Getting started with PTZ
Using the PTZ camera
From the center will move fast
Camera Setting
Preset Setting
Press OK Preset will be saved as a name that you entered
Search
Time Search
Backup Search
Event Search
Screen switches to the motion data playback mode
Motion Search
Playback
Play
Using the Playback Button
REC
If configured, etc
What is Web Viewer?
Product Features
Introducing Web Viewer
Connecting Web Viewer Windows
`` Initial password of the Admin user is set to
192.168.1.200 / SDR-5200
Print
Using Live Viewer Windows
Capture
OSD
OSD Information Display
Setting the Display of the OSD Time Information
Connected DVR
Nine Mode Sixteen Mode
To switch to full screen mode
Single Modequad Mode
Split-Screen
Changing the Live Screen Mode
To capture a screen
To save as AVI
To print a screen
Audio
Focus
Controlling a Connected Network Camera
Controlling PTZ
Iris
Click button to display Preset window
To set a preset
To activate the preset
To activate Swing, Group, Tour and Trace
Controlling OSD Menu
Enter
Using Search Viewer
Searching the Recorded Video in the Calendar
To adjust timeline
To search by date
Names and Functions of Play Buttons
Moves forward by 1 second from current playing point
System
Viewer Setup
You can configure the various settings of the DVR system
Date/Time/Language
Holiday
Permission Management
System Management
Device
Camera
Storage Device
Remote Device
Monitor
Recording Schedule
For more information, refer to Setting the Recording.
Record
Event Record Duration
Record Option
REC Quality & Resolution
Event
Motion Detection
Tampering Detection
You can set the alarm output time if a video loss occurs
Video Loss Detection
Motion Region Set the target motion detection area
For more information, refer to Network Configuration.
Alarm Schedule
Connection Mode
Network
Live Transfer
Mailing Service
You can check the Ddns settings
Smtp
About
Connecting Web Viewer Mac
Using Live Viewer Mac
Capture
Mobile Viewer
What is Mobile Viewer?
Key Features
Compatible Smartphone
Recommended System Requirements
SEC Backup Viewer
You can play a file that is backed up in the format of SEC
You can enable the De-interlace function
Screen switches to the selected split screen mode
You can adjust the volume level from 0 to
Restores the timeline to the default
UTP
WDR
Environmental
Mechanical Weatherproof IP66 Dimension W x H x D
Weight
10C ~ +50C / 90%
VGA
Product Specification
8CH4CH HD, 4CH SD
Hdmi
External USB 2.0 I/F
Rate
Sata
Ddns
USB
Adsl
USB I/F
OSG
TBD
Product Overview
SDH-P5080/SDH-V5100/SDH-V5120
Default Setting
Management
Duration 10 sec Mode
Setup
Alarm
Duration 10 sec Alarm Schedule
Static Transfer Bandwidth 2Mbps
192.168.1.200 Connection Mode
Mailing Service
192.168.1.1 Subnet Mask 255.255.255.0
Troubleshooting
Icon on the launcher to switch to Live mode
By the service personnel
Quick start guide backup, search
On the screen
WD14CIF2CIFCIF
Preamble
Open Source Announcement
GNU General Public License
We protect your rights with two steps
END of Terms and Conditions
No Warranty
How to Apply These Terms to Your New Programs
Each time you redistribute the Program or any work based on
Terms and Conditions
Version 3, 29 June
Conveying Modified Source Versions
Conveying Verbatim Copies
Additional Terms
Patents
Acceptance Not Required for Having Copies
Automatic Licensing of Downstream Recipients
No Surrender of Others’ Freedom
Limitation of Liability
Disclaimer of Warranty
GNU Lesser General Public License
Interpretation of Sections 15
Modified work must itself be a software library
OpenSSL License
How to Apply These Terms to Your New Libraries
Original SSLeay License
License means this document
Boost Software License
Common Development and Distribution License Version
License Grants Initial Developer Grant
Required Notices
Distribution Obligations Availability of Source Code
Modifications
Application of Additional Terms
=========== Definitions
FreeType Project License
Legal Terms
Redistribution
MIT License
RSA MD4 or MD5 Message-Digest Algorithm License
Copyright c 2004, Kneschke, incremental
Component Name License License URL Librtp BSD
Copyright c 1998-2000 University College London
Part 1 CMU/UCD copyright notice BSD like
All rights reserved
Part 6 Cisco/BUPTNIC copyright notice BSD
Part 4 Sun Microsystems, Inc. copyright notice BSD
Part 5 Sparta, Inc copyright notice BSD
Part 8 Apple Inc. copyright notice BSD
Copyright c 2003 Paul Mackerras
Part 9 ScienceLogic, LLC copyright notice BSD
Copyright c 2005-2009, Thomas Bernard
Copyright c 1995 Pedro Roque Marques
Copyright c 1999 Tommi Komulainen
Copyright c 2002 Google, Inc
Copyright c 2001 by Sun Microsystems, Inc
Copyright c 1984-2000 Carnegie Mellon University
Correct disposal of batteries in this product
Page
Samsung Techwin America Inc
Samsung House, 1000 Hillswood Drive, Hillswood Business