Charge Coupled Device
Owner’s Instruction Book
AD68-01230G
Contents
Initial Setting System Menu Setting
Using a Memory Card Usable Memory Card not supplied
DVD Camcorder Thumbnail index and Playlist63
Maintenance
PictBridge VP-DC173i/DC175WB/DC175Wi
USB Interface VP-DC173i/DC175WB
English
Use a soft cloth to clean the disc
Servicing & Replacement Parts
Features
Getting to Know Your DVD Camcorder
Learning available Discs and Their Features
Times
You may not use 12cm CD/DVD discs Unusable 8cm discs
Floppy Disk, MO, MD, iD, LD
Case of Video mode
Case of VR mode
DVD player DVD recorder DVD drive-equipped PC
DVD recorder
How to use the DVD Camcorder easily
You may edit only in DVD-RW VR Mode. page
Accessories Supplied with the DVD Camcorder
Basic Accessories
Optional Accessories
Lens Cover Lens Cover Strap
Access Indicator page Open Switch page Lens
Front & Left View
Internal MIC EASY.Q Button page Menu Button page
TFT LCD Screen
Left Side View
NITE/S.SHOW Button VP-DC173i only
page 49/95
Record Start/Stop Button page
Right & Top View
Zoom W/T Lever page
DC575WB/DC575Wi only page
BATT. Release Switch
Rear & Bottom View
Photo page
Display page
/Skip /Search Stop Slow Play/Still
Up /Down /Left /Right /OK
Using the Hand Strap & Lens Cover
Installing the Lens Cover after Operation
Preparation
Lens Cover
Lithium Battery Installation
Lithium Battery Installation for the Internal Clock
Precautions regarding the Lithium Battery
firmly until you hear locking sound
Using the Lithium Ion Battery Pack
Charging the Lithium Ion Battery Pack
Charging, Recording Times based on Battery Type
Amount of continuous recording time available depends on
Battery Level Display
At battery level ‘e’
Battery Pack Management
Maintaining the Battery Pack
Make sure that the Battery Pack is fitted firmly into place
Connecting a Power Source
Using a Household Power Source
Green Tab on the Power switch and turning
Power switch to on or OFF
Using the Joystick
Mode Name Camera Mode Player Mode
About the Operating Modes
Using the Q.MENU
Functions available using the Q.MENU are as below
For example Setting the White Balance
Press the Q.MENU button The quick menu list will appear
OSD On Screen Display in Camera Mode/Player Mode
Turning the OSD On Screen Display On/Off
Initial Setting System Menu Setting
Setting the Clock Clock Set
Camera or
Press the Menu button The menu list will appear
Press the Menu button. The menu list will appear
Setting the Beep Sound Beep Sound
Set the Mode switch to Card
The Shutter Sound function works only in M.Cam Mode. page
Selecting the OSD Language Language
Viewing the Demonstration Demonstration
Initial Setting Display Menu Setting
Adjusting the LCD Screen LCD Bright/LCD Colour
LCD Bright LCD Colour
Displaying the Date/Time Date/Time
Setting the TV Display TV Display
Off The OSD appears in the LCD Screen and Viewfinder only
Using the Viewfinder
Using the LCD Enhancer
Adjusting the Focus
DVD Camcorder Before Recording
Various Recording Techniques
General recording Downward recording
Upward recording
Self recording
Inserting and Removing a Disc
Inserting a Disc
When using a New Disc Formatting a new Disc
Upon completion, the Complete! message will appear
Removing a Disc
Selecting the Record Mode Rec Mode
Recording Times based on Disc Type
Camera
Tip
Recording with Ease for Beginners EASY.Q Mode
DVD Camcorder Basic Recording
Unavailable buttons during operation
Menu button Nite button
Zooming In and Out
Using the Fade In and Out Fade
Set the Power switch to Camera
To Start Recording
To Stop Recording
Using Back Light Compensation Mode BLC
Set the Power switch to Camera
Using the Colour Nite
Color N /25, Color N /13 and off
Color N /25, Color N /13, Color N /13 and off
Using the Light VP-DC175WB/DC175Wi/DC575WB/DC575Wi only
Please disable 169 Wide mode to use this function. page
Set the Mode switch to Disc
DVD Camcorder Advanced Recording
Cutting Off Wind Noise Wind Cut
Press the Menu button
Setting the Shutter Speed & Exposure Shutter/Exposure
Camera
Automatic focusing difficult or unreliable
Auto Focus / Manual Focus
Cam Mode. page
Auto Focus
Programmed Automatic Exposure Modes Program AE
Setting the Program AE
Setting the White Balance White Balance
Close up
Outdoor
Custom WB
Setting the Custom White Balance
The Set White Balance will blink
Applying Digital Effects Digital Effect
The display mode is set to the selected mode
Selecting the Digital Effects
Joystick
Nite is in use
Setting the 169 Wide mode 169 Wide
Setting the Digital Image Stabilizer DIS
Recording through the window of a vehicle
Press the Joystick
Zooming In and Out with Digital Zoom Digital Zoom
The Digital Zoom works only in Camera Mode. page
Maximum zooming may result in lower picture quality
What is the Thumbnail Index?
What’s a Playlist? DVD-RWVR mode
DVD Camcorder Thumbnail index and Playlist
Recorded title scenes
Adjusting the Volume DVD-RW/+RW/-R/+R DL
Volume
DVD Camcorder
Playing Title Scenes DVD-RW/+RW/-R/+R DL
Various Functions while in Player Mode DVD-RW/+RW/-R/+R DL
Playback/Still
Skip Playback Forward/Reverse
Picture Search Forward/Reverse
Set the Power switch to Player
Deleting a Title Scene Delete DVD -RW/+RW
Then press the Joystick
Set the Power switch to Player Press the Q.MENU button
Creating a New Playlist New Playlist DVD-RWVR mode
DVD Camcorder Playlist
Playing the Playlist DVD-RWVR mode
This function works only in Player Mode. page
Deleting a Playlist Delete DVD-RWVR mode
Adding Scenes to Playlist Scene-Add DVD-RWVR mode
Add
Edit Move
Deleting Scenes from Playlist Scene-Delete DVD-RWVR mode
The Partial Delete screen will appear
Use the Joystick to search the start point of deletion
Set the Power switch to Camera or Player
DVD Camcorder Disc Manager
Disc Information Disc Info DVD-RW/+RW/-R/+R DL
Will be displayed
Editing the Disc Name Disc Info-Rename DVD-RW/+RW/-R/+R DL
VR VR Mode
Formatting a Disc Disc Format DVD-RW/+RW
Back on other DVD Players/Recorders
Finalising a Disc Disc Finalise DVD-RW/-R/+R DL
This function works only in Camera Mode. page
To Playback DVD-RW discs recorded in VR mode
Playing Back on a PC with DVD drive
Playing back a finalised disc on a DVD Player/Recorder
To Playback a disc
Unfinalising a Disc Disc Unfinalise DVD-RW
Set the Power switch to Player
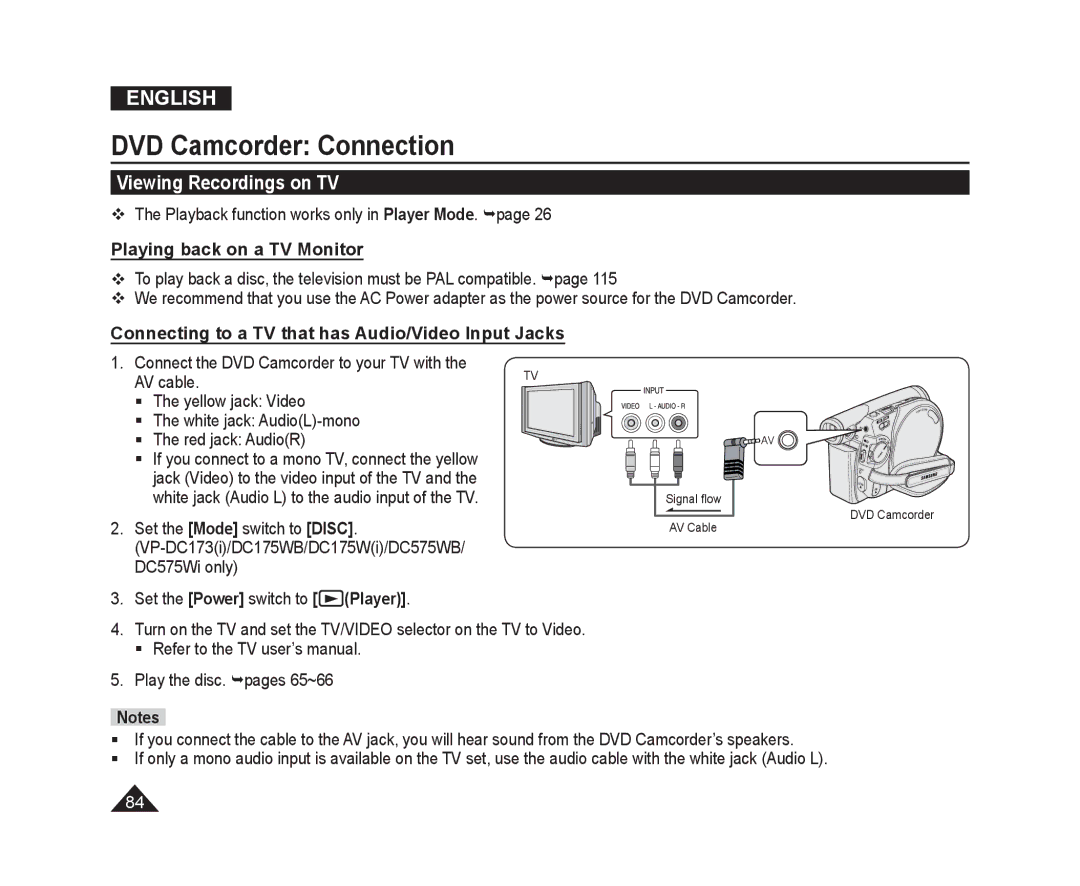
DVD Camcorder Connection
AV In/Out function works only in Player Mode. page
External device
Connecting to a TV that has Audio/Video Input Jacks
Viewing Recordings on TV
Playing back on a TV Monitor
Connecting to a TV that has no Audio/Video Input Jacks
Play the disc. pages 65~66
When Copying is Complete
Copying a Disc onto a Tape
Connect the AV cable to the input jack on your VCR
Set the TV Display to Off in the menu. page
Using the Voice Plus
To cancel, press the Record Start/Stop button again
Recording Copying onto a Disc
Using a Memory Card Usable Memory Card not supplied
Memory Card Functions
Inserting a Memory Card
Ejecting a Memory Card
Structure of Folders and Files on the Memory Card
Image Format Photo Image
Moving Image
Selecting the Photo Quality Photo Quality
Select the Photo Quality
Number of Images that can be stored on a Memory Card
Setting the Photo Size Photo Size VP-DC575WB/DC575Wi only
Setting the File Number File No
Taking a Photo Image Jpeg on a Memory Card
Viewing Photo Images Jpeg
To view a Single Image
To view a Slide Show
Loading time may vary depending on the image size
Protection from accidental Erasure Protect
Memory Card, No file! is displayed
Use the Joystick to select images to be protected
The protection icon is displayed
Deleting Photo Images and Moving Images Delete
The Delete function works only in M.Player Mode. page
Delete All
Formatting the Memory Card Format
The Format? All files will be deleted! message will appear
Recording Moving Images Mpeg on a Memory Card
Saving Moving Images onto a Memory Card
Recording time available on a Memory Card
Playing the Moving Images Mpeg on a Memory Card
Then move it right to Highlight the moving image icon
102
It can be set up to
Marking Images for Printing Print Mark
Removing the Print Mark
Printing Your Pictures-Using PictBridge
PictBridge printer using a USB cable
Connecting To a Printer USB Connect
Turn your printer power off
Setting the Number of Prints
Setting the Date/Time Imprint Option
Canceling the Printing
Printing Images
Using USB Interface
Transferring a Digital Image through a USB Connection
USB Connection Speed depending on the System
System Requirements
USB Streaming requires Video Codec, DV Driver and DirectX
Selecting the USB Device USB Connect
Installing DV Media PRO Program
Installing Driver DV Driver and DirectX
Click on DV Driver on the Setup screen
111
Connecting to a PC
Disconnecting the USB Cable
Using the PC Camera Function
Using the USB Streaming Function
Using the removable Disk Function
Maintenance
Using Your DVD Camcorder Abroad
Troubleshooting
Troubleshooting
Display Blinking Informs that Action
Symptom Explanation/Solution
Record Start/Stop button
Normal screen Power switch to on, and then connect it again
Disc is a damaged one. Replace with a new disc
Opens
Playing DVD Camcorder
Disc Cover Make sure the Battery Pack is charged
Local service centre
Connected and stable
+RW/-R/+R DL disc
Setting menu items
Main Menu Sub Menu Functions Available Mode Camera Player
Trademark Acknowledgements
Miscellaneous Information
Disc Type Description
You must format a new disc before recording on it
Specifications
System
Index
Power Sources United Kingdom Only
Blue = Neutral Brown = Live
United Kingdom
Ελλασ Greece
Fourlis Trade A.E.B.E
Page
Contact Samsung World Wide
Country Customer Care Centre Web Site
This DVD Camcorder is Manufactured by
RoHS compliant