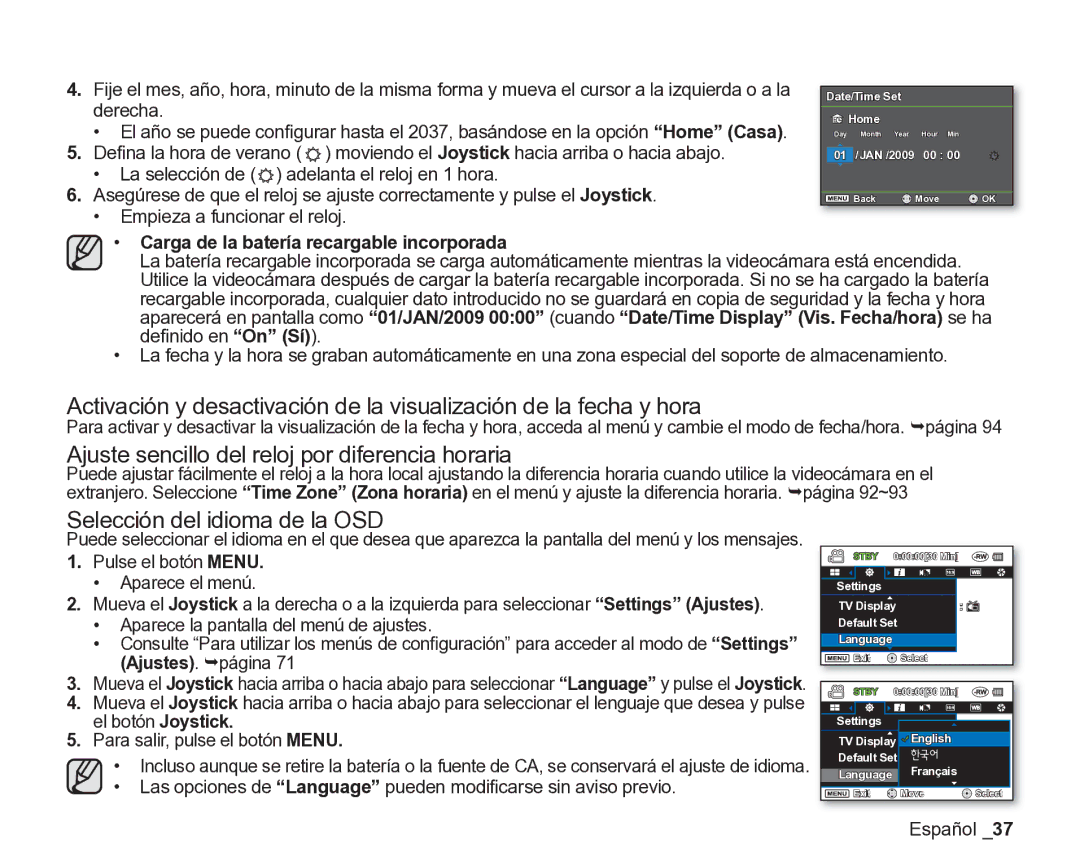
4.Fije el mes, año, hora, minuto de la misma forma y mueva el cursor a la izquierda o a la derecha.

El año se puede configurar hasta el 2037, basándose en la opción “Home” (Casa).

5.Defina la hora de verano ( ) moviendo el Joystick hacia arriba o hacia abajo.

La selección de () adelanta el reloj en 1 hora.

6.Asegúrese de que el reloj se ajuste correctamente y pulse el Joystick.

Empieza a funcionar el reloj.

Date/Time Set

Home

Day Month Year Hour Min

01 /JAN /2009 00 : 00

Back Move OK

Carga de la batería recargable incorporada

La batería recargable incorporada se carga automáticamente mientras la videocámara está encendida. Utilice la videocámara después de cargar la batería recargable incorporada. Si no se ha cargado la batería recargable incorporada, cualquier dato introducido no se guardará en copia de seguridad y la fecha y hora aparecerá en pantalla como “01/JAN/2009 00:00” (cuando “Date/Time Display” (Vis. Fecha/hora) se ha definido en “On” (Sí)).

La fecha y la hora se graban automáticamente en una zona especial del soporte de almacenamiento.

Activación y desactivación de la visualización de la fecha y hora

Para activar y desactivar la visualización de la fecha y hora, acceda al menú y cambie el modo de fecha/hora. ¬página 94

Ajuste sencillo del reloj por diferencia horaria

Puede ajustar fácilmente el reloj a la hora local ajustando la diferencia horaria cuando utilice la videocámara en el extranjero. Seleccione “Time Zone” (Zona horaria) en el menú y ajuste la diferencia horaria. ¬página 92~93

Selección del idioma de la OSD

Puede seleccionar el idioma en el que desea que aparezca la pantalla del menú y los mensajes.

1.Pulse el botón MENU.

Aparece el menú.

2.Mueva el Joystick a la derecha o a la izquierda para seleccionar “Settings” (Ajustes).

Aparece la pantalla del menú de ajustes.

Consulte “Para utilizar los menús de configuración” para acceder al modo de “Settings” (Ajustes). ¬página 71

3.Mueva el Joystick hacia arriba o hacia abajo para seleccionar “Language” y pulse el Joystick.

4.Mueva el Joystick hacia arriba o hacia abajo para seleccionar el lenguaje que desea y pulse el botón Joystick.

5.Para salir, pulse el botón MENU.

• Incluso aunque se retire la batería o la fuente de CA, se conservará el ajuste de idioma.

• Las opciones de “Language” pueden modificarse sin aviso previo.

STBY

0:00:00[30 Min]


Settings


TV Display

:

Default Set


Language


Exit

Select


STBY

0:00:00[30 Min]


Settings


TV Display

English


Default Set

한국어

: 20%

Language

Français


Exit

Move

Select

Español _37

Page 47
Image 47
Samsung VP-DX200/EDC, VP-DX205/EDC manual Ajuste sencillo del reloj por diferencia horaria, Selección del idioma de la OSD

VP-DX200/EDC, VP-DX205/EDC specifications

The Samsung VP-DX205/EDC and VP-DX200/EDC are compact camcorders that represent the convergence of convenience, advanced technology, and user-friendly features. These devices cater to both novice videographers and enthusiasts, providing an exceptional recording experience.

One of the standout features of the VP-DX205/EDC and VP-DX200/EDC is their capability to record in high-resolution formats. With a 680,000-pixel sensor, these camcorders ensure crystal-clear video quality, allowing users to capture vivid details in their recordings. Coupled with Samsung's advanced image stabilization technology, users can achieve steady shots, minimizing the effects of handshakes during filming.

The VP-DX205/EDC comes equipped with a powerful 34x optical zoom lens, offering versatility for capturing subjects at various distances. Whether it’s a wide-angle landscape shot or close-up details of a sporting event, this zoom capability ensures that every scene can be captured with precision. The VP-DX200/EDC also boasts impressive shooting capabilities, although with slightly different specifications that place it as a value option in the lineup.

Another notable feature is the dual recording functionality that allows users to capture videos and still images simultaneously. This feature is particularly advantageous for those wishing to document events without the need for separate equipment.

Convenience is a hallmark of these Samsung camcorders, underscored by their intuitive interface and design. The large 2.7-inch LCD screen provides clear playback and easy navigation through menus, making it simple to adjust settings or review recordings. Furthermore, the camcorders offer a slew of preset recording modes tailored to different environments and subjects, promoting a straightforward filming experience.

In terms of connectivity, both models include USB ports for easy file transfer and sharing of content on various platforms. They support SD memory cards, which allows for expandable storage, ensuring users never run out of space during important captures.

Overall, the Samsung VP-DX205/EDC and VP-DX200/EDC stand out in the digital camcorder market with their excellent recording capabilities, user-friendly design, and practical features. Whether for everyday use or special occasions, these camcorders cater to a wide range of videography needs, making them a solid choice for anyone looking to document life’s moments.