H9680UD_EN/SP.qx3 04.8.10 4:26 PM Page 11

VCR Functions

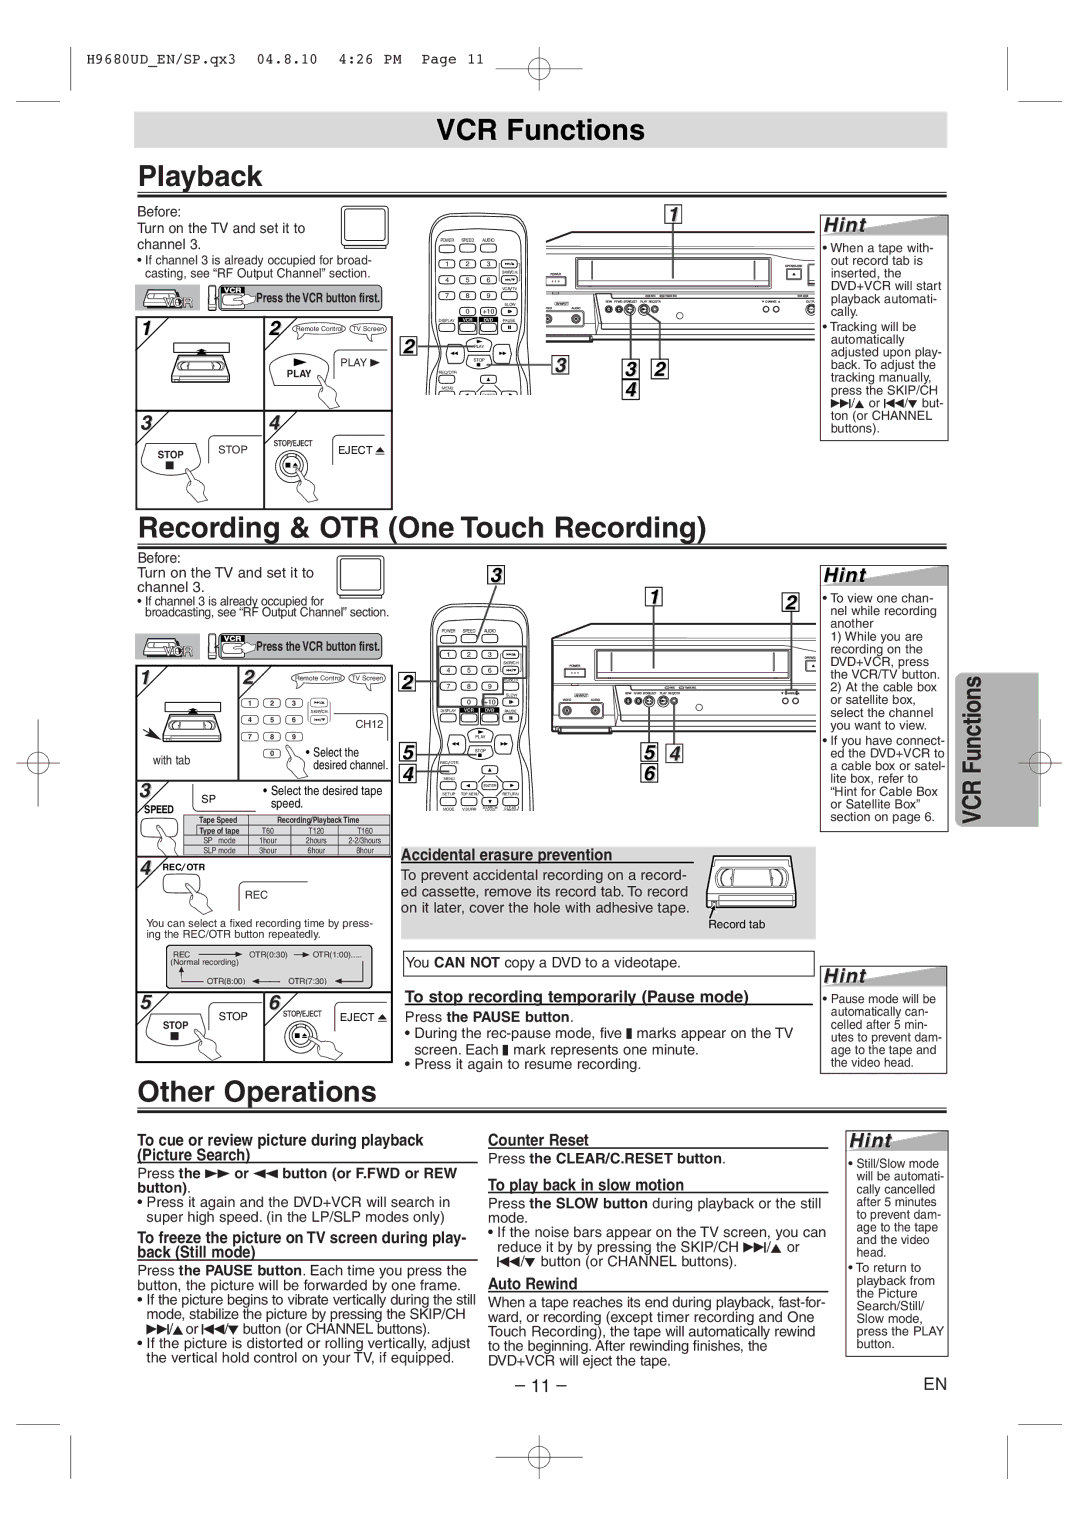
Playback

Before:

Turn on the TV and set it to channel 3.

1

POWER SPEED AUDIO

Hint

• When a tape with-

If channel 3 is already occupied for broad- casting, see “RF Output Channel” section.


VCR

Press the VCR button first.

VCR


1


2

Remote Control TV Screen


PLAY B


PLAY

3


4


STOP

STOP/EJECT

STOP


EJECT A


2

1

2

3


SKIP CH.

POWER

4

5

6


VCR TV


7

8

9


SLOW

AV INPUT


0

+10

DEO


DISPLAY

VCR

DVD PAUSE


PLAY


STOP

3

REC OTR


MENU

ENTER

REC

TIMER REC

REW F.FWD STOP/EJECT PLAY REC/OTR

AUDIO

3 2

4

OPEN/CLOSE

VCR

CHANNEL

OUTPU

out record tab is

inserted, the

DVD+VCR will start

playback automati-

cally.

• Tracking will be

automatically

adjusted upon play-

back. To adjust the

tracking manually,

press the SKIP/CH

G/K or H/L but-

ton (or CHANNEL

buttons).

Recording & OTR (One Touch Recording)

Before:

Turn on the TV and set it to channel 3.

• If channel 3 is already occupied for broadcasting, see “RF Output Channel” section.


VCR

Press the VCR button first.


VCR


1

2


Remote Control

TV Screen


1

2

3


SKIP CH.


4

5

6

CH12


7

8

9


with tab

0

• Select the


desired channel.


3

SP

• Select the desired tape

SPEED

speed.


Tape Speed


Recording/Playback Time


Type of tape

T60

T120

T160


SP mode

1hour

2hours

2-2/3hours

2

5

4


3


1


POWER

SPEED

AUDIO


1

2

3


SKIP CH.


4

5

6

POWER


VCR TV


7

8

9


REC TIMER REC


SLOW

REW F.FWD STOP/EJECT PLAY REC/OTR


AV INPUT


0

+10

VIDEO

AUDIO


DISPLAY

VCR

DVD

PAUSE


PLAY


STOP


5 4

REC OTR


MENU


6


ENTER


SETUP

TOP MENU


RETURN


MODE

V.SURR

SEARCH

CLEAR


MODE

C RESET


2

OPEN/CL

CHANNEL

Hint

To view one chan- nel while recording another

1)While you are recording on the DVD+VCR, press the VCR/TV button.

2)At the cable box or satellite box, select the channel you want to view.

If you have connect- ed the DVD+VCR to a cable box or satel- lite box, refer to “Hint for Cable Box or Satellite Box” section on page 6.

VCR Functions

SLP mode

3hour

6hour

8hour

4 REC OTR

REC

You can select a fixed recording time by press- ing the REC/OTR button repeatedly.

REC

OTR(0:30)


OTR(1:00)

(Normal recording)


OTR(8:00)

OTR(7:30)


5

6


STOP

STOP/EJECT

EJECT A

STOP


Accidental erasure prevention

To prevent accidental recording on a record- ed cassette, remove its record tab. To record on it later, cover the hole with adhesive tape.

Record tab

You CAN NOT copy a DVD to a videotape.

To stop recording temporarily (Pause mode)

Press the PAUSE button.

During the rec-pause mode, five C marks appear on the TV screen. Each C mark represents one minute.

Press it again to resume recording.

Hint

Pause mode will be automatically can- celled after 5 min- utes to prevent dam- age to the tape and the video head.

Other Operations

To cue or review picture during playback (Picture Search)

Press the g or h button (or F.FWD or REW button).

Press it again and the DVD+VCR will search in super high speed. (in the LP/SLP modes only)

To freeze the picture on TV screen during play- back (Still mode)

Press the PAUSE button. Each time you press the button, the picture will be forwarded by one frame.

If the picture begins to vibrate vertically during the still mode, stabilize the picture by pressing the SKIP/CH G/K or H/L button (or CHANNEL buttons).

If the picture is distorted or rolling vertically, adjust the vertical hold control on your TV, if equipped.

Counter Reset

Press the CLEAR/C.RESET button.

To play back in slow motion

Press the SLOW button during playback or the still mode.

If the noise bars appear on the TV screen, you can reduce it by by pressing the SKIP/CH G/K or H/L button (or CHANNEL buttons).

Auto Rewind

When a tape reaches its end during playback, fast-for- ward, or recording (except timer recording and One Touch Recording), the tape will automatically rewind to the beginning. After rewinding finishes, the DVD+VCR will eject the tape.

Hint

Still/Slow mode will be automati- cally cancelled after 5 minutes to prevent dam- age to the tape and the video head.

To return to playback from the Picture Search/Still/ Slow mode, press the PLAY button.

– 11 –

EN

Page 11
Image 11
Sanyo DVW-7100a instruction manual VCR Functions Playback, Recording & OTR One Touch Recording, Other Operations

DVW-7100a specifications

The Sanyo DVW-7100A is a versatile and innovative digital video recorder designed to meet the demands of both professional and home users seeking high-quality video recording and playback capabilities. This device combines advanced features and technologies, making it a popular choice among videographers and enthusiasts alike.

One of the main highlights of the DVW-7100A is its capability to record in both standard and high-definition formats. This flexibility allows users to choose the resolution that best suits their needs, whether it's for professional projects or personal use. The recorder supports various video formats, ensuring compatibility with a wide range of playback devices and editing software.

Another standout feature is the Sanyo DVW-7100A's integrated high-quality audio recording system, which includes advanced noise reduction technology. This ensures that the audio captured during filming remains clear and crisp, essential for maintaining the quality of any video production. The device also supports multiple audio channels, providing users with options for enhanced sound mixing during the editing process.

The DVW-7100A incorporates advanced digital signal processing technologies to improve video quality. Its image stabilization feature helps minimize shakiness, allowing for smoother recording even in dynamic environments. This can be particularly beneficial for action-driven video content where camera movement is inevitable.

The user interface of the Sanyo DVW-7100A is designed for ease of use, featuring intuitive controls and a clear display. This makes it accessible to both novice and experienced users, who can quickly navigate through menus and settings to optimize their recording experience. Additionally, the device offers various preset modes for different shooting scenarios, further simplifying the process.

Portability is another key advantage of the DVW-7100A. With its lightweight design and compact size, this digital video recorder is easy to transport, making it ideal for on-the-go shooting. Whether users are capturing moments at events, filming projects outdoors, or conducting interviews, the DVW-7100A is equipped to handle a variety of situations.

In summary, the Sanyo DVW-7100A stands out in the competitive landscape of video recording devices. Its combination of high-definition recording, superior audio capabilities, advanced digital processing, user-friendly interface, and portable design make it a solid choice for anyone looking to create professional-quality video content. Whether for personal use or professional projects, this recorder is equipped to deliver exceptional results.