5Althoughthemotorisdesignedfor operationon the voltageandfrequencyspecifiedon motornameplate, normalloadswill be handledsafelyon voltagesnot morethan10%aboveorbelowthenameplatevoltage. Heavyloads,however,requirethatvoltageat motor terminalsbe not lessthanthe voltagespecifiedon
nameplate
6Mostmotortroublesmay be tracedto looseor incorrect connections,overloading,reducedinput voltage(whichresultswhensmallsizewiresareusedin the supplycircuit)or whenthe supplycircuit is extremelylong.Alwayscheckconnections,loadand
supply circuit when the motor fails to perform
satisfactorily Check wire sizes and lengths with the table in the next paragraph° Replace or repair damaged or worn cord immediately.
CONNECTING TO POWER SOURCE OUTLET
This saw must be grounded while in use to protect the operator from electrical shock
If power cord is worn or cut, or damaged in any way, have it replaced immediately
CAUTION: This saw is wired for operation on 240 volts only, Connect to a 15 ampere branch circuit protected by a 15 ampere time delay or circuit saver fuse or circuit breaker,
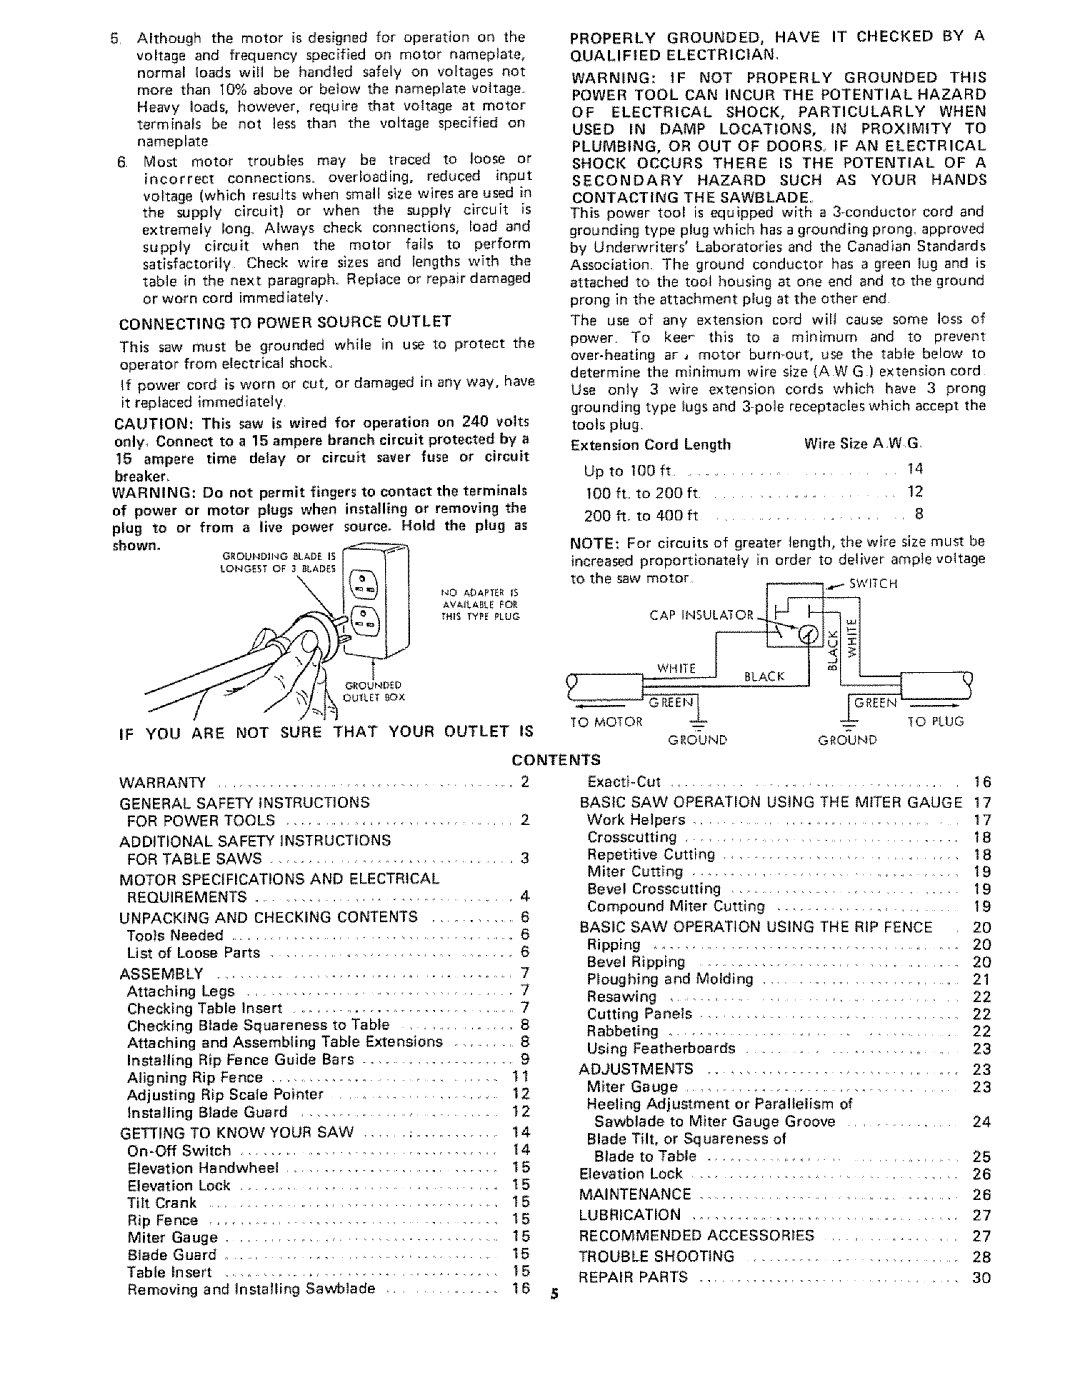
WARNING: Do not permit fingers to contact the terminals of power or motor plugs when installing or removing the plug to or from a live power source. Hold the plug as
shown.
O,OUND_NG_LADE_s
LONGEST OF 3 _LADES
t40 ADAPTER IS AVAILABLE FOR
THIS TYPE PLUG
GROUNDED
OUTLET _OX
PROPERLY | GROUNDED, | HAVE | IT | CHECKED |
| BY | A | ||
QUALIFIED | ELECTRICIAN. |
|
|
|
|
|
| ||
WARNING: | tF NOT PROPERLY | GROUNDED |
| THIS | |||||
POWER | TOOL CAN | INCUR | THE POTENTIAL | HAZARD | |||||
OF ELECTRICAL | SHOCK, | PARTICULARLY |
| WHEN | |||||
USED | IN | DAMP | LOCATIONS, | IN | PROXIMITY |
| TO | ||
PLUMBING, | OR OUT OF DOORS., IF AN ELECTRICAL |
| |||||||
SHOCK | OCCURS | THERE | IS THE | POTENTIAL |
| OF | A | ||
SECONDARY | HAZARD | SUCH | AS | YOUR |
| HANDS | |||
CONTACTING | THE | SAWBLADE. |
|
|
|
|
| ||
This power | tool | is | equipped | with | a 3_conductor | cord and | ||
grounding | type plug | which | has a grounding | prong, | approved | |||
by Underwriters' | Laboratories | and | the Canadian | Standards | ||||
Association | The | ground | conductor | has | a green | lug and is | ||
attached to the tool housing at one end and to the ground
prong | in | the | attachment | plug | at | the | other | end |
| |||||
The | use | of |
| any | extension | cord | will | cause some loss of | ||||||
power |
| To |
| kee_ | this | to | a | minimum |
| and to | prevent | |||
| ar, |
| motor | use the | table | below to | ||||||||
determine | the | minimum | wire | size | (A | W | G ) extension cord | |||||||
Use | only | 3 | wire | extension | cords | which | have | 3 prong | ||||||
grounding | type | tugs and | 3pole | receptacles | which accept the | |||||||||
tools | plug |
|
|
|
|
|
|
|
|
|
|
|
| |
Extension | Cord | Length |
|
| Wire | Size | AWG |
| ||||||
Up | to | 100 | ft |
|
|
|
|
| 14 |
| ||||
I00 | fL | to | 200 | ft |
|
|
|
| 12 |
| ||||
200 | ft. | to | 400 | ft | ................... |
|
|
|
| 8 |
| |||
NOTE: For circuits of greater length, the wire size must be
increased proportionately in order to deliver ample voltage
IF YOU ARE |
| NOT | SURE | THAT | YOUR OUTLET | IS |
|
|
| GROUND |
| G{_OUND |
| ||||||||||
|
|
|
|
|
|
|
|
|
|
|
|
|
|
|
|
|
| ||||||
|
|
|
|
|
|
|
|
|
|
|
| CONTENTS |
|
|
|
|
|
|
|
|
| ||
WARRANTY |
|
|
|
|
|
|
|
|
| 2 |
| .................................. |
|
|
|
| 16 | ||||||
GENERAL | SAFETY | INSTRUCTIONS |
|
| BASIC | SAW | OPERATION | USING | THE | MITER GAUGE | 17 | ||||||||||||
FOR | POWER | TOOLS | ................................... |
|
|
| 2 | Work | Helpers | ....................................... |
|
|
| 17 | |||||||||
ADDITIONAL | SAFETY | INSTRUCTIONS |
| Crosscutting |
|
| ................................... |
|
|
| 18 | ||||||||||||
FOR | TABLE SAWS |
|
|
|
|
|
| 3 | Repetitive |
| Cutting | ................................ |
|
| 18 | ||||||||
................................. |
|
|
|
|
|
|
|
|
|
|
|
|
|
| |||||||||
MOTOR | SPECIFICATIONS | AND | ELECTRICAL |
| Miter | Cutting | ...................................... |
|
|
| 19 | ||||||||||||
| Bevel | Crosscutting |
|
|
|
| 19 | ||||||||||||||||
REQUIREMENTS |
|
|
|
|
|
|
| 4 | ............................. |
|
| ||||||||||||
|
|
|
|
|
|
| Compound |
| Miter | Cutting |
|
|
| I9 | |||||||||
UNPACKING | AND | CHECKING | CONTENTS | 6 |
| .................... |
| ||||||||||||||||
BASIC | SAW | OPERATION | USING | THE | RIP FENCE | 20 | |||||||||||||||||
Tools Needed |
| ......................................... |
|
|
|
|
| 6 | |||||||||||||||
List | of | Loose | Parts |
|
|
|
|
|
| 6 | Ripping | .......................................... |
|
|
|
|
|
| 20 | ||||
|
|
|
|
|
| Bevel | Ripping |
|
|
|
| 20 | |||||||||||
ASSEMBLY |
|
|
|
|
|
|
|
|
| 7 |
|
|
| ||||||||||
....................................... |
|
|
|
|
|
|
| Ploughing |
| and Molding |
|
|
| 21 | |||||||||
Attaching | Legs |
|
|
|
|
|
|
| 7 |
|
|
|
| ||||||||||
.................................... |
|
|
|
|
| Resawing |
|
|
|
|
|
|
| 22 | |||||||||
Checking | Table | Insert |
|
|
|
|
| 7 |
| ................................ |
|
|
|
| |||||||||
................................ |
|
|
| Cutting | Panels |
|
|
|
|
| 22 | ||||||||||||
Checking | Blade | Squareness | to | Table | 8 | ................................. |
|
|
| ||||||||||||||
Rabbeting |
|
|
|
|
|
|
| 22 | |||||||||||||||
Attaching | and | Assembling |
| Table | Extensions | 8 |
| ................................. |
|
|
|
| |||||||||||
| Using | Featherboards |
|
|
| 23 | |||||||||||||||||
installing | Rip | Fence | Guide | Bars |
|
| 9 |
|
| ||||||||||||||
.................... | ADJUSTMENTS |
|
|
|
|
| 23 | ||||||||||||||||
Aligning |
| Rip | Fence |
|
|
|
|
| 11 |
| ................................. |
|
| ||||||||||
|
|
|
|
| Miter | Gauge |
|
|
|
|
| 23 | |||||||||||
Adjusting | Rip |
| Scale | Pointer |
|
|
| 12 | .................................. |
|
|
| |||||||||||
| ......................... |
| Heeling | Adjustment | or | Parallelism | of |
|
| ||||||||||||||
Installing | Blade | Guard |
|
|
|
| 12 |
|
| ||||||||||||||
|
|
| Sawblade |
| to | Miter Gauge Groove |
| 24 | |||||||||||||||
GETTING TO KNOW YOUR SAW |
|
| 14 |
| |||||||||||||||||||
.................. | Blade Tilt, | or | Squareness | of |
|
|
| ||||||||||||||||
Switch |
|
|
|
|
|
|
|
| 14 |
|
|
| |||||||||||
| ............................... |
|
|
|
|
| Blade | to |
| Table |
|
|
|
| 25 | ||||||||
Elevation | Handwheel |
|
|
|
|
| 1 5 |
| .................................. |
|
| ||||||||||||
............................. |
|
|
| Elevation | Lock |
|
|
|
|
| 26 | ||||||||||||
Elevation | Lock |
|
|
|
|
|
|
| 15 | ................................. |
|
|
| ||||||||||
................................... |
|
|
|
|
| MAINTENANCE |
|
|
|
|
| 26 | |||||||||||
Tilt | Crank |
|
|
|
|
|
|
|
|
| 15 |
|
|
|
|
| |||||||
...................................... |
|
|
|
|
|
|
| LUBRICATION |
|
|
|
|
| 27 | |||||||||
Rip | Fence |
|
|
|
|
|
|
|
|
|
| ........................................ |
|
|
| ||||||||
|
|
|
|
|
|
|
|
|
|
|
|
|
|
|
|
|
|
|
| ||||
Miter | Gauge | .................................... |
|
|
|
|
|
| 15 | RECOMMENDED |
| ACCESSORIES | ............... | 27 | |||||||||
Blade | Guard |
| ..................................... |
|
|
|
|
| I 5 | TROUBLE | SHOOTING |
|
| 28 | |||||||||
Table | Insert | ...................................... |
|
|
|
|
|
| 15 | REPAIR | PARTS |
|
|
|
|
| 30 | ||||||
|
|
|
|
|
|
|
|
|
|
|
|
| ............................ |
|
|
| |||||||
Removing | and | Installing | Sawblade | .............. | 1 6 |
|
|
|
|
|
|
|
|
|
| ||||||||