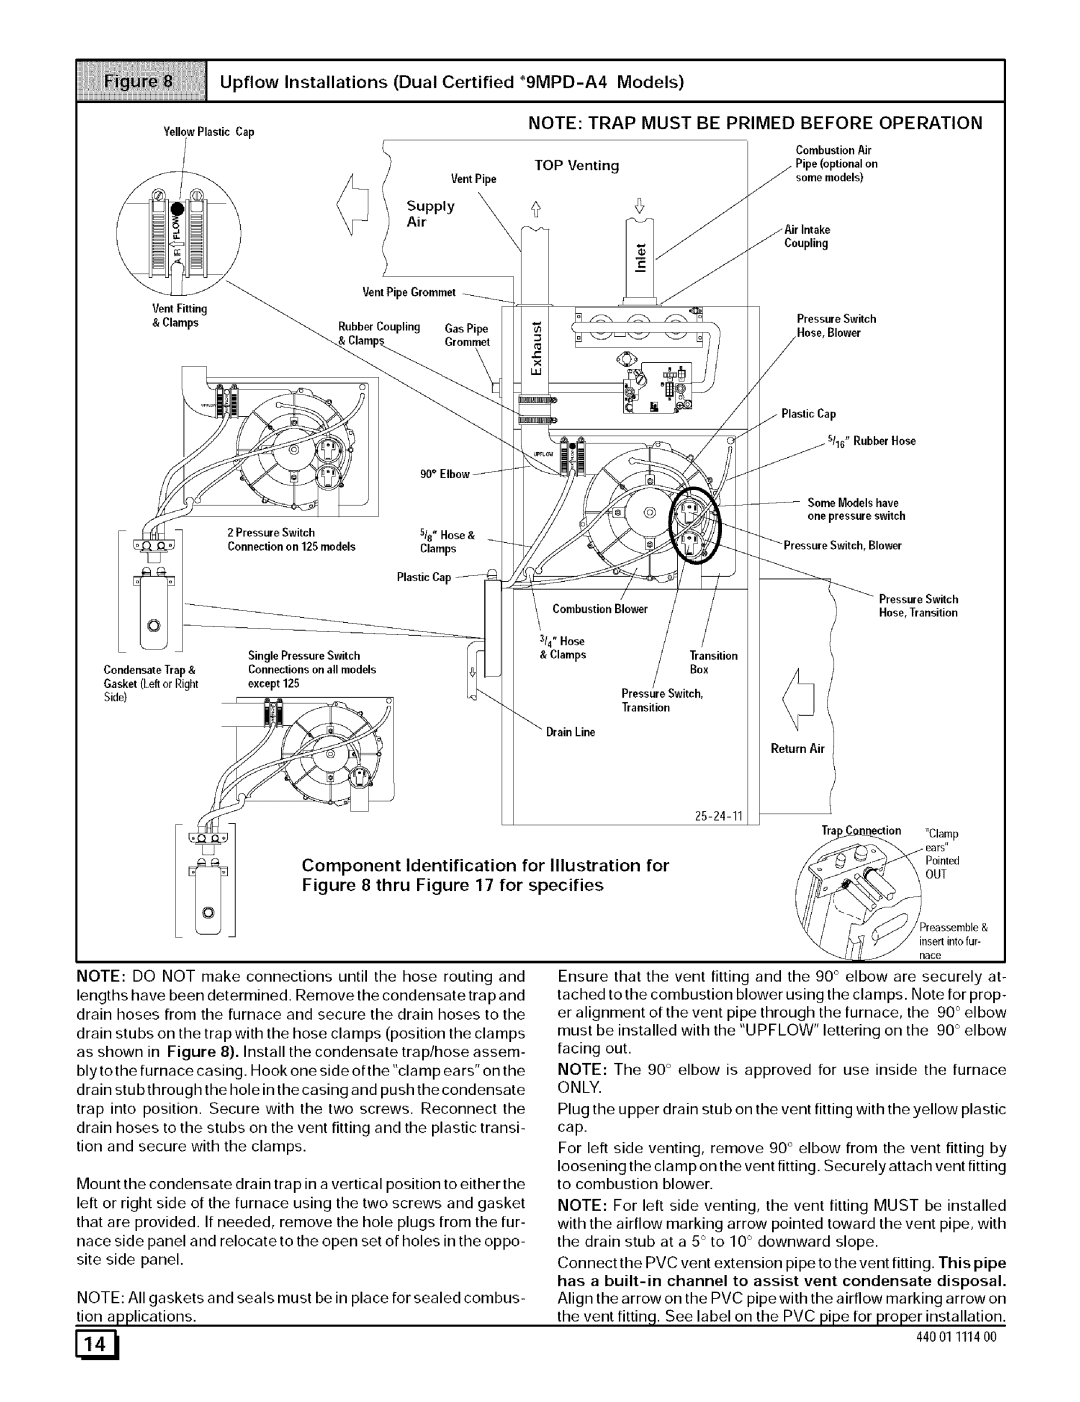
Upflow Installations (Dual Certified *9MPD-A4 Models)

YellowPlasticCap

NOTE: TRAP MUST BE PRIMED BEFORE OPERATION


Combustion

Air


TOP Venting

Pipe

(optional

on


Vent Pipe


some

models)


Air


_

_


Supply


Coupling


Vent P )e Grommet


Pressure Switch

Rubber Coupling

Gas

Pipe


Hose,

Blower


Grommet


/

Plastic Cap


Rubber Hose

Some Models have one pressure switch

Sls"Hose&

Clamps

Plastic Cap

Blower

Pressure Switch

Hose, Transition


SinglePressureSwitch

CondensateTrap &

Connectionsonallmodels

Gasket (Leftor Right

except125

Side)


DrainLine

Transition

Box

Switch,

Return Air

Transition

25-24-11

_n"Clamp

ears"

Poin,ed

_

Figure

8 thru

Figure

17 for

specifies

for

Component

Identification

for Illustration

NOTE: DO NOT make connections until the hose routing and

lengths have been determined. Remove the condensate trap and drain hoses from the furnace and secure the drain hoses to the

drain stubs on the trap with the hose clamps (position the clamps as shown in Figure 8). Install the condensate trap/hose assem-

blyto the furnace casing. Hook one side ofthe"clamp ears" on the drain stub through the hole in the casing and push the condensate trap into position. Secure with the two screws. Reconnect the drain hoses to the stubs on the vent fitting and the plastic transi- tion and secure with the clamps.

Mount the condensate drain trap in a vertical position to either the left or right side of the furnace using the two screws and gasket that are provided. If needed, remove the hole plugs from the fur- nace side panel and relocate to the open set of holes in the oppo- site side panel.

NOTE: All gaskets and seals must be in place for sealed combus- tion applications.

/

_

(_///Preassemble

&

_.

/_/

y/

inseri into

fur-


nace


Ensure that the vent fitting and the 90 ° elbow are securely at-

tached

to the

combustion


blower using the clamps. Note for prop-

er alignment

of

the vent

pipe through

the furnace,

the 90 ° elbow

must

be installed

with the

"UPFLOW"

lettering

on

the

90 ° elbow

facing

out.


NOTE:

The

90 ° elbow

is

approved

for use

inside

the furnace

ONLY.


Plug the upper drain stub on the vent fitting with the yellow plastic cap.

For left side venting, remove 90 ° elbow from the vent fitting by loosening the clamp on the vent fitting. Securely attach vent fitting

to combustion blower.

NOTE: For left side venting, the vent fitting MUST be installed with the airflow marking arrow pointed toward the vent pipe, with the drain stub at a 5 ° to 10 ° downward slope.

Connect the PVC vent extension pipe to the vent fitting. This pipe

has a built-in channel to assist vent condensate disposal. Align the arrow on the PVC pipe with the airflow marking arrow on

the ventfittin . See label on the PVC i efor ro erinstallation. 44001 111400

Page 14
Image 14
Sears N9MP2, N9MP1 manual Upflow Installations Dual Certified *9MPD-A4 Models, YellowPlasticCap, DrainLine, Transition

9MPD, N9MP1, N9MP2 specifications

The Sears N9MP2, N9MP1, and 9MPD are prominent models in the realm of residential heating systems, specifically designed to provide efficient and effective heating solutions. These models are part of Sears' commitment to quality and innovation, making them a popular choice among homeowners seeking reliability and performance.

The N9MP2 is a high-efficiency multi-speed gas furnace that boasts an impressive AFUE (Annual Fuel Utilization Efficiency) rating. This feature allows the furnace to convert a significant portion of fuel into usable heat, which effectively translates to lower energy bills for homeowners. The unit is equipped with a two-stage gas valve that provides increased comfort by adjusting the heating output based on demand, ensuring an even temperature throughout the home.

The N9MP1, like its counterpart, is known for its reliability and efficiency. It offers a single-stage operation that is ideal for homes needing consistent heating without the necessity for the more complex stages present in two-stage systems. This model also has a good AFUE rating, making it a cost-effective solution for families looking to reduce their heating expenses. Its design is tailored for easy installation and maintenance, allowing homeowners to keep their heating systems running at optimal performance without hassle.

The 9MPD model takes a step further with its advanced technology integration. It features a sophisticated control board that allows for easier diagnostics and enhanced system management. The 9MPD is also designed with quiet operation in mind, employing advanced sound-reduction technologies to minimize noise levels during heating cycles. Homeowners will appreciate the peace and quiet it brings, particularly in shared living spaces.

All three models are equipped with high-quality insulation and specialized heat exchangers that enhance their thermal efficiency. Additionally, they are designed with safety features such as automatic shut-off systems and robust flame rollout protection, ensuring a safe heating experience.

In terms of characteristics, these models are generally constructed with durable materials, designed to endure harsh weather conditions while providing consistent heating. They can be connected to various home automation systems, which adds to their appeal for tech-savvy consumers.

In conclusion, the Sears N9MP2, N9MP1, and 9MPD represent a comprehensive lineup of reliable, efficient, and technologically advanced heating systems suitable for contemporary homes. Their dedication to performance ensures that homeowners enjoy a warm and energy-efficient environment throughout the chilly seasons.