LC-46GD7X LC-52GD7X
Contents
Dear Sharp customer
Contents
Trademarks
Important Safety Precautions
Precautions when transporting the TV
Supplied accessories
Using the remote control unit
Preparation
Inserting the batteries
Removing the terminal cover
Setting the TV
Preparation
Bundling the cables and closing the terminal cover
Removing the stand
Setting the TV on the wall
Using an optional bracket to mount the TV
Before attaching/detaching the stand
Fixing the TV to the table
Protection against overturning
Anchoring the TV to the wall or a pillar
View from the top
Basic connection
Connecting to an antenna
Connecting to the AC outlet
Simple operations for watching a TV programme
Game console Camcorder
Connecting a VCR, game console or camcorder
Connecting a DVD player
DVD player
When using DVI cable commercially available
Preparation Connecting a Digital TV STB Set Top Box
Connecting a PC
Digital TV STB
TV Front
Volume display when headphones are plugged
Part names
Regarding the headphone jack
TV Rear
Part names
Remote control unit
FAV
Watching TV
Turning on the power
Turning off the power
Simple button operations for changing channels
Using Flashback a on the remote control unit
Using MPX on the remote control unit
Watching TV
Changing the volume
Simple button operation for changing volume/sound
Sleep timer
Using Mute e on the remote control unit
When you watch the TV for the first time
ANALOG/DTV/RADIO buttons
Analogue TV
On-Screen Display
Basic adjustment settings
Menu operation buttons
Example
List of menu items to help you with operations
Basic adjustment settings
Menu items TV/DTV/INPUT1-3 Menu items HDMI/DVI
Pages
Auto installation Programme setup
Basic adjustment settings Analogue
Auto search
Fine tuning
Search tuning
Programme Setup Manual Adjust menu
Colour system See
Colour system
Press a/bto select Colour sys., and then press Enter
Colour system menu
Skip menu
Setting the child lock
Skipping channels
Sort menus
Basic adjustment settings Analogue Erase Programme
Erase programme menus
AV Mode selection
OPC Optical Picture Control setting
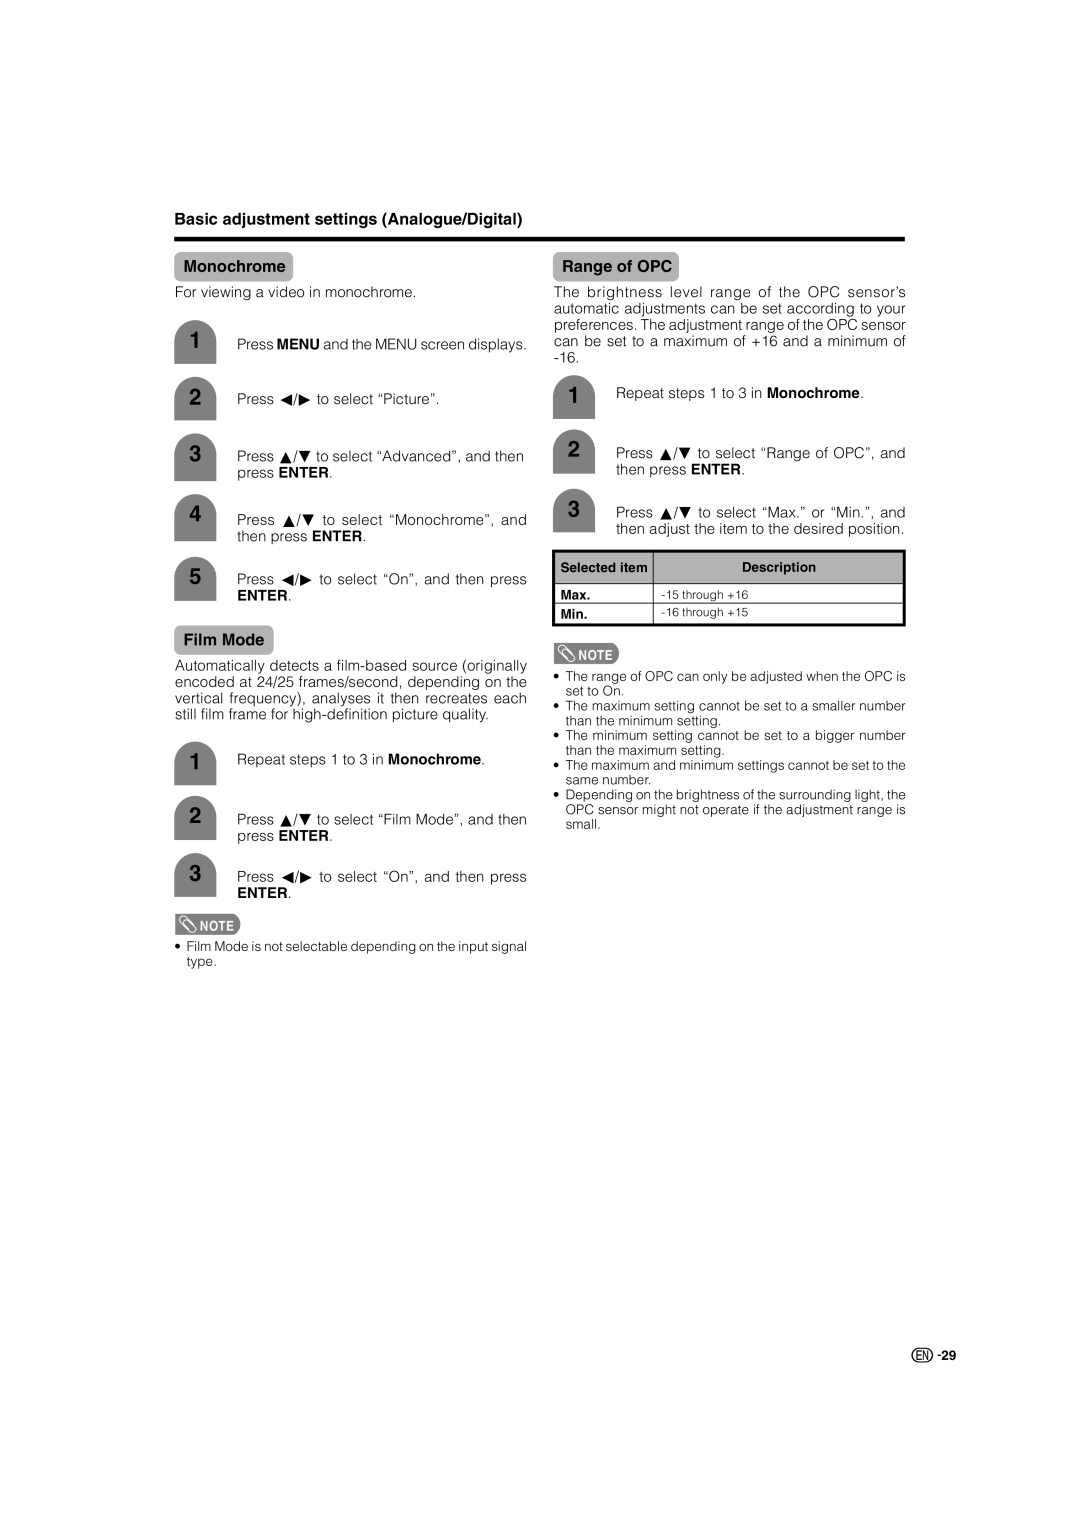
Basic adjustment settings Analogue/Digital
Picture adjustments
Adjustments items
Black
Colour temperature Quick Shoot
Advanced
3D-Y/C
Basic adjustment settings Analogue/Digital Monochrome
Film Mode
Range of OPC
Using Surround on the menu screen
Audio adjustment
Using Surround on the remote control unit
Press Surround to switch the Surround function on and off
No Signal Off
Power Control
Power control setting allows you to save energy
No Operation Off
Selecting DTV mode
Basic adjustment settings Digital
DTV input mode menu items
List of DTV menu items to help you with operations
Programme Guide Favourite Programme List
Info
Press c/d to select Lock or Fav, and then press Enter
Press a/bto select your desired rating, and then press Enter
Installation
Auto search starts
Press a/bto select Start Scan, and then press Enter
Press a/b to select Quick Search, and then press Enter
Press a/bto select your desired item, and then press Enter
Digital Output
Time Setup
Using Digital Audio Output
Multilingual
Information
Plate Setup Information Plate Setup
Update Service only
Press a/bto select Information, and then press Enter
Resetting the password
Useful adjustment settings
Password setting for child lock for TV/DTV input mode
Setting a password
Connecting speaker cables
Useful adjustment settings
Connecting external speakers
External Audio Bypass
INPUT5 or INPUT6 you wish to Skip, Then press Enter
Input Signal PC input mode only
Input Skip
Press Menu to exit
Press c/dto adjust the item to your
Auto Sync. adjustment PC input mode only
Fine Sync. adjustment PC input mode only
Desired position
Image position
Adjustments are stored separately according to input source
Input Label
Repeat until the name is fully spelt out
Picture aspect ratio
Wide Screen Signalling WSS
WSS signal 43 screen Mode Panorama Mode Normal
Press c/dto select On or Off, and then press Enter
Selected item Description Mode1
Standby Mode
Reset
Mode2
Wide mode for TV/AV input mode
Manual Selection
Auto Selection
Normal Cinema Full Dot by Dot
Wide mode for PC input mode
Input Signal
Full Dot by Dot
DNR Digital Noise Reduction
Hdmi Setup
Audio Only
Press a/bto select the desired item, and then press Enter
Language setting for on-screen display
Colour system setting
Identification
Using external equipment
Input Select
Press Freeze again to cancel the function
Useful features
Teletext language setting
Freezing images
Teletext function
Time display
Useful features Displaying Subtitle
Displaying Subpages
Subpage screen
Problem Possible Solution
Troubleshooting
Troubleshooting DTV
Appendix
PC Control of the TV
RS-232C port specifications
Appendix
Communication conditions
PC compatibility chart
Commands
Response code format
Model
Specifications
Optional accessories
Part name Model number
Removing the speakers
Before attaching/detaching the speakers
Unit’s speakers can be attached and removed
Dimensional drawings
LC-46GD7X, LC-52GD7X
Clearing the Password
1300 135
Do not Return this Document to Sharp