(Continued)

Before setting the timer, make sure that the clock setting is correct. (Page 9)

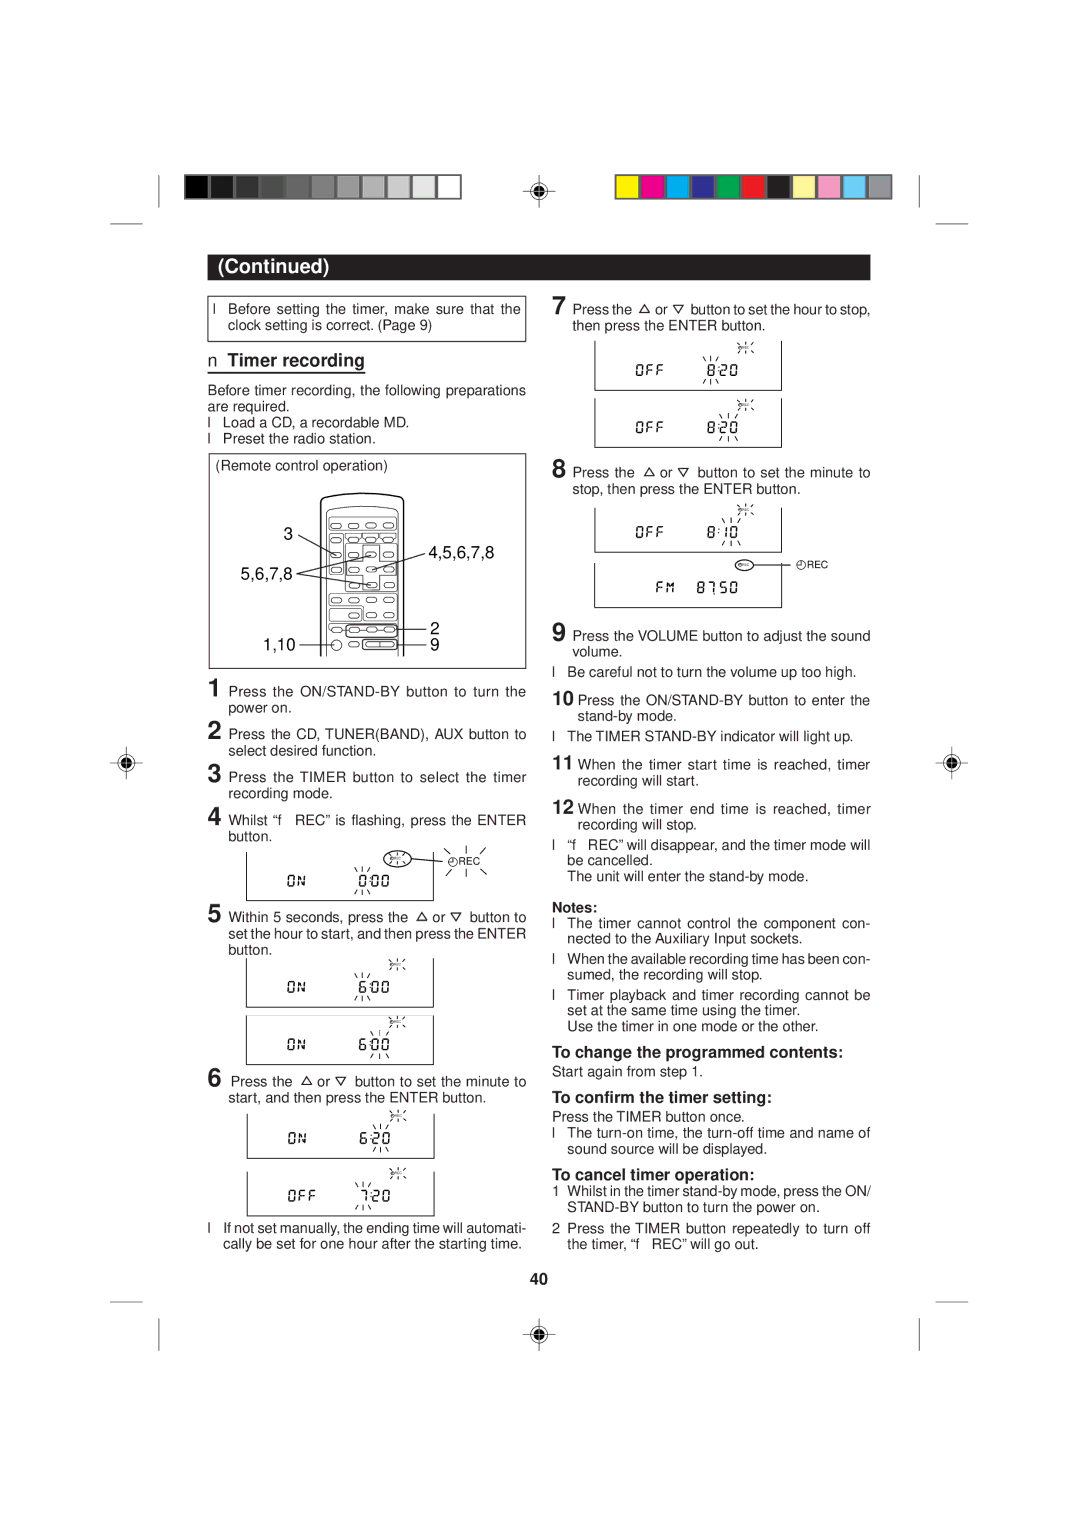
Timer recording

Before timer recording, the following preparations are required.

Load a CD, a recordable MD.

Preset the radio station.

(Remote control operation)

3

4,5,6,7,8

5,6,7,8


2

1,10

9

1 Press the ON/STAND-BY button to turn the power on.

2 Press the CD, TUNER(BAND), AUX button to select desired function.

3 Press the TIMER button to select the timer recording mode.

4 Whilst “f REC” is flashing, press the ENTER button.

REC

REC


DISC TOC


TRACK


MEMORY


RANDOM

REC

TOTAL

REMAIN

SLEEP

5 Within 5 seconds, press the or button to set the hour to start, and then press the ENTER button.

REC

REC

6 Press the or button to set the minute to start, and then press the ENTER button.

REC

REC

If not set manually, the ending time will automati- cally be set for one hour after the starting time.

7 Press the or button to set the hour to stop, then press the ENTER button.


REC

DISC TOC


TRACK


MEMORY


RANDOM

REC

TOTAL

REMAIN

SLEEP


REC

DISC TOC


TRACK


MEMORY


RANDOM

REC

TOTAL

REMAIN

SLEEP

8 Press the or button to set the minute to stop, then press the ENTER button.


REC

DISC TOC


TRACK


MEMORY


RANDOM

REC

TOTAL

REMAIN

SLEEP


REC REC

9 Press the VOLUME button to adjust the sound volume.

Be careful not to turn the volume up too high.

10 Press the ON/STAND-BY button to enter the stand-by mode.

The TIMER STAND-BY indicator will light up.

11 When the timer start time is reached, timer recording will start.

12 When the timer end time is reached, timer recording will stop.

f REC” will disappear, and the timer mode will be cancelled.

The unit will enter the stand-by mode.

Notes:

The timer cannot control the component con- nected to the Auxiliary Input sockets.

When the available recording time has been con- sumed, the recording will stop.

Timer playback and timer recording cannot be set at the same time using the timer.

Use the timer in one mode or the other.

To change the programmed contents:

Start again from step 1.

To confirm the timer setting:

Press the TIMER button once.

The turn-on time, the turn-off time and name of sound source will be displayed.

To cancel timer operation:

1Whilst in the timer stand-by mode, press the ON/ STAND-BY button to turn the power on.

2Press the TIMER button repeatedly to turn off the timer, “f REC” will go out.

40

Page 41
Image 41
Sharp MD-M2H operation manual Timer recording

MD-M2H specifications

The Sharp MD-M2H is a versatile portable MiniDisc recorder that gained popularity for its compact design and advanced features, catering to music lovers and professionals alike. One of the standout features of the MD-M2H is its ability to record audio in high-quality formats, offering both stereo and mono options. This flexibility appeals to various users, including musicians, journalists, and audiophiles seeking pristine sound quality.

Equipped with a digital input, the MD-M2H allows users to connect directly to other digital devices, ensuring minimal loss of audio quality during transfers. The device also supports a unique ATRAC (Adaptive Transform Acoustic Coding) compression algorithm, which maintains the integrity of the original recording while significantly reducing file sizes. This technology enables longer recording times on a single MiniDisc, making it ideal for extended sessions.

Another important aspect of the MD-M2H is its user-friendly interface. The device features an intuitive control layout that facilitates easy navigation through its various functions. With an LCD display, users can easily monitor battery life, recording time, and other essential information at a glance. The inclusion of external microphone inputs adds to its adaptability, allowing for enhanced audio capture in diverse environments.

The Sharp MD-M2H is powered by rechargeable batteries, appealing to environmentally conscious users while providing the convenience of extended playback and recording times. Its compact and lightweight design, combined with a robust build, makes it perfect for on-the-go recording, whether that’s in the studio, at concerts, or while traveling.

In summary, the Sharp MD-M2H stands out for its high-quality audio recording capabilities, user-friendly design, and advanced compression technology. Its adaptability makes it a valuable tool for a wide range of applications. Whether for personal use or professional purposes, the MD-M2H continues to impress with its performance and reliability, cementing its place in the world of portable audio recording.