Model No Serial No
VL-WD250U
Applies to the supplied AC adapter
Thank you for purchasing this camcorder from Sharp
Sharp Camcorder
Specifications are subject to change without notice
Should never be blocked by placing
Iii
Page
Inserting a Mini DV Cassette
Charging the Battery Pack
Attaching the Battery Pack
To stop playback
Easy Camera Recording
Tape Playback
Zooming
Vii
Supplied Accessories
Viii
Optional Accessories
Do not aim the lens at the sun
Precautions
PCM digital recording
High horizontal resolution
DV Technology
DV and conventional video cassette tapes
Contents
Xii
Advanced Features
Appendix
Remote sensor p
Part Names
Operation
References
Operation References
Pp , 56
Jack cover pp , 58
Quick Reference List
On-screen Display Index
Camera mode
Easy mode p
VCR mode
AS S E T T E
Preparationreparation
Extending battery pack life
Removing the Battery Pack
Attaching and Removing the Battery Pack
Attaching the Battery Pack
Removing the DC cable from the camcorder
Powering the Camcorder from an AC Outlet
Preparation
Perform above, then take out the cassette
Inserting and Removing a Mini DV Cassette
Inserting a Cassette
Removing a Cassette
Removing the lithium battery
Installing the Lithium Memory Battery
Installing the Lithium Battery
Changing the Language
Setting the Language
Selecting the Language for
On-screen Display
0 0 AM
Setting the Date and Time
T T I NG
Press dor yto select 24H, and then press e
Changing to the 24-hour Time Mode
Displaying the Date and Time of Recording
S P L AY
Open the hand strap flap 1 and the grip strap
Adjusting the Hand Strap
Using the Lens Cap
Attaching the Shoulder Strap
Closing the viewfinder
Using the Viewfinder
Adjusting the Diopter
Closing the LCD monitor
Using the LCD Monitor
Maximum continuous recording and actual recording times
Easy Camera Recording in Full Auto Mode
To turn the power off
To pause recording
Basic Operations Camera Recording
Remaining Recording Time Display
Remaining Battery Power Display
To stop playback
Volume Control
Playback
Watching the Playback in the Viewfinder
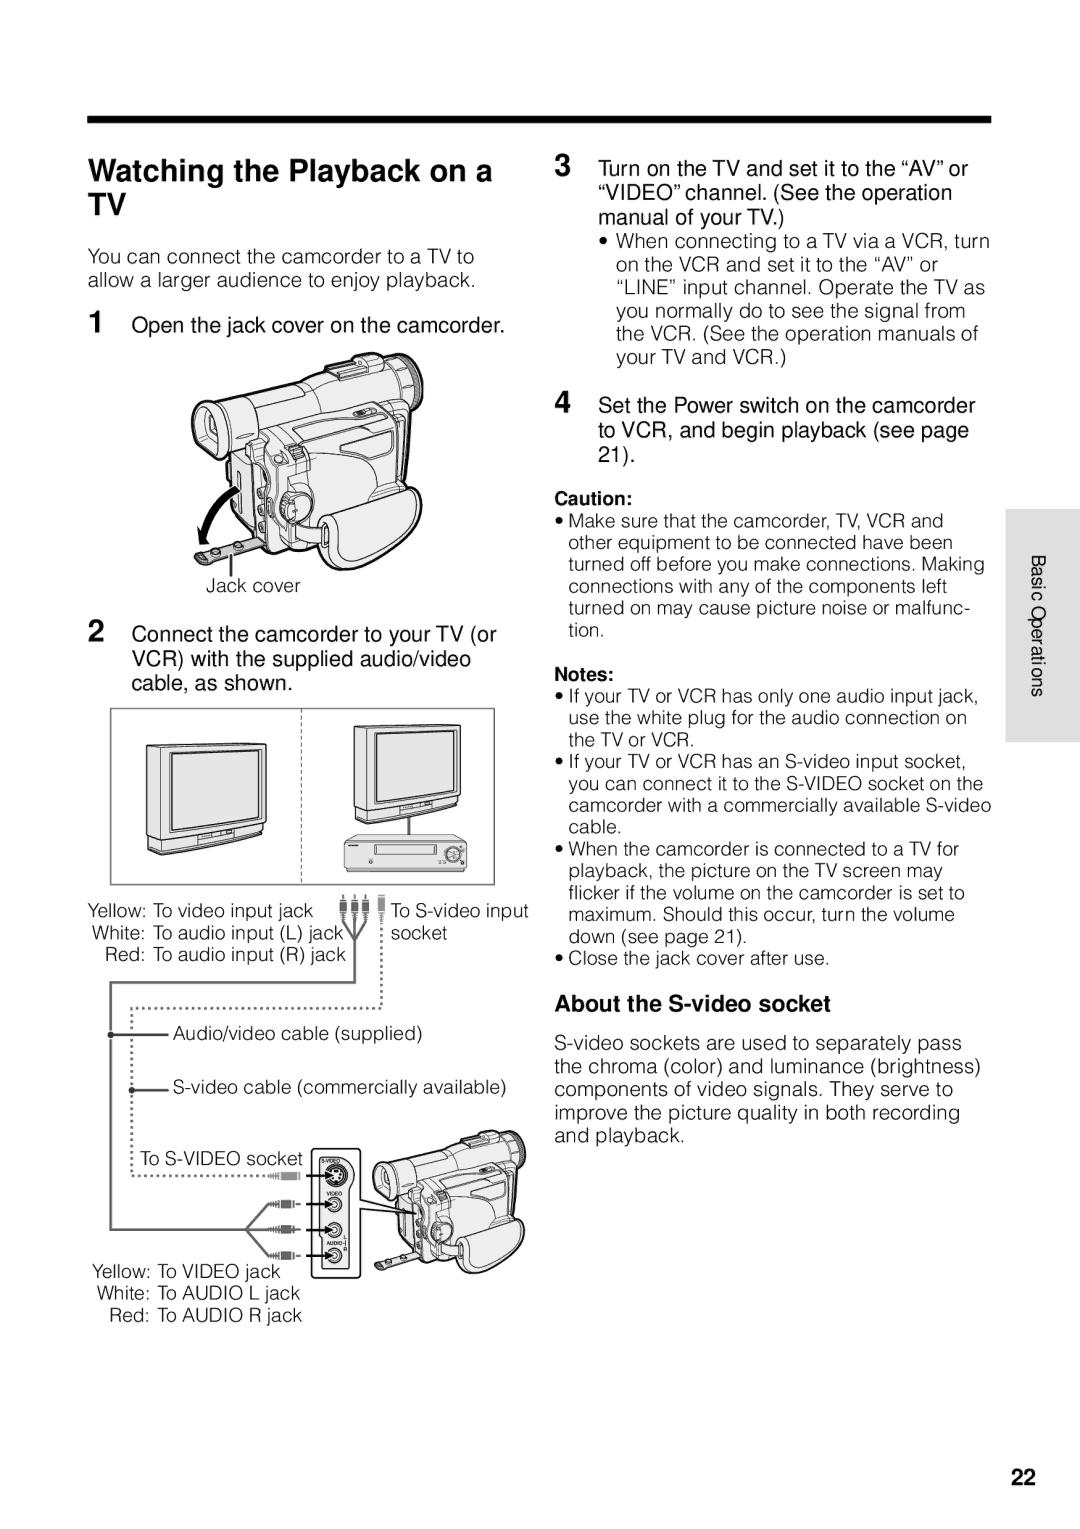
About the S-video socket
Watching the Playback on a
Basic Operations Playback
Video Search
Still
Operation button
Using the Controls
Power switch
MENU/DISPLAY button
To select Easy mode, hold down
Selecting the User Mode
Useful Features
User mode
Desired menu item, then press r
Using the Menu Screens
To turn off the menu screen
Press d or y 1 to select
Recording in LP Long Play
Recording Mode
Features Amera Recording
To return to SP mode
Turning Off the DIS Function
To return to 12-bit audio recording mode
To return to DIS mode
To use optical zoom only
Setting the Digital Zoom
Useful Features Camera Recording
To obtain a brighter picture
To cancel Gamma Brightness Compensation
Gamma Brightness Compensation
Camera mode, press the Gamma Brighter button once
To cancel the gain-up function
Gain-up
Night Recording Cat’s Eye
To cancel Night Recording
Adeon
Using Fade Mode
Setting Fade Mode
Fade In and Fade Out
QK. RE T URN S E a RCH
Quick Return
Edit Search
Still Recording
Selecting Still Recording Mode
Using Still Recording
To cancel the still image
Still Recording Effect Photo Shot
Using Photo Shot mode
Setting a still recording effect
To cancel still recording effect
Macro Shots
Auto Focus Using the Remote Control
Installing the Batteries in the Remote Control
Turning on the Remote Control Mode
Press d or y to select ON, then press e
Operating the Remote Control
Remo T E on
Subject is displayed
Set the Power switch to Camera
Letting the Subject Monitor
Shot
Slow
Playback Functions with the Remote Control
Frame Advance
Reverse Playback
Displaying the time code on a TV during playback
Using the Time Code
Useful Features Playback
OU T
After performing above, select AUTO, then press e
To cancel Manual Exposure mode
Press e to display the exposure setting screen
Manual Exposure
Manual Focus
Advanced Features Camera Recording
Press e to display the focus setting screen
Press e
To cancel Manual Focus mode
Press d or y 1 to focus on the subject, then press e
To return to Auto Shutter Speed mode
Setting the Shutter Speed
Recommended Shutter Speeds
Tips on Using the Manual Shutter Speed
White Balance Lock
To cancel White Balance Lock
SC E NE Menu Sport
Type of Scene Settings
To cancel the scene setting
Scene Menu Program AE
Digital Picture Effects
Setting the Confirmation Sounds
Type of Confirmation Sound Settings
To cancel the digital picture effect
Mounting the Zoom Microphone
Using the Zoom Microphone
Selecting Zoom Microphone Mode
OOM M I C AUT O
Press the Zoom W button to zoom out to the widest angle
To cancel Playback Zoom
Playback Zoom
Gamma Playback
To cancel Gamma Playback
PB E F F E C T WI PE
Advanced Features Playback
Using Playback Effect
Playback Effects
Type of Picture Effects
To cancel Picture Effect Playback
Picture Effect Playback
Picture/Backlight
Adjustments
Adjusting the Backlight
Adjusting the Picture
To stop editing
Editing
Cutting Unwanted Sequences
Press d on the Operation button
Recording from an External Source
To Record from an External Source
To stop recording
To Record to Video Equipment
Editing with the DV Terminal IEEE1394
To Record from Video Equipment
Audio Recording
Audio Dubbing Feature
Normal recording mode
Audio Dubbing mode
Press e to begin audio dubbing. Record your narration
Audio Dubbing
To pause audio dubbing
To quit audio dubbing
Audio
Mode
AUD I O
Audio 1+2
System Requirements
Configuring Software for PC Connection
Installing the Software
Connecting the camcorder to a Personal Computer
Select your print settings, then click OK
Using the Software
Installing Adobe Acrobat Reader
Lighting
Use a wide-angle setting for fast-moving subjects
Useful Information
Hints for Better Shooting
To protect recordings against acciden
Precautions when using a Mini DV Cassette
Appendix Mini DV Cassette
Copyright Protection
Use
Battery Pack
This camcorder uses a lithium-ion type battery pack
Charging
Dew Formation
AC Adapter/Battery Charger
Appendix
Replacing the Fluorescent Lamp
Remove the cleaning tape To cancel cleaning, press e
Using a Cleaning Tape Commer- cially Available
Cleaning
Using Your Camcorder Abroad
EMO MOD E on
Demonstration Mode
Demo Mode of F
Canceling Demo Mode
Symptom Possible cause Suggested solution
Before Requesting Service
Properly pp
Service Information For the U.S
Specifications
Inserción de un minivideocasete DV
Carga de la batería
Colocación de la batería
Para detener la reproducció n
Grabació n fá cil con la videocá mara
Empleo del zoom
Reproducció n de cinta
Modo VCR
Modo Camera
Modo fá cil FÁ CIL
Mode VCR
Mode Camera
Mode facile Facile
Page
Page
Osaka, Japan 0P11-M-G
Valid for warranty service in the U.S. only
Where to Obtain Service What to do to Obtain Service