SETTING THE INPUT
INPUT |
|
|
| VID 1 CFG | |
|
|
| |||
|
|
|
| VID 2 | CFG |
|
|
|
| ||
|
|
|
| VID 3 | CFG |
|
|
|
| ||
|
|
|
| CD CFG | |
|
|
|
| ||
|
|
|
| TAPE | CFG |
|
|
|
| ||
|
|
|
| AUX | CFG |
|
|
|
| ||
|
|
|
| TUNE CFG | |
|
|
|
| ||
|
|
|
| RETURN | |
|
|
|
| ||
D. IN | : OPT 1 / OPT 2 / COX 1 / COX 2 / ANL |
V. MODE : AT / CPS / SVD / CPN | |
AUTO | : OFF / ON |
REMST : OFF / ON | |
SYNC | : 0 / 0~200 |
RETURN
ENGLISH
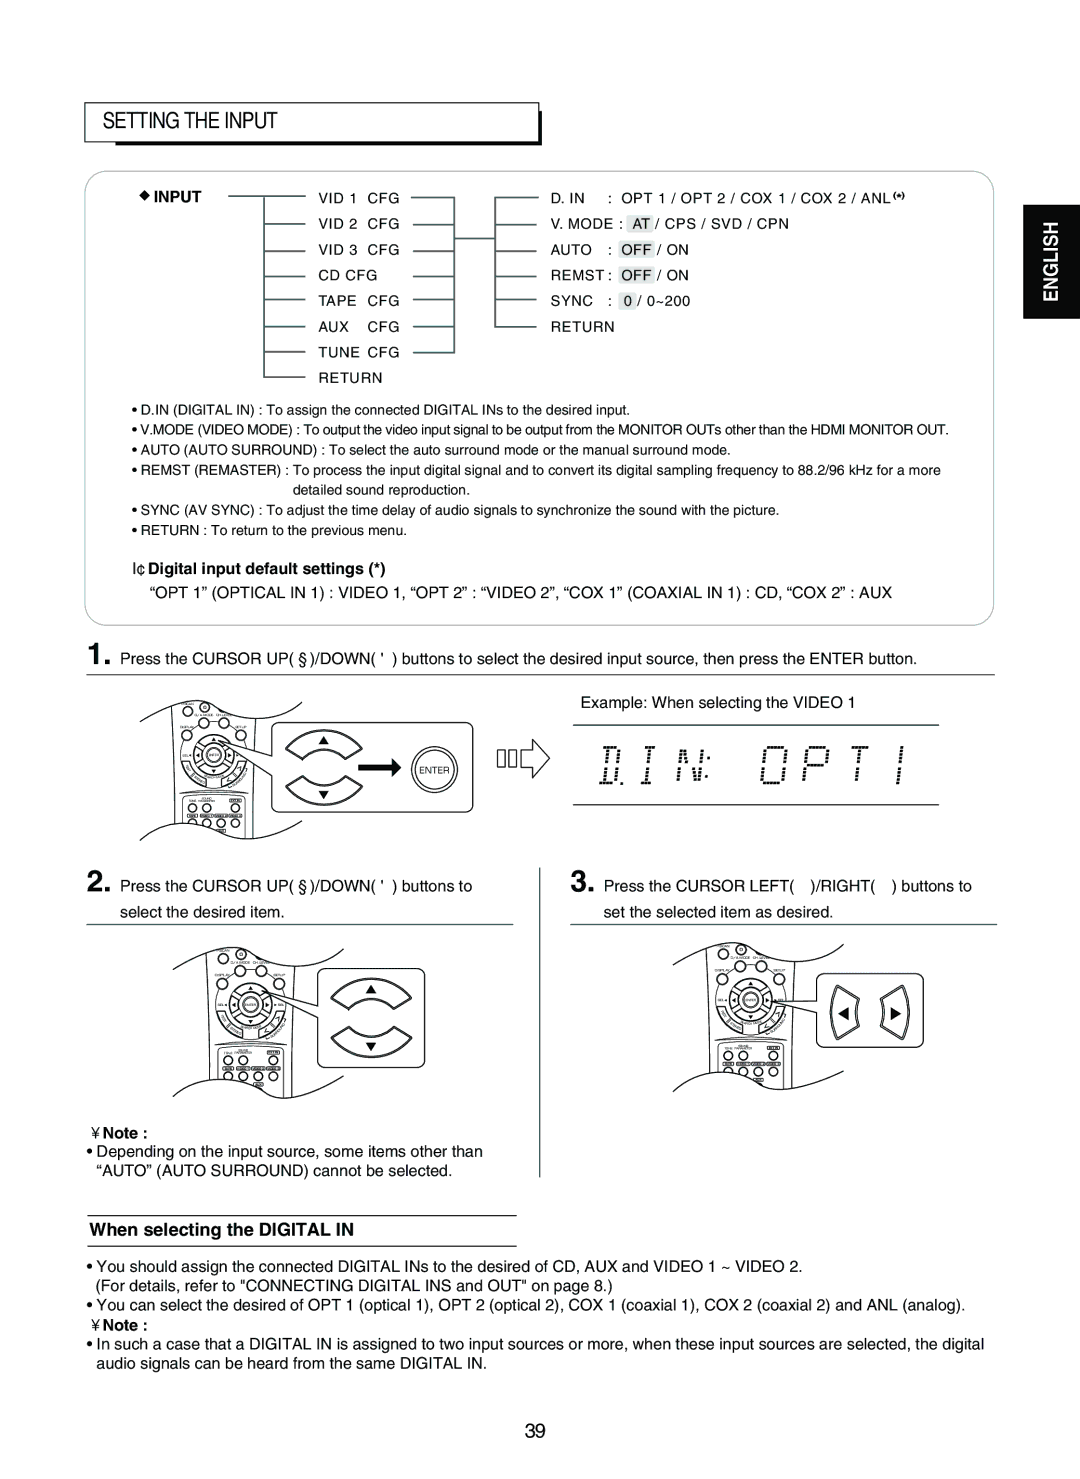
•D.IN (DIGITAL IN) : To assign the connected DIGITAL INs to the desired input.
•V.MODE (VIDEO MODE) : To output the video input signal to be output from the MONITOR OUTs other than the HDMI MONITOR OUT.
•AUTO (AUTO SURROUND) : To select the auto surround mode or the manual surround mode.
•REMST (REMASTER) : To process the input digital signal and to convert its digital sampling frequency to 88.2/96 kHz for a more detailed sound reproduction.
•SYNC (AV SYNC) : To adjust the time delay of audio signals to synchronize the sound with the picture.
•RETURN : To return to the previous menu.
Digital input default settings (*)
“OPT 1” (OPTICAL IN 1) : VIDEO 1, “OPT 2” : “VIDEO 2”, “COX 1” (COAXIAL IN 1) : CD, “COX 2” : AUX
1. Press the CURSOR UP( )/DOWN( ) buttons to select the desired input source, then press the ENTER button.
7 | 0 |
|
|
|
|
| Example: When selecting the VIDEO 1 |
| MUTE |
|
|
|
| ||
P.SCAN |
|
| VOLUME |
| |||
D/A MODE | CH.LEVEL |
|
|
|
| ||
DISPLAY |
|
| SETUP |
| |||
SEL | ENTER | SEL |
| ||||
T |
|
|
|
|
|
| ENTER |
E |
|
|
|
|
|
|
|
S |
|
|
|
|
|
|
|
T |
|
|
|
|
|
|
|
S | SEARCH MODE |
| U | N | D |
| |
TE |
| RO |
|
|
| ||
| REO |
|
|
|
|
| |
|
|
| SUR |
|
|
|
|
| SOUND |
| EXT.IN |
|
|
|
|
TONE | PARAMETER |
|
|
|
|
| |
TAPE | VIDEO 1 | VIDEO 2 | VIDEO 3 |
|
|
|
|
FM/AM/XM CD | AUX |
|
|
|
|
| |
2. Press the CURSOR UP( )/DOWN( ) buttons to
select the desired item.
7 | 8 | 9 |
|
|
|
|
|
|
|
| |
|
| MUTE |
|
|
|
P.SCAN | 0 |
| VOLUME | ||
|
|
|
|
| |
D/A MODE | CH.LEVEL |
|
| ||
DISPLAY |
|
| SETUP | ||
SEL | ENTER | SEL | |||
T |
|
|
|
|
|
E |
|
|
|
|
|
S |
|
|
|
|
|
T |
|
|
|
|
|
ST | SEARCH MODE | OU | N | D | |
ER | EO |
|
|
| |
|
| RR |
|
| |
|
|
| SU |
|
|
| SOUND |
| EXT.IN |
|
|
TONE PARAMETER |
|
|
| ||
TAPE | VIDEO 1 | VIDEO 2 | VIDEO 3 |
|
|
FM/AM/XM | CD | AUX |
|
|
|
Note :
•Depending on the input source, some items other than “AUTO” (AUTO SURROUND) cannot be selected.
When selecting the DIGITAL IN
3. Press the CURSOR LEFT( )/RIGHT( ) buttons to
set the selected item as desired.
7
|
| MUTE |
|
|
|
P.SCAN | 0 |
| VOLUME | ||
|
|
|
|
| |
D/A MODE | CH.LEVEL |
|
| ||
DISPLAY |
|
| SETUP | ||
SEL | ENTER | SEL | |||
T |
|
|
|
|
|
E |
|
|
|
|
|
S |
|
|
|
|
|
T |
|
|
|
|
|
ST | SEARC H MODE | OU | N | D | |
ER | EO |
|
|
| |
|
| RR |
|
| |
|
|
| SU |
|
|
| SOUND |
| EXT.IN |
|
|
TONE PARAMETER |
|
|
| ||
TAPE | VIDEO 1 | VIDEO 2 | VIDEO 3 |
|
|
FM/AM/XM | CD | AUX |
|
|
|
•You should assign the connected DIGITAL INs to the desired of CD, AUX and VIDEO 1 ~ VIDEO 2. (For details, refer to "CONNECTING DIGITAL INS and OUT" on page 8.)
•You can select the desired of OPT 1 (optical 1), OPT 2 (optical 2), COX 1 (coaxial 1), COX 2 (coaxial 2) and ANL (analog).
Note :
•In such a case that a DIGITAL IN is assigned to two input sources or more, when these input sources are selected, the digital audio signals can be heard from the same DIGITAL IN.
39
