1


Getting to know your machine

2


Instrucciones importantes de seguridad

Faites connaissance avec votre machine


Conociendo su Máquina


ANTES DE USAR UN APARATO ELÉCTRICO, SIEMPRE DEBEN SEGUIRSE LAS INSTRUCCIONES DE SEGURIDAD, INCLUYENDO LO SIGUIENTE:

LEA TODAS LAS INSTRUCCIONES ANTES DE USAR ESTE APARATO.

COMO REDUCIR EL RIESGO DE INCENDIO, DESCARGA ELÉCTRICA O DAÑOS PERSONALES:

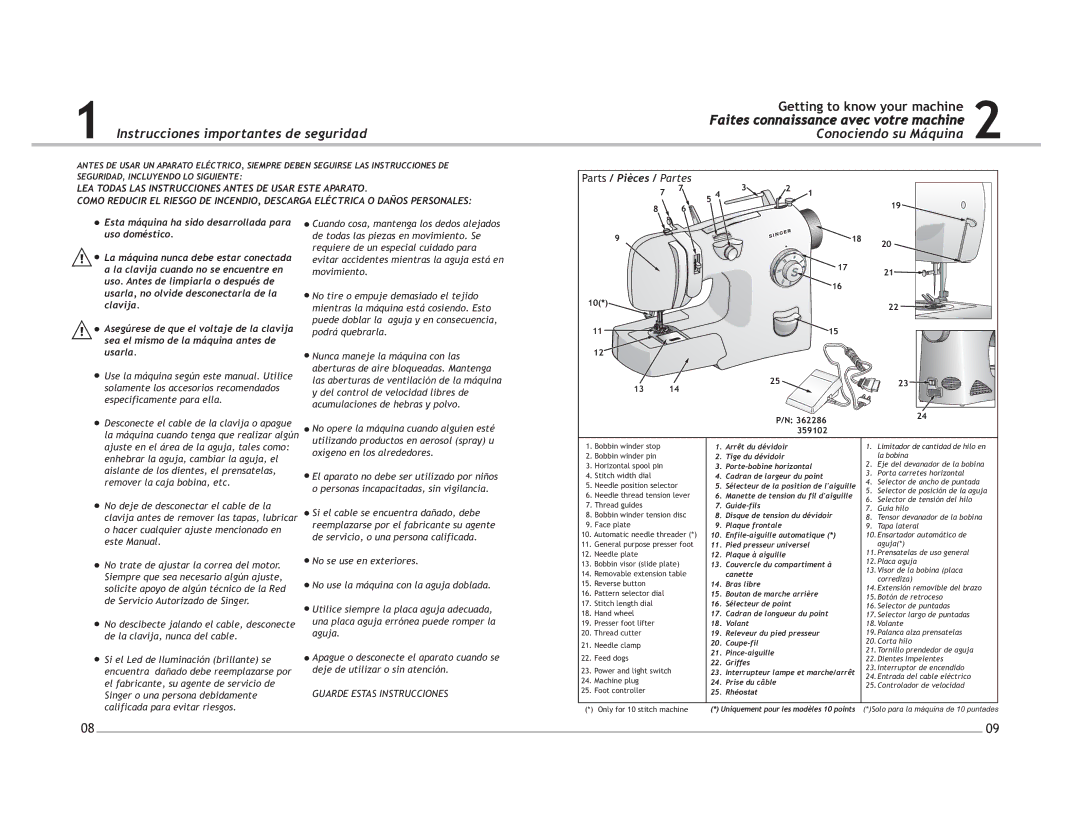
Parts / Pièces / Partes

3


7

7

2

1


5

4


8


6


19


Esta máquina ha sido desarrollada para uso doméstico.

La máquina nunca debe estar conectada a la clavija cuando no se encuentre en uso. Antes de limpiarla o después de usarla, no olvide desconectarla de la clavija.

Asegúrese de que el voltaje de la clavija sea el mismo de la máquina antes de usarla.

Use la máquina según este manual. Utilice solamente los accesorios recomendados especificamente para ella.

Desconecte el cable de la clavija o apague la máquina cuando tenga que realizar algún

Cuando cosa, mantenga los dedos alejados de todas las piezas en movimiento. Se requiere de un especial cuidado para evitar accidentes mientras la aguja está en movimiento.

No tire o empuje demasiado el tejido mientras la máquina está cosiendo. Esto puede doblar la aguja y en consecuencia, podrá quebrarla.

Nunca maneje la máquina con las aberturas de aire bloqueadas. Mantenga las aberturas de ventilación de la máquina y del control de velocidad libres de acumulaciones de hebras y polvo.

No opere la máquina cuando alguien esté utilizando productos en aerosol (spray) u

9


18

20


17


21


16


10(*)


22


11


15


12


13

14

25


23


P/N: 362286


24


359102


ajuste en el área de la aguja, tales como: enhebrar la aguja, cambiar la aguja, el aislante de los dientes, el prensatelas, remover la caja bobina, etc.

No deje de desconectar el cable de la clavija antes de remover las tapas, lubricar o hacer cualquier ajuste mencionado en este Manual.

No trate de ajustar la correa del motor. Siempre que sea necesario algún ajuste, solicite apoyo de algún técnico de la Red de Servicio Autorizado de Singer.

No descibecte jalando el cable, desconecte de la clavija, nunca del cable.

Si el Led de Iluminación (brillante) se encuentra dañado debe reemplazarse por el fabricante, su agente de servicio de Singer o una persona debidamente

oxígeno en los alrededores.

El aparato no debe ser utilizado por niños o personas incapacitadas, sin vigilancia.

Si el cable se encuentra dañado, debe reemplazarse por el fabricante su agente de servicio, o una persona calificada.

No se use en exteriores.

No use la máquina con la aguja doblada.

Utilice siempre la placa aguja adecuada, una placa aguja errónea puede romper la aguja.

Apague o desconecte el aparato cuando se deje de utilizar o sin atención.

GUARDE ESTAS INSTRUCCIONES

1.Bobbin winder stop

2.Bobbin winder pin

3.Horizontal spool pin

4.Stitch width dial

5.Needle position selector

6.Needle thread tension lever

7.Thread guides

8.Bobbin winder tension disc

9.Face plate

10.Automatic needle threader (*)

11.General purpose presser foot

12.Needle plate

13.Bobbin visor (slide plate)

14.Removable extension table

15.Reverse button

16.Pattern selector dial

17.Stitch length dial

18.Hand wheel

19.Presser foot lifter

20.Thread cutter

21.Needle clamp

22.Feed dogs

23.Power and light switch

24.Machine plug

25.Foot controller

1.Arrêt du dévidoir

2.Tige du dévidoir

3.Porte-bobine horizontal

4.Cadran de largeur du point

5.Sélecteur de la position de l'aiguille

6.Manette de tension du fil d'aiguille

7.Guide-fils

8.Disque de tension du dévidoir

9.Plaque frontale

10.Enfile-aiguille automatique (*)

11.Pied presseur universel

12.Plaque à aiguille

13.Couvercle du compartiment à canette

14.Bras libre

15.Bouton de marche arrière

16.Sélecteur de point

17.Cadran de longueur du point

18.Volant

19.Releveur du pied presseur

20.Coupe-fil

21.Pince-aiguille

22.Griffes

23.Interrupteur lampe et marche/arrêt

24.Prise du câble

25.Rhéostat

1.Limitador de cantidad de hilo en la bobina

2.Eje del devanador de la bobina

3.Porta carretes horizontal

4.Selector de ancho de puntada

5.Selector de posición de la aguja

6.Selector de tensión del hilo

7.Guía hilo

8.Tensor devanador de la bobina

9.Tapa lateral

10.Ensartador automático de aguja(*)

11.Prensatelas de uso general

12.Placa aguja

13.Visor de la bobina (placa corrediza)

14.Extensión removible del brazo

15.Botón de retroceso

16.Selector de puntadas

17.Selector largo de puntadas

18.Volante

19.Palanca alza prensatelas

20.Corta hilo

21.Tornillo prendedor de aguja

22.Dientes Impelentes

23.Interruptor de encendido

24.Entrada del cable eléctrico

25.Controlador de velocidad

calificada para evitar riesgos.

(*) Only for 10 stitch machine

(*) Uniquement pour les modèles 10 points (*)Solo para la máquina de 10 puntades

08


09

Page 6
Image 6
Singer 4205, 4210 manuel dutilisation Calificada para evitar riesgos, 359102

4210, 4205 specifications

The Singer 4205 and 4210 sewing machines represent a significant advancement in home sewing technology, catering to both novice and experienced sewers alike. These versatile models are renowned for their ease of use, allowing users to create a wide variety of beautiful projects with minimal effort.

One of the standout features of the Singer 4205 is its user-friendly sewing operations. With an intuitive interface and easy-to-navigate controls, beginners can quickly understand and master the machine. The 4210 model takes this further by incorporating an automatic needle threader, which eliminates the frustration of manual threading, making it accessible for users of all skill levels.

Additionally, both models boast an impressive selection of built-in stitches, providing flexibility for different sewing applications. The Singer 4205 offers 32 built-in stitches, while the 4210 enhances this with 40 distinct stitch options, including basic, decorative, and stretch stitches. This variety allows users to tackle different sewing projects, from simple hems to intricate designs, with confidence.

The adjustable stitch length and width features inherent in both models give users complete control over their sewing. This customization ability enhances the sewing experience by enabling users to modify stitches to meet their specific needs, whether for quilting or garment construction.

Durability and reliability are trademarks of the Singer brand, and the 4205 and 4210 are no exceptions. Constructed with high-quality materials, these machines are designed to withstand the rigors of continuous use. The robust metal frame ensures stability during operation, resulting in precise stitching without any inconsistency.

Additionally, both models come equipped with essential technologies such as the drop-in bobbin system, which simplifies the bobbin replacement process, and a powerful motor that allows for smooth operation across various fabric types. The sewing machines can handle everything from lightweight cotton to thicker materials like denim, catering to a wide range of projects.

Ultimately, the Singer 4205 and 4210 sewing machines embody a perfect blend of functionality and innovation. With features designed to enhance creativity, ease of use, and durability, these machines are ideal for anyone looking to explore the world of sewing, be it for crafting unique garments, home décor, or innovative quilting projects.