![]() SM 2610008289
SM 2610008289
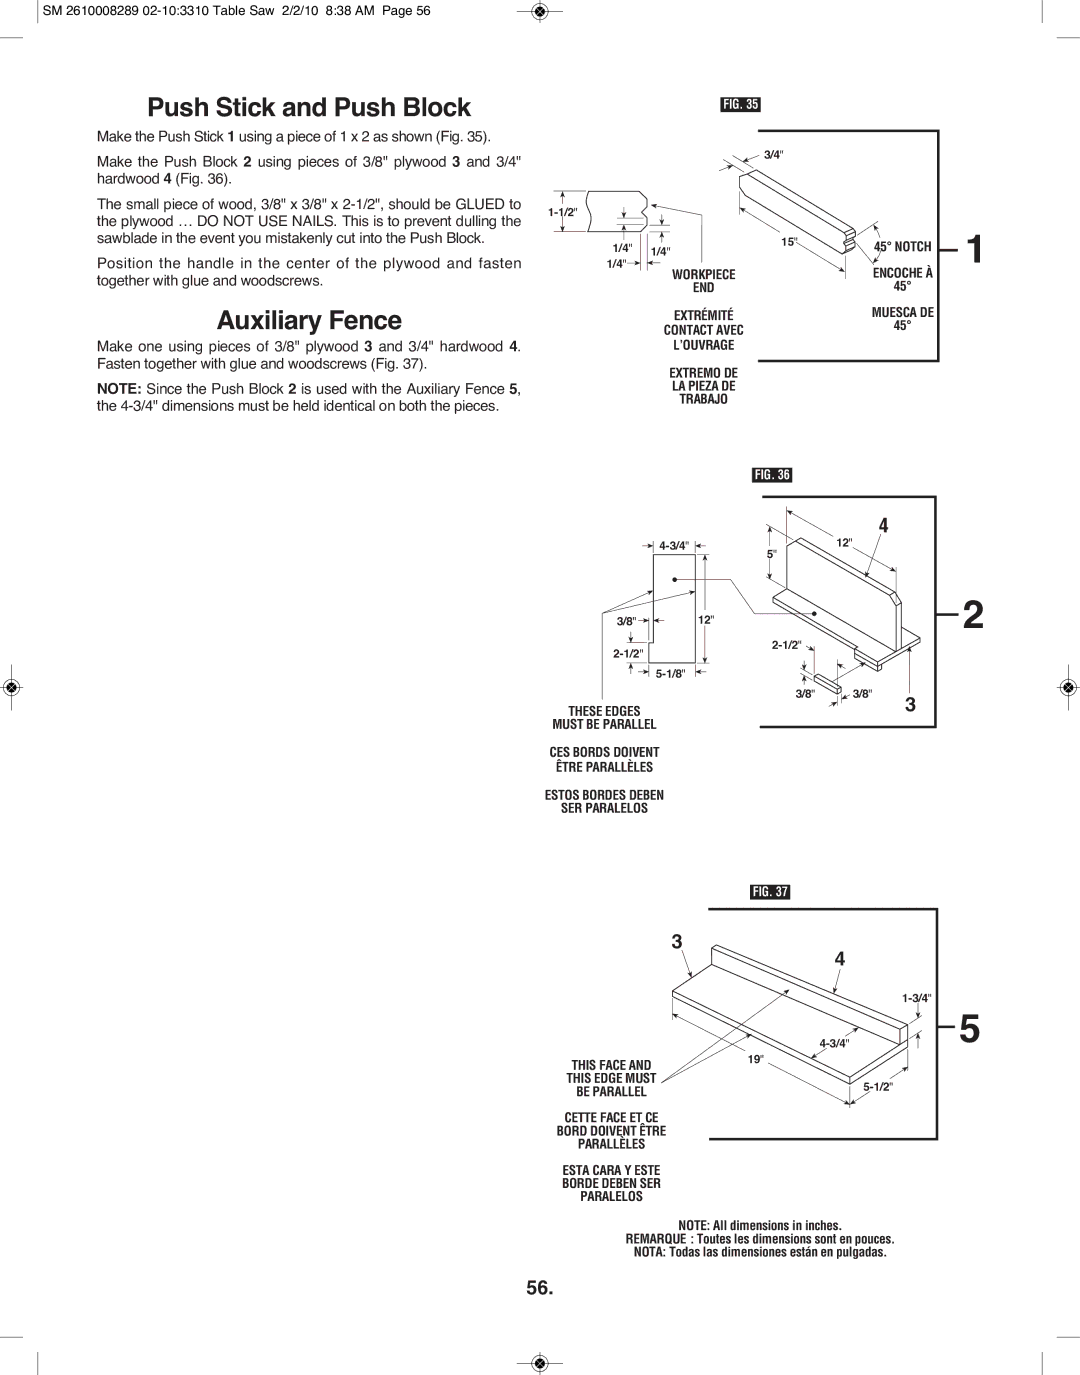
Push Stick and Push Block
Make the Push Stick 1 using a piece of 1 x 2 as shown (Fig. 35).
FIG. 35
Make the Push Block 2 using pieces of 3/8" plywood 3 and 3/4" hardwood 4 (Fig. 36).
The small piece of wood, 3/8" x 3/8" x
Position the handle in the center of the plywood and fasten together with glue and woodscrews.
Auxiliary Fence
Make one using pieces of 3/8" plywood 3 and 3/4" hardwood 4. Fasten together with glue and woodscrews (Fig. 37).
NOTE: Since the Push Block 2 is used with the Auxiliary Fence 5, the
1/4" 1/4"![]()
![]() 3/4"
3/4"
|
| 15" | 45° NOTCH | |||
1/4" | ||||||
|
|
| ||||
| WORKPIECE |
|
|
| ENCOCHE À | |
|
|
|
| |||
| END |
|
|
| 45° | |
| EXTRÉMITÉ |
|
|
| MUESCA DE | |
| CONTACT AVEC |
|
|
| 45° | |
| L’OUVRAGE |
|
|
|
| |
| EXTREMO DE |
|
|
|
| |
|
|
|
|
| ||
| LA PIEZA DE |
|
|
|
| |
| TRABAJO |
|
|
|
| |
|
|
|
|
| ||
|
| FIG. 36 |
| |||
1
|
| 12" | 4 |
5" |
| ||
|
|
| |
3/8" | 12" |
| 2 |
|
| ||
|
| ||
|
|
| |
|
|
| |
| 3/8" | 3/8" | 3 |
THESE EDGES |
|
| |
MUST BE PARALLEL |
|
|
|
CES BORDS DOIVENT
ÊTRE PARALLÈLES
ESTOS BORDES DEBEN
SER PARALELOS
| FIG. 37 |
|
| 3 |
|
| 4 |
|
|
| |
| 5 | |
THIS FACE AND | 19" |
|
|
| |
THIS EDGE MUST |
| |
BE PARALLEL |
| |
|
| |
CETTE FACE ET CE |
|
|
BORD DOIVENT ÊTRE |
|
|
PARALLÈLES |
|
|
ESTA CARA Y ESTE |
|
|
BORDE DEBEN SER |
|
|
PARALELOS |
|
|
NOTE: All dimensions in inches.
REMARQUE : Toutes les dimensions sont en pouces.
NOTA: Todas las dimensiones están en pulgadas.
56.