![]() SM 2610008289
SM 2610008289
Dado and Molding Cutting
Instructions for operating the saw with Dado and Molding Head sets are contained in the booklet furnished with these accessories.
ALWAYS USE AN APPROPRIATE SKIL TABLE INSERT AND WASHERS LISTED UNDER RECOMMENDED ACCESSORIES.
ALWAYS PLACE THE BLADE WASHERS IN THE ORIGINAL POSITIONS WHEN YOU ARE FINISHED DADO OR MOLDING CUTTING.
INSTALLING A DADO SET
A dado set is an accessory system used to make
To reduce the risk of injury, always disconnect plug from power source before
changing blades.
To reduce the risk of injury, always use the Skil Dado Blade Table Insert No. 2610011336 (comes with a dado accessory washer). Never make dado cuts
without this insert. Do not use dado sets larger than 8” diameter. Never set dado cutters to any bevel angle other than the vertical 0° angle. Follow all warnings and instructions shown here and those that accompany your dado set. Failure to comply with these warnings may result in serious bodily injuries.
To reduce the risk of injury, do not use dado sets larger than 8 inches in diameter. The saw
is not designed to accept larger sized dados.
USING STACKED DADO SETS
1.Disconnect plug from power source.
2.Remove the Smart Guard System and
3.Remove standard table insert plate. Raise saw blade to maximum height.
4.Remove the arbor nut, outer washer, and saw blade.
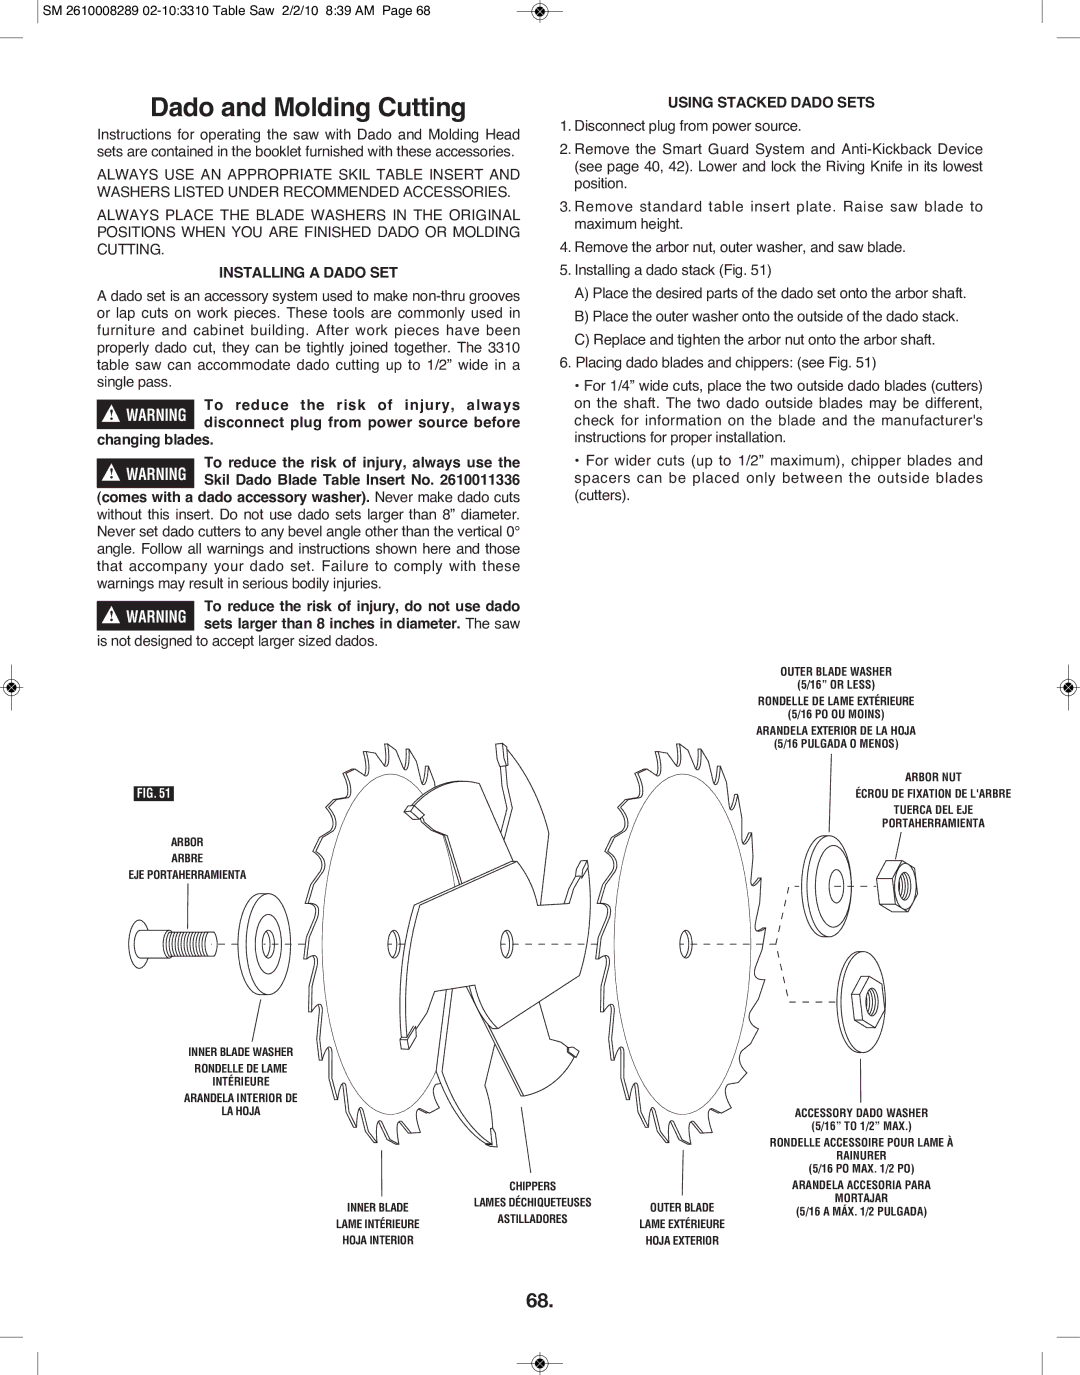
5.Installing a dado stack (Fig. 51)
A)Place the desired parts of the dado set onto the arbor shaft.
B)Place the outer washer onto the outside of the dado stack.
C)Replace and tighten the arbor nut onto the arbor shaft.
6.Placing dado blades and chippers: (see Fig. 51)
•For 1/4” wide cuts, place the two outside dado blades (cutters) on the shaft. The two dado outside blades may be different, check for information on the blade and the manufacturer's instructions for proper installation.
•For wider cuts (up to 1/2” maximum), chipper blades and spacers can be placed only between the outside blades (cutters).
OUTER BLADE WASHER
(5/16” OR LESS)
RONDELLE DE LAME EXTÉRIEURE
(5/16 PO OU MOINS)
ARANDELA EXTERIOR DE LA HOJA
(5/16 PULGADA O MENOS)
ARBOR NUT
FIG. 51 | ÉCROU DE FIXATION DE L'ARBRE |
TUERCA DEL EJE
PORTAHERRAMIENTA
ARBOR
ARBRE
EJE PORTAHERRAMIENTA
INNER BLADE WASHER
RONDELLE DE LAME
INTÉRIEURE
ARANDELA INTERIOR DE
LA HOJA![]()
![]() ACCESSORY DADO WASHER (5/16” TO 1/2” MAX.)
ACCESSORY DADO WASHER (5/16” TO 1/2” MAX.)
|
|
| RONDELLE ACCESSOIRE POUR LAME À | |
|
|
| RAINURER | |
|
|
| (5/16 PO MAX. 1/2 PO) | |
| CHIPPERS |
| ARANDELA ACCESORIA PARA | |
INNER BLADE | LAMES DÉCHIQUETEUSES | OUTER BLADE | MORTAJAR | |
(5/16 A MÁX. 1/2 PULGADA) | ||||
ASTILLADORES | ||||
LAME INTÉRIEURE | LAME EXTÉRIEURE | |||
| ||||
|
| |||
HOJA INTERIOR |
| HOJA EXTERIOR |
|
68.