Operation

Mulching Operation


Installing the Discharge


For best mulching results, cut up to a maximum of 1/3

Deflector


of grass blade length and recycle ONLY when grass is


dry.


!

WARNING

!

1. Set all wheels in the highest cutting position (Notch


7). Refer to the Section entitled “Cutting Height

DO NOT attempt any maintenance, adjustments or

Adjustment”.


service with engine and blade running. STOP engine

2. Move the engine speed control to the fast (Rabbit)

and blade. Disconnect spark plug wire and secure

position.


away from spark plug. Engine and components are

3. Move the ground speed control to the slowest


HOT. Avoid serious burns, allow sufficient time for all

speed setting.


components to cool.


4. Proceed mowing slowly. If the grass is very dense,

1. Remove the mulching cover. Refer to the Section

lower each rear wheel latch one notch lower than

the front wheel latches to improve mulching perfor-

2.

entitled “Mulching Operation”.


mance.


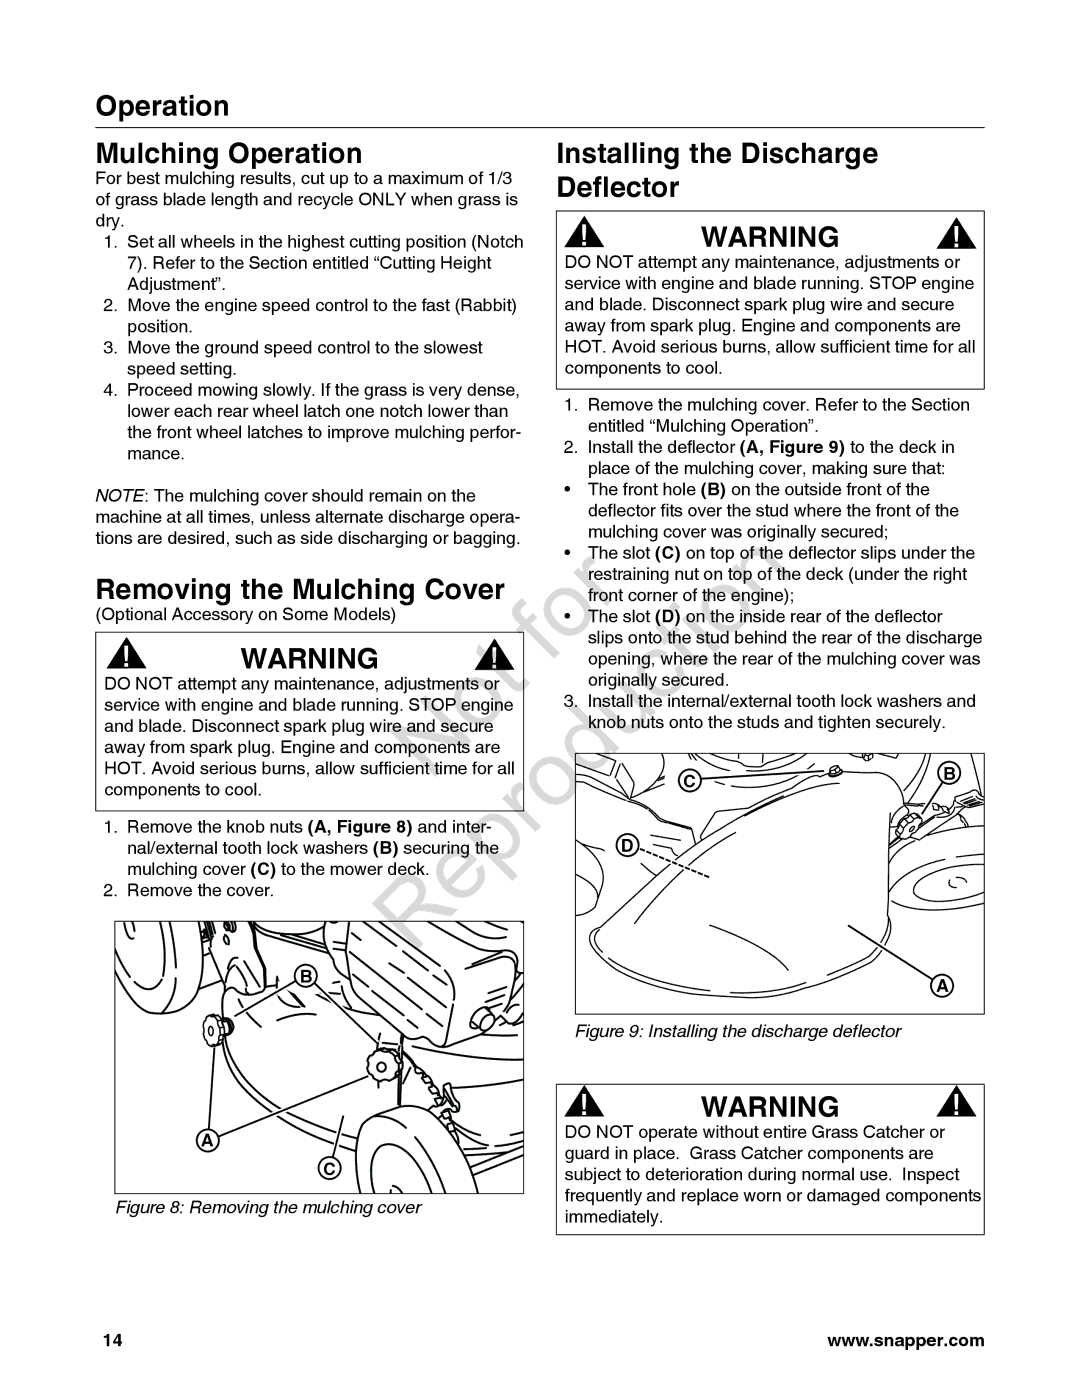
Install the deflector (A, Figure 9) to the deck in


place of the mulching cover, making sure that:

NOTE: The mulching cover should remain on the


• The front hole (B) on the outside front of the


machine at all times, unless alternate discharge opera-


deflector fits over the stud where the front of the

tions are desired, such as side discharging or bagging.


mulching cover was originally secured;


• The slot (C) on top of the deflector slips under the

Removing the Mulching Cover


est aining nut on top of the deck (under the right

ont corner

f the e gi e);


(Optional Accessory on Some Models)


The slot (D)

n the inside rear of the deflector

!

WARNING


slips on o he s ud behind the rear of the discharge

! foropening, where the rear of the mulching cover was

DO NOT attempt any maintenance, adjustmen s

r

3.

originally se ured.


service with engine and blade running. STOP engine

Install the internal/external tooth lock washers and

and blade. Disconnect spark plug wire and secure


knob n ts onto the studs and tighten securely.

away from spark plug. Engine and components are


HOT. Avoid serious burns, allow sufficient time for all


C

B

components to cool.


1. Remove the knob nuts (A, Figure 8) and inter-


D


nal/external tooth lock washers (B) securing the


mulching cover (C) to the mower ck.


2. Remove the cover.

Reproduction


B

A


Figure 9: Installing the discharge deflector


!

WARNING

!

A


DO NOT operate without entire Grass Catcher or

C


guard in place. Grass Catcher components are


subject to deterioration during normal use. Inspect

Figure 8: Removing the mulching cover


frequently and replace worn or damaged components


immediately.


14

www.snapper.com

Page 14
Image 14
Snapper 7800842-01, 7800841-01 manual Mulching Operation Installing the Discharge, Deflector, Removing the Mulching Cover

7800841-01, 780084-01, 7800842-01 specifications

The Snapper 7800842-01, 780084-01, and 7800841-01 are cutting-edge lawn care equipment designed to enhance the mowing experience while providing outstanding performance and reliability for homeowners and professionals alike. These models are part of Snapper's extensive lineup of outdoor power equipment, recognized for their durability and innovative features.

One of the main features of the Snapper 7800842-01 series is its advanced cutting technology. It is equipped with a robust 21-inch steel mowing deck, which ensures a clean and efficient cut, allowing users to tackle various lawn types and conditions. The durable construction of the deck not only enhances its longevity but also offers superior performance in mulching, bagging, or side-discharging grass clippings.

The Snapper series employs a powerful engine that delivers robust performance. With a reliable Briggs & Stratton engine, users can expect easy starting and impressive fuel efficiency. This engine is designed to provide ample torque for tackling tough grassy areas while ensuring smooth operation, reducing the effort required for maintaining your lawn.

Another notable feature is the adjustable cutting height system, which allows for easy customization of grass height. Users can quickly set their desired height for optimal mowing results, accommodating different grass types and seasonal growth patterns. This versatility is essential for achieving the perfect lawn manicuring experience.

Comfort is a priority in the design of the Snapper 7800842-01 series. The ergonomic handle design reduces operator fatigue, making it easier to maneuver the mower over more extensive areas. Additionally, the foldable handle feature simplifies storage and transportation, catering to users with limited space.

Safety features are also integrated into these models, ensuring peace of mind for users. An operator presence control system immediately stops the blade when the user releases the handle, preventing accidents.

Overall, the Snapper 7800842-01, 780084-01, and 7800841-01 models are a testimony to Snapper's commitment to quality and innovation. With their combination of reliable power, efficient cutting capabilities, and user-friendly design, they are well-suited for maintaining a pristine lawn. Whether used by homeowners seeking a perfect yard or professionals needing dependable equipment, these mowers stand out as excellent choices in the realm of outdoor power tools.