To use the VCR after setting the timer
To use the VCR before a timer recording begins, just press ?/1. The ![]() indicator disappears from the display window and the VCR switches on. Remember to press ?/1 to reset the VCR to the timer recording standby mode after using the VCR.
indicator disappears from the display window and the VCR switches on. Remember to press ?/1 to reset the VCR to the timer recording standby mode after using the VCR.
You can also do the following tasks while the VCR is recording:
•Reset the counter (page 33).
•Display tape information on the TV screen (page 36).
•Check the timer settings (page 50).
•Watch another TV program (page 37).
To set the clock
1
2 Press DIAL TIMER.
“DIA” appears in the display window.
3
4 Press DIAL TIMER.
“MES” appears in the display window.
5 Turn and press DIAL TIMER to set the month and then the year. After you set the year, “RELOJ” appears in the display window again.
6 Turn and press DIAL TIMER to set the hour and minute.
7 When you have finished setting the time, press DIAL TIMER to start the clock.
Tips
•To cancel a Dial Timer setting, press x STOP on the VCR while you are making the setting.
•The program is recorded in the current tape speed. To change the tape speed, press SP/EP before you complete the setting in step 9 (page 40).
•When you are recording a program in the SP mode and the remaining tape becomes shorter than the recording time, the tape speed is automatically changed to the EP mode. Note that some noise will appear on the picture when the tape speed is changed. If you want to keep the tape speed, set VEL. AUTO. CINTA to NO in the OPCIONES menu (page 62).
•To check, change, or cancel the program setting, see “Checking/changing/canceling timer settings” (page 50).
continued
Recording TV programs using the Dial Timer 41
Recording TV programs using the timer
Notes
•If eight programs have already been set using the PROG./VERIF. menu, “LLENO” appears in the display window for about five seconds.
•If you set the clock using the Auto Clock Set function, the clock will adjust itself to the incoming time signal regardless of adjustments made with the Dial Timer. Be sure you have set ACS correctly.
•The ![]() indicator flashes in the display window when you complete the setting in step 9 (page 40) with no tape inserted.
indicator flashes in the display window when you complete the setting in step 9 (page 40) with no tape inserted.
About the Demonstration Mode
The Dial Timer function has a Demonstration Mode that allows the user, such as a salesperson, to enter more than eight examples of timer settings when demonstrating the use of the Dial Timer. It cancels the LLENO notice which appears if eight programs have already been set. Do not use the Demonstration Mode for making timer recordings. Doing so may cause the settings to be inaccurate.
To activate the Demonstration Mode
Press X PAUSE on the VCR while turning the DIAL TIMER. “DEMO” appears in the display window for a few seconds.
To cancel the Demonstration Mode
Turn the power off and unplug the AC power cord. Although the Demonstration Mode is canceled, the timer settings entered while using the Demonstration Mode will remain. Be sure to manually cancel the timer settings before you use the Dial Timer or any other timer method after reconnecting the AC power cord (see page 50).
42Recording TV programs using the Dial Timer
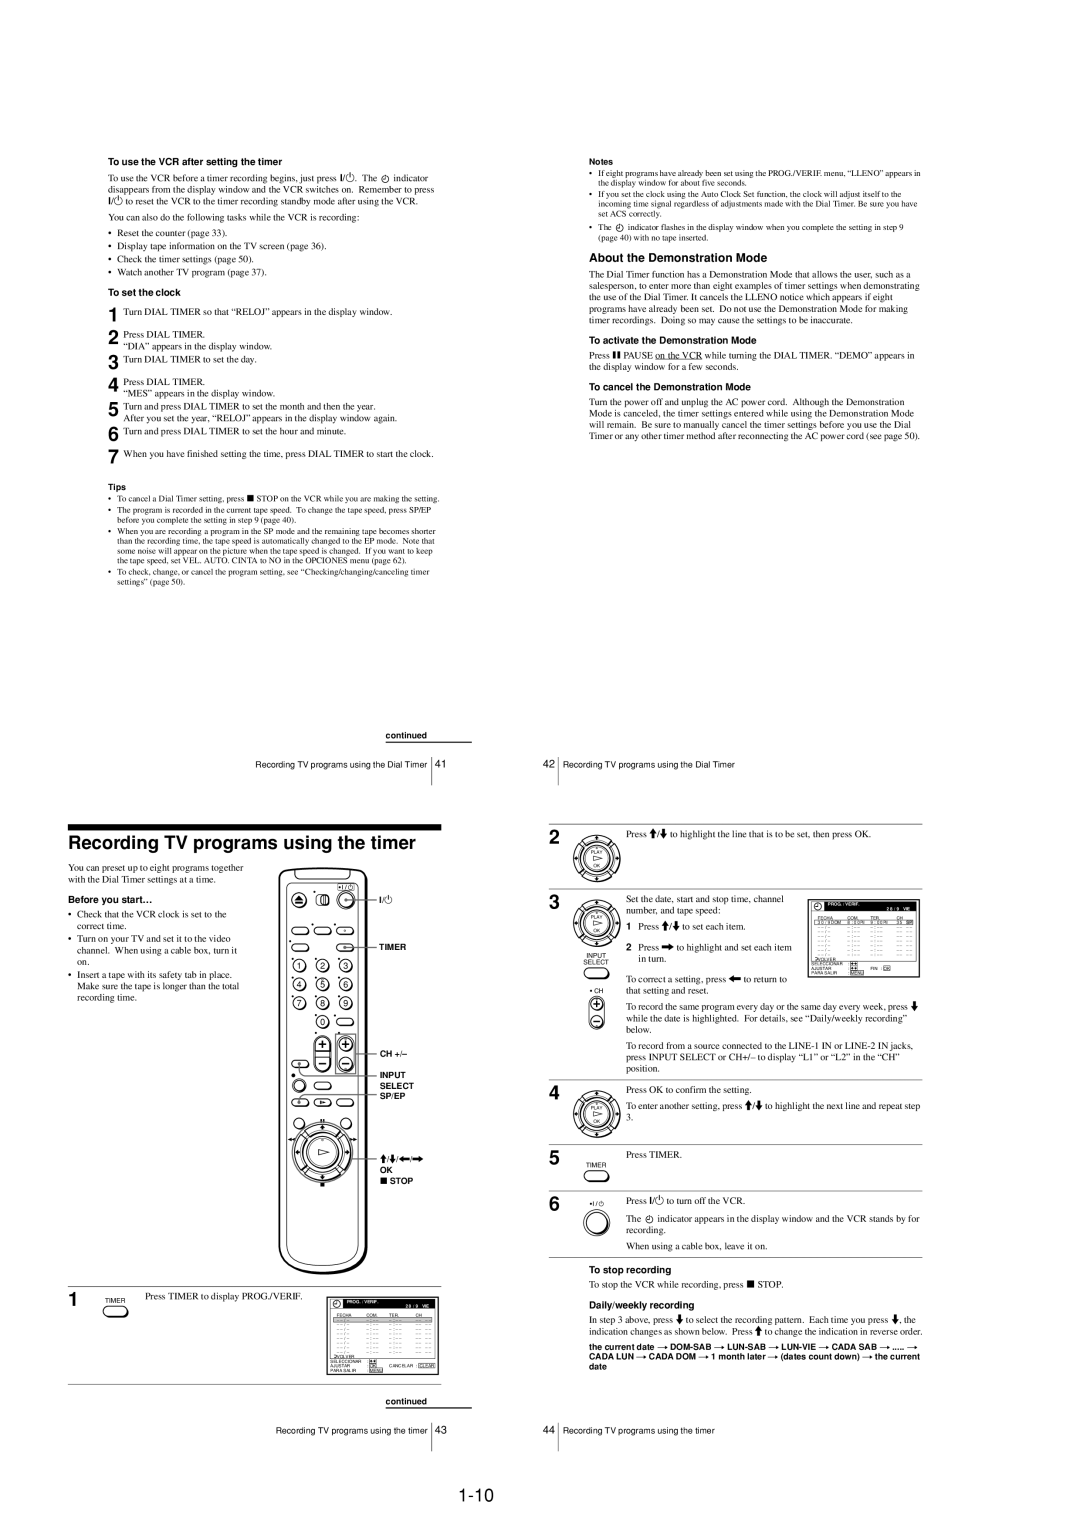
2 | Press M/m to highlight the line that is to be set, then press OK. |
| |
| PLAY |
You can preset up to eight programs together with the Dial Timer settings at a time.
Before you start…
•Check that the VCR clock is set to the correct time.
•Turn on your TV and set it to the video channel. When using a cable box, turn it on.
•Insert a tape with its safety tab in place. Make sure the tape is longer than the total recording time.
?/1
TIMER
1 2 3
4 5 6
7 8 9
0
CH +/–
INPUT
SELECT
SP/EP
| OK |
|
|
|
|
|
|
|
|
|
|
|
|
|
|
|
|
|
|
|
|
|
|
|
|
|
|
|
|
|
|
|
|
|
|
|
|
3 |
| Set the date, start and stop time, channel |
|
|
|
|
|
|
|
|
|
|
|
|
|
|
|
|
|
|
|
| PROG. / VERIF. |
|
|
|
|
|
|
|
| ||||||
| number, and tape speed: |
|
|
|
|
|
|
|
|
| 2 8 / 9 |
| VIE |
| ||||
PLAY |
| FECHA | COM. | TER. | CH |
|
|
|
| |||||||||
|
|
|
|
|
|
| ||||||||||||
|
| 1 Press M/m to set each item. |
| 3 | 0 | / 9 DOM | 8 | : 0 0 PM | 9 | : 0 0 PM | 3 | 5 |
| SP |
|
| ||
| OK |
| – | – | – |
| – – |
|
| |||||||||
|
|
| – | – – – – |
| |||||||||||||
|
|
|
| – | – – – – |
| ||||||||||||
|
| 2 Press , to highlight and set each item |
| – | – – – – |
| ||||||||||||
|
|
| – | – – – – |
| |||||||||||||
| INPUT |
| – | – – | – – |
| ||||||||||||
| in turn. |
| – | – – | – – |
| ||||||||||||
| SELECT |
| VOLVER |
|
|
|
|
|
|
|
|
|
|
|
| |||
| SELECCIONAR | : |
|
|
|
|
|
|
|
|
|
|
| |||||
|
|
| AJUSTAR | : |
|
|
| FIN : OK |
|
|
|
|
|
| ||||
|
| To correct a setting, press < to return to | PARA SALIR | : | MENU |
|
|
|
|
|
|
|
|
| ||||
|
|
|
|
|
|
|
|
|
|
|
|
|
|
|
|
|
| |
|
|
|
|
|
|
|
|
|
|
|
|
|
|
|
|
|
| |
•CH that setting and reset.
To record the same program every day or the same day every week, press m while the date is highlighted. For details, see “Daily/weekly recording” below.
To record from a source connected to the
4 | Press OK to confirm the setting. |
|
PLAYTo enter another setting, press M/m to highlight the next line and repeat step
OK
3.
M/m/</,
OK
x STOP
5 | Press TIMER. |
TIMER | |
|
|
6 | Press ?/1 to turn off the VCR. |
The ![]() indicator appears in the display window and the VCR stands by for recording.
indicator appears in the display window and the VCR stands by for recording.
When using a cable box, leave it on.
To stop recording
To stop the VCR while recording, press x STOP.
1 | TIMER | Press TIMER to display PROG./VERIF. |
|
|
|
|
|
|
|
|
|
|
|
| PROG. / VERIF. | 2 8 / 9 VIE |
|
| |||||||||
|
|
|
|
|
|
|
|
| |||||
|
|
| FECHA | COM. | TER. | CH |
|
| |||||
|
|
| – | – – – – |
|
|
| ||||||
|
|
| – | – – – – |
|
|
| ||||||
|
|
| – | – – – – |
|
| |||||||
|
|
| – | – – – – |
|
| |||||||
|
|
| – | – – – – |
|
| |||||||
|
|
| – | – – – – |
|
| |||||||
|
|
| – | – – – – |
|
| |||||||
|
|
| – | – – – – |
|
| |||||||
|
|
| VOLVER |
|
|
|
|
|
|
|
|
| |
|
|
| SELECCIONAR | : |
|
|
|
|
|
|
|
| |
|
|
| AJUSTAR | : | OK |
| CANCELAR | : | CLEAR |
|
| ||
|
|
| PARA SALIR | : | MENU |
|
|
|
|
|
| ||
|
|
|
|
|
|
|
|
|
|
|
|
|
|
|
|
|
|
|
|
|
|
|
|
|
|
|
|
continued
Recording TV programs using the timer 43
Daily/weekly recording
In step 3 above, press m to select the recording pattern. Each time you press m, the indication changes as shown below. Press M to change the indication in reverse order.
the current date t
CADA LUN t CADA DOM t 1 month later t (dates count down) t the current date
44Recording TV programs using the timer