Step 2 : Setting up the remote commander
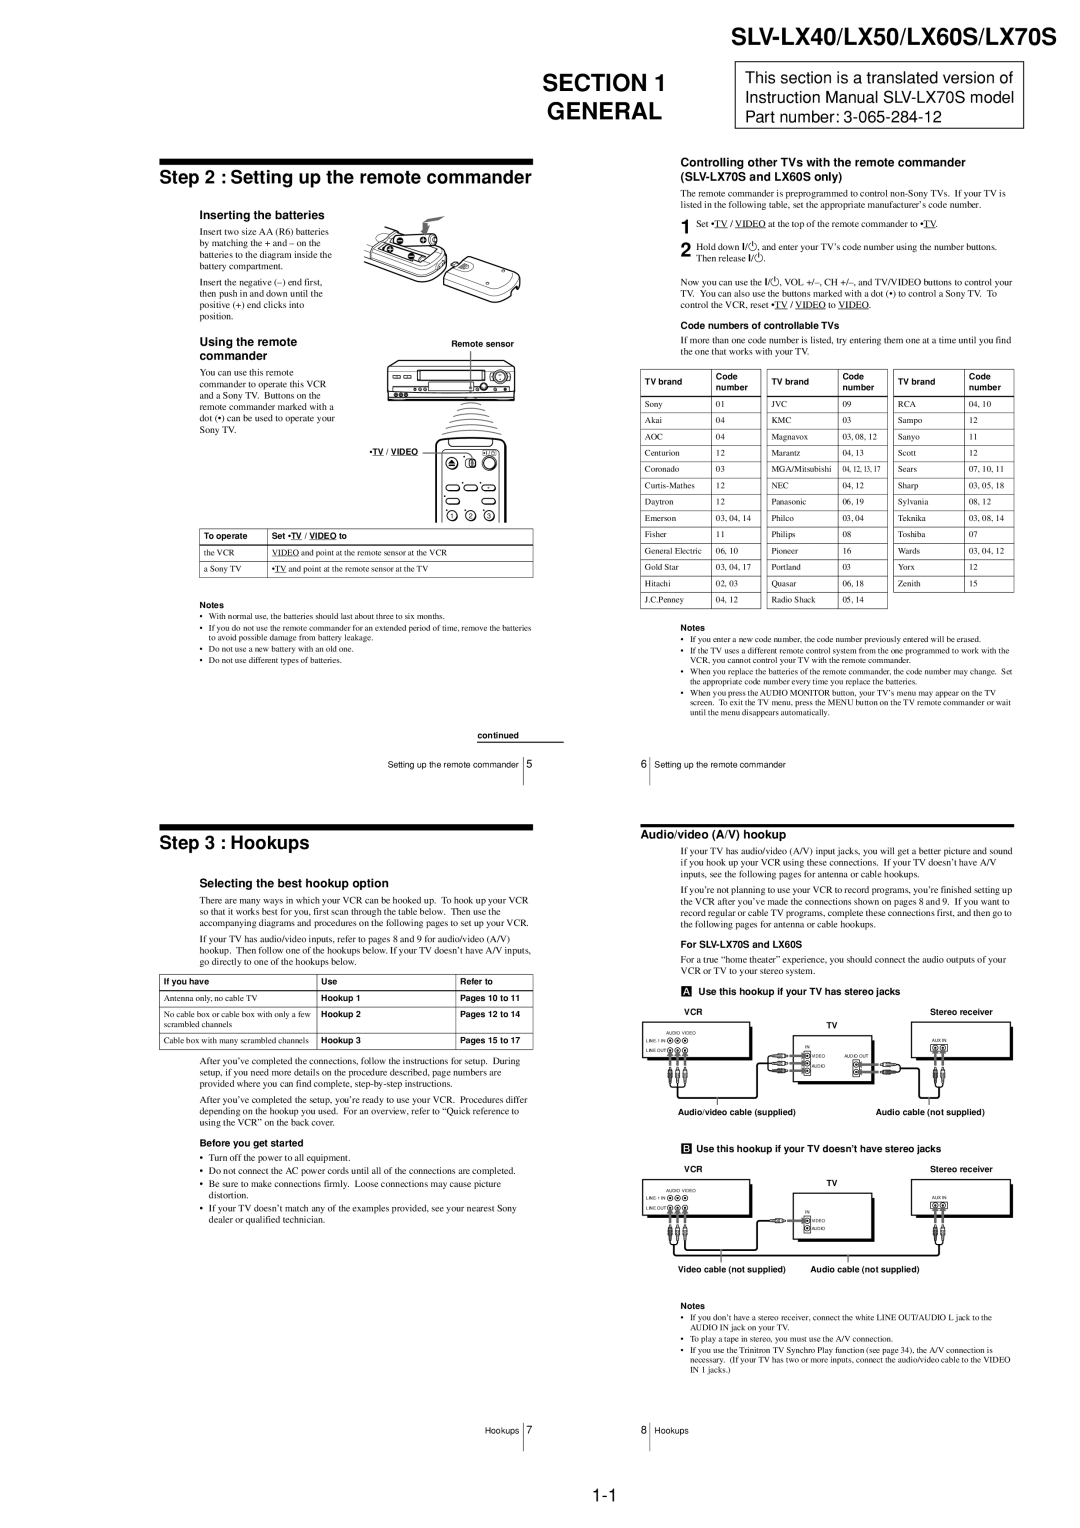
Inserting the batteries
Insert two size AA (R6) batteries by matching the + and – on the batteries to the diagram inside the battery compartment.
Insert the negative
Using the remote | Remote sensor |
commander |
|
You can use this remote commander to operate this VCR and a Sony TV. Buttons on the remote commander marked with a dot (•) can be used to operate your Sony TV.
•TV / VIDEO 
1 2 3
To operate | Set •TV / VIDEO to |
|
|
the VCR | VIDEO and point at the remote sensor at the VCR |
|
|
a Sony TV | •TV and point at the remote sensor at the TV |
|
|
Notes
•With normal use, the batteries should last about three to six months.
•If you do not use the remote commander for an extended period of time, remove the batteries to avoid possible damage from battery leakage.
•Do not use a new battery with an old one.
•Do not use different types of batteries.
continued
| |||
|
|
|
|
SECTION 1 |
| This section is a translated version of |
|
| Instruction Manual |
| |
GENERAL |
|
| |
| Part number: |
| |
Controlling other TVs with the remote commander
The remote commander is preprogrammed to control
1
2 Hold down ?/1, and enter your TV’s code number using the number buttons. Then release ?/1.
Now you can use the ?/1, VOL
Code numbers of controllable TVs
If more than one code number is listed, try entering them one at a time until you find the one that works with your TV.
TV brand | Code |
| TV brand | Code |
| TV brand | Code |
number |
| number |
| number | |||
|
|
|
|
| |||
|
|
|
|
|
|
|
|
Sony | 01 |
| JVC | 09 |
| RCA | 04, 10 |
|
|
|
|
|
|
|
|
Akai | 04 |
| KMC | 03 |
| Sampo | 12 |
|
|
|
|
|
|
|
|
AOC | 04 |
| Magnavox | 03, 08, 12 |
| Sanyo | 11 |
|
|
|
|
|
|
|
|
Centurion | 12 |
| Marantz | 04, 13 |
| Scott | 12 |
|
|
|
|
|
|
|
|
Coronado | 03 |
| MGA/Mitsubishi | 04, 12, 13, 17 |
| Sears | 07, 10, 11 |
|
|
|
|
|
|
|
|
12 |
| NEC | 04, 12 |
| Sharp | 03, 05, 18 | |
|
|
|
|
|
|
|
|
Daytron | 12 |
| Panasonic | 06, 19 |
| Sylvania | 08, 12 |
|
|
|
|
|
|
|
|
Emerson | 03, 04, 14 |
| Philco | 03, 04 |
| Teknika | 03, 08, 14 |
|
|
|
|
|
|
|
|
Fisher | 11 |
| Philips | 08 |
| Toshiba | 07 |
|
|
|
|
|
|
|
|
General Electric | 06, 10 |
| Pioneer | 16 |
| Wards | 03, 04, 12 |
|
|
|
|
|
|
|
|
Gold Star | 03, 04, 17 |
| Portland | 03 |
| Yorx | 12 |
|
|
|
|
|
|
|
|
Hitachi | 02, 03 |
| Quasar | 06, 18 |
| Zenith | 15 |
|
|
|
|
|
|
|
|
J.C.Penney | 04, 12 |
| Radio Shack | 05, 14 |
|
|
|
|
|
|
|
|
|
|
|
Notes
•If you enter a new code number, the code number previously entered will be erased.
•If the TV uses a different remote control system from the one programmed to work with the VCR, you cannot control your TV with the remote commander.
•When you replace the batteries of the remote commander, the code number may change. Set the appropriate code number every time you replace the batteries.
•When you press the AUDIO MONITOR button, your TV’s menu may appear on the TV screen. To exit the TV menu, press the MENU button on the TV remote commander or wait until the menu disappears automatically.
Setting up the remote commander
56
Setting up the remote commander
Step 3 : Hookups
Selecting the best hookup option
There are many ways in which your VCR can be hooked up. To hook up your VCR so that it works best for you, first scan through the table below. Then use the accompanying diagrams and procedures on the following pages to set up your VCR.
If your TV has audio/video inputs, refer to pages 8 and 9 for audio/video (A/V) hookup. Then follow one of the hookups below. If your TV doesn’t have A/V inputs, go directly to one of the hookups below.
If you have | Use | Refer to |
|
|
|
Antenna only, no cable TV | Hookup 1 | Pages 10 to 11 |
|
|
|
No cable box or cable box with only a few | Hookup 2 | Pages 12 to 14 |
scrambled channels |
|
|
|
|
|
Cable box with many scrambled channels | Hookup 3 | Pages 15 to 17 |
|
|
|
After you’ve completed the connections, follow the instructions for setup. During setup, if you need more details on the procedure described, page numbers are provided where you can find complete,
After you’ve completed the setup, you’re ready to use your VCR. Procedures differ depending on the hookup you used. For an overview, refer to “Quick reference to using the VCR” on the back cover.
Before you get started
•Turn off the power to all equipment.
•Do not connect the AC power cords until all of the connections are completed.
•Be sure to make connections firmly. Loose connections may cause picture distortion.
•If your TV doesn’t match any of the examples provided, see your nearest Sony dealer or qualified technician.
Hookups 7
Audio/video (A/V) hookup
If your TV has audio/video (A/V) input jacks, you will get a better picture and sound if you hook up your VCR using these connections. If your TV doesn’t have A/V inputs, see the following pages for antenna or cable hookups.
If you’re not planning to use your VCR to record programs, you’re finished setting up the VCR after you’ve made the connections shown on pages 8 and 9. If you want to record regular or cable TV programs, complete these connections first, and then go to the following pages for antenna or cable hookups.
For SLV-LX70S and LX60S
For a true “home theater” experience, you should connect the audio outputs of your VCR or TV to your stereo system.
AUse this hookup if your TV has stereo jacks
VCR | Stereo receiver |
| TV |
AUDIO VIDEO |
|
AUX IN | |
IN |
|
LINE OUT |
|
VIDEO | AUDIO OUT |
AUDIO |
|
Audio/video cable (supplied) | Audio cable (not supplied) |
BUse this hookup if your TV doesn’t have stereo jacks
VCR | Stereo receiver |
| TV |
AUDIO VIDEO |
|
AUX IN | |
LINE OUT | IN |
| |
| VIDEO |
| AUDIO |
Video cable (not supplied) | Audio cable (not supplied) |
Notes
•If you don’t have a stereo receiver, connect the white LINE OUT/AUDIO L jack to the AUDIO IN jack on your TV.
•To play a tape in stereo, you must use the A/V connection.
•If you use the Trinitron TV Synchro Play function (see page 34), the A/V connection is necessary. (If your TV has two or more inputs, connect the audio/video cable to the VIDEO IN 1 jacks.)
8Hookups