For
AUse this hookup if your TV has stereo jacks
VCR
TV
AUDIO VIDEO
![]()
![]()
IN
LINE OUT
VIDEO
![]()
![]() AUDIO
AUDIO
Audio/video cable (not supplied)
BUse this hookup if your TV doesn’t have stereo jacks
VCR
TV
AUDIO VIDEO
![]()
![]()
LINE OUT
IN
VIDEO
![]()
![]() AUDIO
AUDIO
Audio/video cable (not supplied)
Note
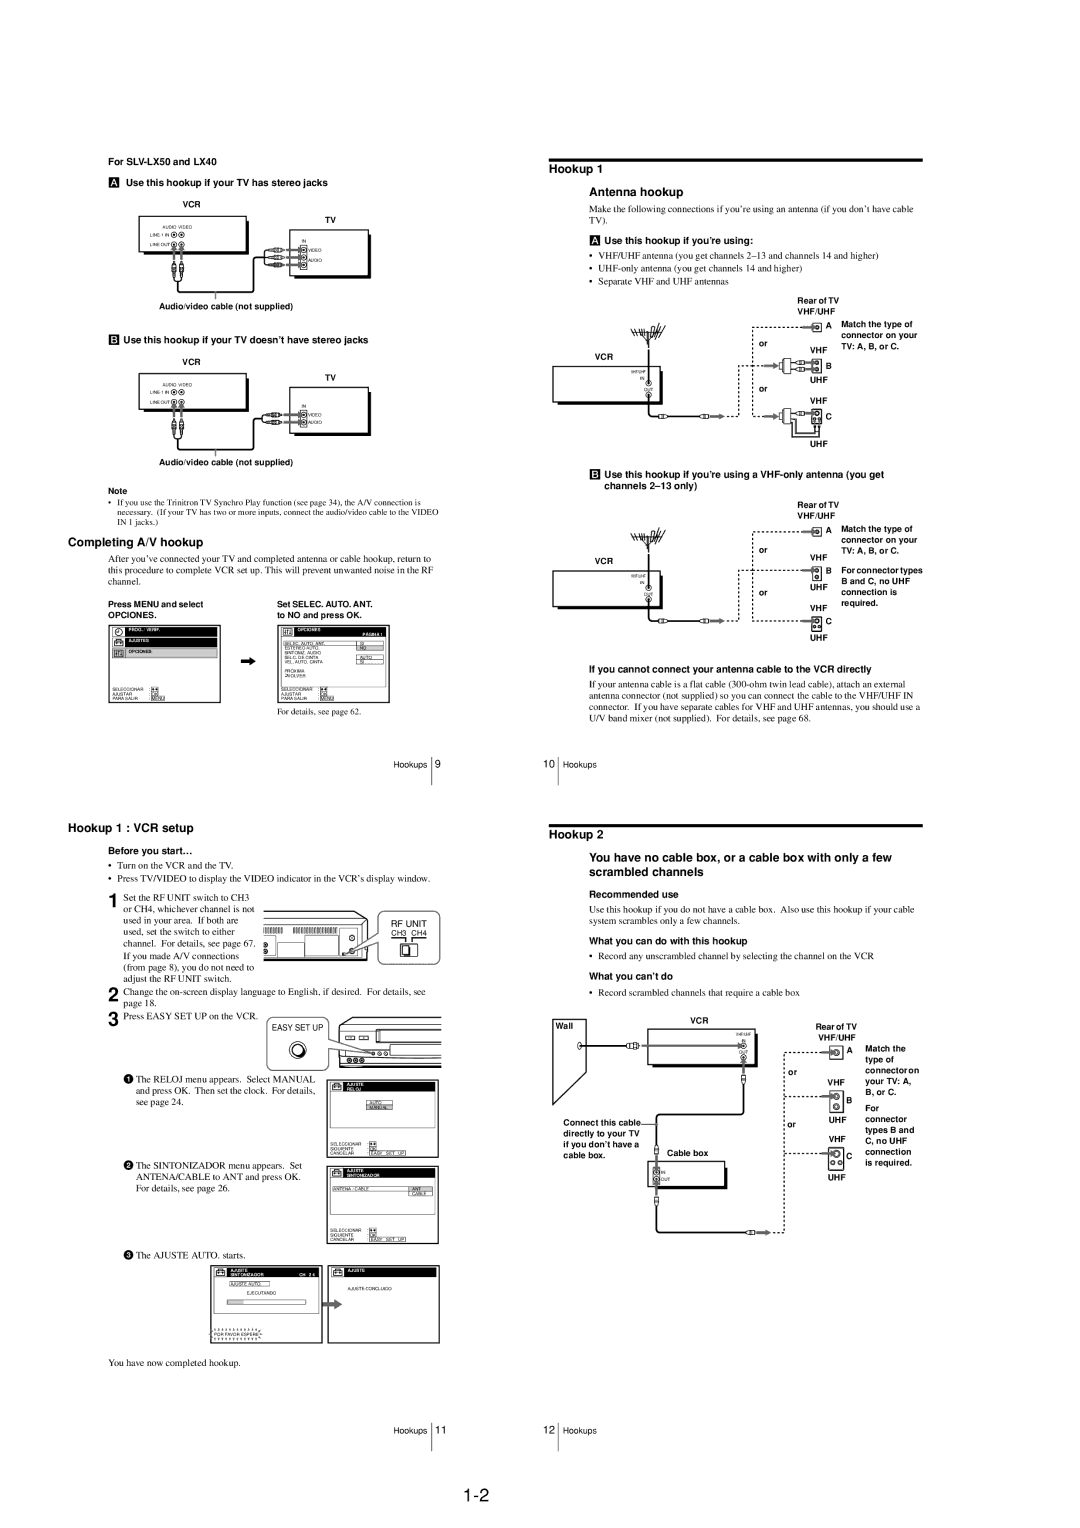
Hookup 1
Antenna hookup
Make the following connections if you’re using an antenna (if you don’t have cable TV).
AUse this hookup if you’re using:
•VHF/UHF antenna (you get channels
•
•Separate VHF and UHF antennas
|
| Rear of TV |
|
|
| VHF/UHF |
|
|
| A Match the type of | |
| or |
| connector on your |
| VHF | TV: A, B, or C. | |
|
| ||
VCR |
|
| |
| B |
| |
VHF/UHF |
|
| |
|
|
| |
IN |
| UHF |
|
| or |
| |
OUT |
|
| |
|
| VHF |
|
|
| C |
|
|
| UHF |
|
BUse this hookup if you’re using a
•If you use the Trinitron TV Synchro Play function (see page 34), the A/V connection is necessary. (If your TV has two or more inputs, connect the audio/video cable to the VIDEO IN 1 jacks.)
Completing A/V hookup
After you’ve connected your TV and completed antenna or cable hookup, return to this procedure to complete VCR set up. This will prevent unwanted noise in the RF
VCR
VHF/UHF
or
Rear of TV
VHF/UHF
![]()
![]()
![]() A Match the type of connector on your
A Match the type of connector on your
TV: A, B, or C.
VHF
B For connector types
channel.
IN
OUT
or
UHF
B and C, no UHF connection is
Press MENU and select | Set SELEC. AUTO. ANT. |
OPCIONES. | to NO and press OK. |
VHF
required.
| PROG. / VERIF. |
|
| OPCIONES | PÁGINA 1 |
| ||||||||
|
|
|
|
|
|
|
|
|
|
|
|
|
| |
|
|
|
|
|
|
|
|
|
|
|
|
|
|
|
| AJUSTES |
|
|
|
|
| SELEC. AUTO. ANT. | SI |
| |||||
|
|
|
|
|
|
| ESTEREO AUTO. | NO |
| |||||
|
|
|
|
|
|
| ||||||||
| OPCIONES | , | SINTONIZ. AUDIO |
|
| |||||||||
|
|
|
|
|
| SELC. DE CINTA | AUTO |
| ||||||
|
|
|
|
|
| VEL. AUTO. CINTA | SI |
| ||||||
|
|
|
|
|
|
| PRÓXIMA |
|
|
|
|
|
| |
|
|
|
|
|
|
| VOLVER |
|
|
|
|
|
| |
SELECCIONAR | : |
|
|
|
|
|
|
|
|
|
|
|
| |
|
|
|
| SELECCIONAR | : |
|
|
|
|
| ||||
AJUSTAR | : | OK |
|
| AJUSTAR | : | OK |
|
|
| ||||
PARA SALIR | : | MENU |
|
| PARA SALIR | : | MENU |
|
|
| ||||
|
|
|
|
|
|
|
|
|
|
|
|
|
|
|
For details, see page 62.
Hookups 9
Hookup 1 : VCR setup
Before you start…
•Turn on the VCR and the TV.
•Press TV/VIDEO to display the VIDEO indicator in the VCR’s display window.
![]() C
C
UHF
If you cannot connect your antenna cable to the VCR directly
If your antenna cable is a flat cable
10Hookups
Hookup 2
You have no cable box, or a cable box with only a few scrambled channels
1 Set the RF UNIT switch to CH3 or CH4, whichever channel is not used in your area. If both are
used, set the switch to either channel. For details, see page 67.
If you made A/V connections (from page 8), you do not need to
adjust the RF UNIT switch.
2 Change the
RF UNIT
CH3 CH4
For details, see
Recommended use
Use this hookup if you do not have a cable box. Also use this hookup if your cable system scrambles only a few channels.
What you can do with this hookup
•Record any unscrambled channel by selecting the channel on the VCR
What you can’t do
•Record scrambled channels that require a cable box
3 Press EASY SET UP on the VCR.
EASY SET UP
Wall
VCR
VHF/UHF
IN
OUT
Rear of TV |
|
VHF/UHF |
|
A | Match the |
| type of |
or | connector on |
1The RELOJ menu appears. Select MANUAL |
and press OK. Then set the clock. For details, |
see page 24. |
AJUSTE |
RELOJ |
AUTO |
VHF | your TV: A, |
| B, or C. |
| B |
2The SINTONIZADOR menu appears. Set ANTENA/CABLE to ANT and press OK. For details, see page 26.
3The AJUSTE AUTO. starts.
AJUSTE |
|
|
SINTONIZADOR | CH | 2 4 |
AJUSTE AUTO. |
|
|
EJECUTANDO |
|
|
POR FAVOR ESPERE |
|
|
|
|
|
|
| MANUAL |
|
|
|
| |||
|
|
|
|
|
|
|
|
|
|
|
|
|
SELECCIONAR | : |
|
|
|
|
|
|
|
|
| ||
SIGUIENTE | : |
| OK |
|
|
|
|
|
|
| ||
CANCELAR | : | EASY | SET | UP |
| |||||||
|
|
|
|
|
|
|
|
|
|
|
|
|
|
|
|
|
|
|
|
|
|
|
|
|
|
|
| AJUSTE |
|
|
|
|
|
|
|
|
|
|
|
| SINTONIZADOR |
|
|
|
|
|
| ||||
|
|
|
|
|
|
|
|
| ||||
| ANTENA / CABLE |
|
|
|
| ANT |
| |||||
|
|
|
|
|
|
|
|
|
|
| CABLE |
|
|
|
|
|
|
|
|
|
|
|
|
|
|
SELECCIONAR | : |
|
|
|
|
|
|
|
|
| ||
SIGUIENTE | : |
| OK |
|
|
|
|
|
|
| ||
CANCELAR | : | EASY | SET | UP |
| |||||||
|
|
|
|
|
|
|
|
|
|
|
|
|
|
|
|
|
|
|
|
|
|
|
|
|
|
|
|
|
|
|
|
|
|
|
|
|
|
|
|
| AJUSTE |
|
|
|
|
|
|
|
|
|
|
|
|
|
|
|
|
|
|
|
|
|
|
|
AJUSTE CONCLUIDO
Connect this cable |
|
|
|
|
|
| |
directly to your TV |
|
| |
if you don’t have a |
| Cable box | |
cable box. |
| ||
|
|
| IN |
|
|
| OUT |
|
|
|
|
|
| For |
or | UHF | connector |
| types B and | |
| VHF | |
| C, no UHF | |
| C | connection |
|
|
is required.
UHF
You have now completed hookup.
Hookups 11
12Hookups