Digital Micro Recorder NT-2
Operating Instr Mode demploi Bedienungsanle Manual de instr
Unpacking
Features
Table of Contents
Using on a dry battery mpage
Connecting to AC power mains and a CD player, etc
While pressing the red button, slide it
Select DIR Mode direction mode
Recording from a CD, etc
Start recording
Play the tape
Listening with the headphones
To play one side
To play both sides
Direction of the arrow
Using on a dry battery
Insert the battery with the side first
When the battery becomes weak Battery life
Lid is removed
Installing a lithium battery
After replacing the lithium battery
Lithium battery life
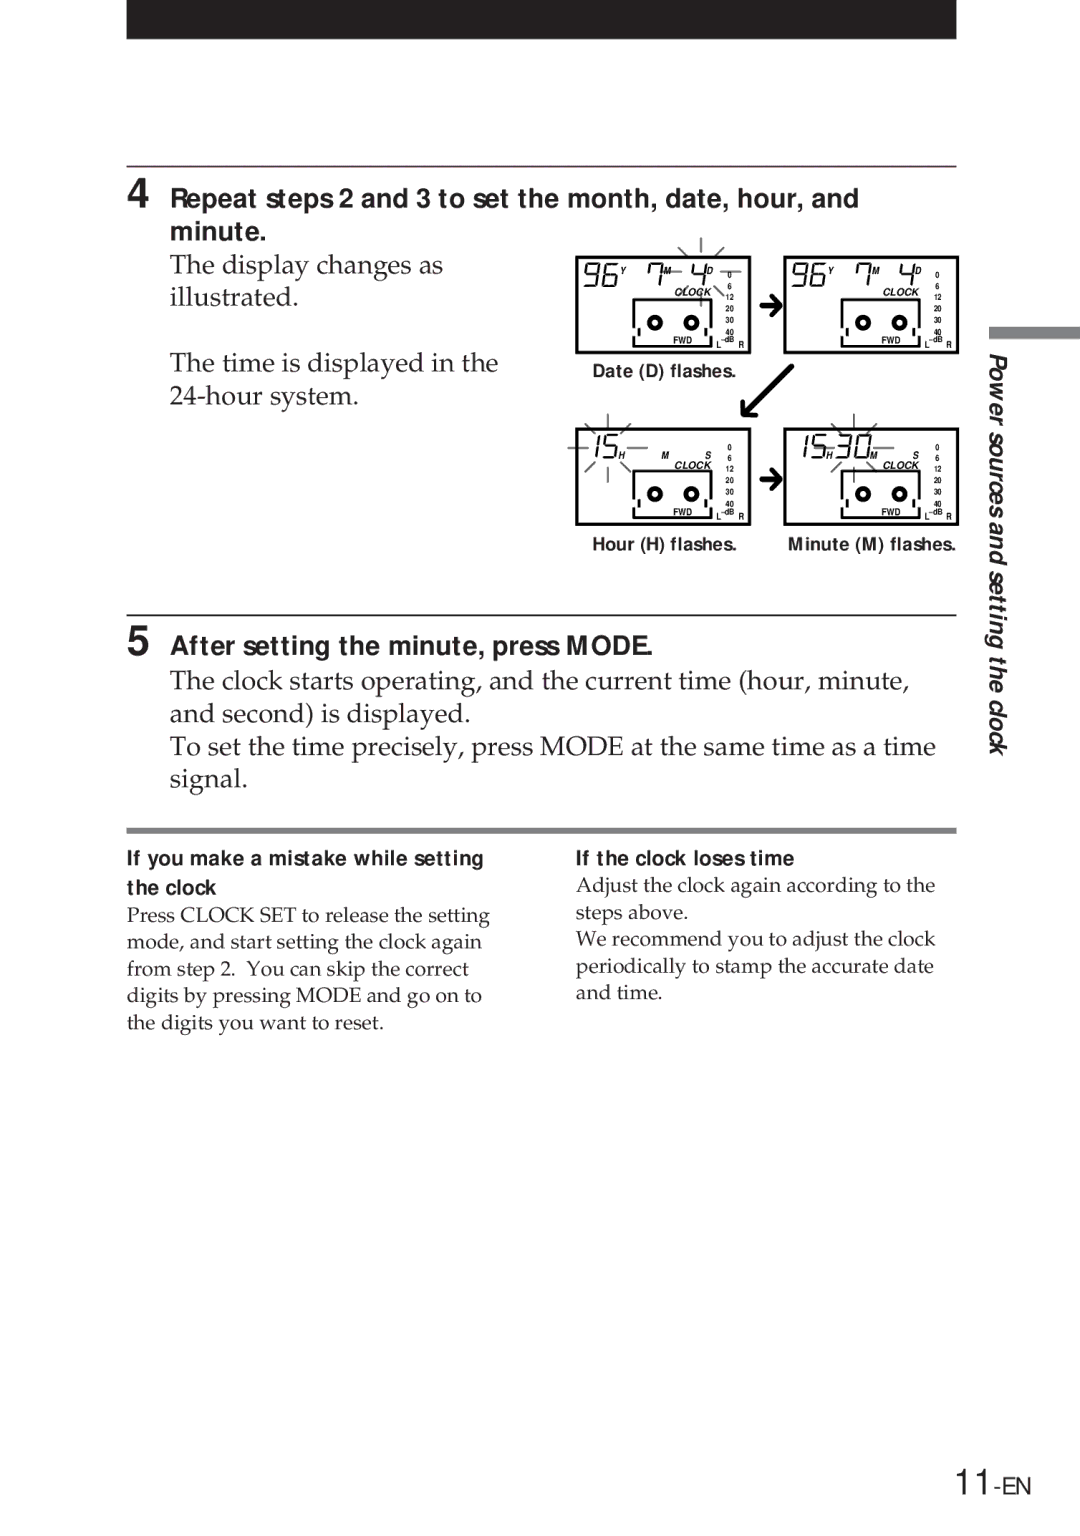
Press + or to enter the current year
Setting the clock
Press Mode
If the clock loses time
After setting the minute, press Mode
If you make a mistake while setting the clock
Repeat steps 2 and 3 to set the month, date, hour, Minute
Recording with a microphone
Select DIR Mode direction mode. a To record on one side
To start recording quickly
This unit adjust the recording level automatically
To adjust the recording level
Recording with a microphone
Press Mode repeatedly to select Speech or Music
Adjusting the recording level
Selecting the automatic adjustment mode
Press Function in recording or recording stanby mode
Recording level control is switched to manual control
Adjusting the recording level manually Manual recording
Adjusting the recording level
Press Mode repeatedly to select Manual
Remaining time display
To reset the tape counter
When Remain flashes in the display
Displays while recording
Press Ï
Adjust the volume on the stereo system
Listening with a stereo system
To play only one side To play both sides continuously
Operation while playing back Press
To listen to a tape in a car
Press Function Press Mode to select Bass 1 or Bass
Using the playback features
Emphasizing the bass Bass Boost feature
To select with the remote controller
Protecting your hearing Avls
Slide Avls on the remote controller to on
Displays while playing
While the recorder is not operating, press p for a while
Locking the controls Hold function
Knowing the side of a tape A/B side checking function
Slide Hold in the direction of the arrow
On battery
Precautions
On the AC power adaptor
On installation
To prevent accidental erasure
On the headphones
On tape
On moisture condensation
How to use the cleaning cassette
Maintenance
Cleaning the tape head
Cleaning the cabinet
Symptom Cause and remedy
Troubleshooting Guide
General
Specifications
General Supplied Accessories
Accessories
Specifications
Preparing an NT cassette tape
What is the NT Non-Tracking format?
Stamp-size cassette tapes
Non-Tracking format
What is the NT Non-Tracking format?
33-EN
Memory reverse function
Non-Loading method
Stop button
Looking at the controls
Recorder
Function button
Looking at the controls
Rear of the recorder
Remote controller
Display window
BB Bass Boost indication
¼ REC Mode recording mode Indication
Battery indication Flashes when the dry battery is weak
REC record indication
Déballage
Caractéristiques
Table des matières
Utilisation d’une pile sèche mpage
Faites glisser la touche rouge, tout en l’enfonçant
Sélectionnez DIR Mode direction mode
Enregistrement à partir d’un CD, etc
Lancez l’enregistrement
Pour Appuyez sur
Ecoute avec les écouteurs
APour lire les deux faces Sans interruption
Lisez la cassette
Lorsque la pile faiblit
Utilisation d’une pile sèche
Dans la direction de la flèche
Introduisez le côté de la pile en premier lieu
Le couvercle est retiré
Installation d’une pile au lithium
Longévité d’une pile au lithium
Après remplacement de la pile au lithium
Appuyez sur + ou pour entrer l’année en cours
Réglage de l’horloge
10-F
Si l’horloge se dérègle
Après avoir réglé les minutes, appuyez sur Mode
11-F
’heure est indiquée suivant le système à 24 heures
12-F
Enregistrement avec un microphone
Pour commencer à enregistrer rapidement
13-F
Enregistrement avec un microphone
14-F
Appuyez sur Function
Sélection du mode de réglage automatique
Réglage du niveau d’enregistrement
15-F
Réglage du niveau d’enregistrement
16-F
Pour réinitialiser le compteur de bande
Affichages pendant l’enregistrement
17-F
Affichage du temps restant
18-F
Ecoute d’un système stéréo
Ecouter une cassette dans la voiture
Commandes en cours de lecture Pour Appuyez sur
19-F
Fonction d’accentuation des graves Bass Boost
Pour faire la sélection avec la commande à distance
Utilisation des fonctions de lecture
20-F
Prévention des troubles de l’ouïe fonction Avls
Réglez le commutateur Avls de la télécommande sur on
21-F
22-F
Affichage pendant la lecture
Déplacez le commutateur Hold en direction de la flèche
23-F
24-F
Précautions
Propos de la condensation d’humidité
25-F
Propos de la cassette
Propos des écouteurs
Nettoyage du boîtier
Entretien
26-F
Nettoyage de la tête audio
Symptôme Cause et remède
Guide de dépannage
27-F
Généralités
28-F
MGuide de dépannage
29-F
Caractéristiques
Accessoires Fournis
30-F
Caractéristiques de la cassette NT
31-F
Cassette de la taille d’un timbre poste
Préparation de la cassette NT
Qu’est-ce que le format NT Non-Tracking?
32-F
Le format Non-Tracking
33-F
Fonction de mémoire d’inversion
34-F
Méthode sans chargement
’enregistreur
Liste des commandes
35-F
Arrière de l’enregistreur
Liste des commandes
36-F
Touche FF fast-forward
La commande à distance
37-F
Fixation de l’étui de transport
’écran d’affichage
38-F
Indication BB Bass Boost
Indication REC Mode recording mode
39-F
Indication REC record
Funktionen
Inhalt
Betrieb mit einer Trockenbatterie mSeite
Anschließen an den Netzstrom und an einen CD-Player usw
Geben Sie die gewünschte CD etc. wieder
Wählen Sie DIR Mode Richtung
Aufnehmen von CD etc
Starten Sie die Aufnahme
Funktionen während der Wiedergabe Drücken Sie
Wiedergabe über die Kopfhörer
So geben Sie beide Seiten fortlaufend wieder
Spielen Sie die Kassette ab Stellen Sie die Lautstärke ein
Wenn die Batterie schwach wird Lebensdauer der Batterie
Betrieb mit einer Trockenbatterie
Und schieben Sie ihn gleichzeitig in Richtung des Pfeils
Legen Sie die Batterie mit dem Minuspol zuerst ein
Der Deckel kann abgenommen werden
Einlegen einer Lithiumbatterie
Schieben Sie den
Hinweise zur Lithiumbatterie
Lebensdauer der Lithiumbatterie
Nach dem Ersetzen der Lithiumbatterie
Drücken Sie + oder -, um das aktuelle Jahr einzugeben
Drücken Sie Mode
Einstellen der Uhr
10-D
Wenn die Uhr nachgeht
Nachdem Sie die Minuten eingestellt haben, drücken Sie Mode
11-D
12-D
Aufnehmen über ein Mikrofon
13-D
Wenn Sie DIR Mode Richtung auf Beide Seiten stellen
Aufnehmen über ein Mikrofon
14-D
Drücken Sie Function
Einstellen des Aufnahmepegels
15-D
Auswählen des automatischen Einstellmodus
Drücken Sie mehrmals MODE, um Manual auszuwählen
16-D
Einstellen des Aufnahmepegels von Hand Manuelle Aufnahme
Einstellen des Aufnahmepegels
So stellen Sie den Bandzähler auf
Display-Anzeigen während der Aufnahme
17-D
Restlaufzeitanzeige
Stellen Sie an Ihrer Stereoanlage die Lautstärke ein
Wiedergabe über ein Stereosystem
18-D
Drücken Sie Ï
So können Sie im Auto Kassetten hören
19-D
So wählen Sie die Einstellung mit der Fernbedienung
Einstellen der Klangqualität
20-D
Betonen der Bässe Bass BOOST-Funktion
Schalten Sie die AVLS-Funktion an der Fernsteuerung ein
21-D
Vermeiden von Gehörschäden AVLS-Funktion
22-D
Display-Anzeigen während der Wiedergabe
Schieben Sie Hold in Richtung des Pfeils
Abrufen der Bandseite A/B Side
23-D
24-D
Sicherheitsmaßnahmen
Kondensationsfeuchtigkeit
25-D
Hinweis zum Band
Kopfhörer
Reinigen des Gehäuses
Wartung
26-D
Reinigen des Tonkopfes
27-D
Symptom Ursache und Abhilfemaßnahmen
Störungsbehebung
Störungsbehebung
Symptom
Technische Daten
28-D
29-D
Mitgeliefertes Zubehör
30-D
Technische Daten
Vorbereiten einer NT-Kassette
Was ist das NT-Format Non-Tracking?
31-D
Briefmarkengroße Kassetten
Was ist das NT-Format Non-Tracking?
32-D
Das Non-Tracking-Format
33-D
Nonstop-Reverse
34-D
Non-Loading-System
Der Recorder
35-D
Taste Clock SET Buchse DC Fach für Lithiumbatterie
36-D
Rückseite des Recorders
Lage und Funktion der Teile und Bedienelemente
Die Fernbedienung
37-D
Das Display
38-D
Anzeige i Batterie
39-D
Anzeige BB Bass Boost
Desembalaje
Características
Indice
Uso de una pila seca mpágina
Reproduzca el CD, etc
Grabación desde un disco compacto, etc
Inicie la grabación
Deslice el botón rojo mientras lo pulsa
Para Pulse
Reproduzca la cinta Ajuste el volumen
Utilización de los auriculares
APara reproducir ambas caras consecutivamente
Cuando la pila se agota
Uso de una pila seca
La dirección de la flecha simultáneamente
Inserte la pila con el polo en primer lugar
Se retira la tapa
Instalación de una pila de litio
Notas sobre la pila de litio
Duración de la pila de litio
Después de sustituir la pila de litio
Pulse + o para introducir el año actual
Pulse Mode
Puesta en hora del reloj
10-E
Si el reloj se atrasa
Después de ajustar los minutos, pulse Mode
Si comete un error al poner en hora el reloj
11-E
12-E
Seleccione DIR Mode modo de dirección
Grabación con un micrófono
Para iniciar la grabación con rapidez
13-E
Para detener la grabación
Para ajustar el nivel de grabación
Para mezclar sonido de las fuentes de audio
14-E
Grabación con un micrófono
REC Protect y 9 REV
Selección del modo de ajuste automático
Pulse Mode varias veces para seleccionar Speech o Music
Ajuste del nivel de grabación
15-E
Ajuste del nivel de grabación
Pulse Mode varias veces para seleccionar Manual
16-E
Ajuste manual del nivel de grabación Grabación manual
Para poner a cero el contador de cinta
Indicaciones durante la grabación
17-E
Indicación del tiempo restante
Pulse Ï
Ajuste el volumen del sistema estereofónico
Escucha con un sistema estereofónico
18-E
Funcionamiento durante la reproducción Para Pulse
19-E
Para escuchar una cinta en un automóvil
Para realizar la selección con el mando a distancia
Uso de las funciones de reproducción
20-E
Enfasis de graves Función de elevación de graves
Deslice Avls en el mando a distancia hasta la posición on
21-E
Protección de los oídos Función Avls
22-E
Indicaciones durante la reproducción
Segundos
23-E
Deslice Hold en la dirección de la flecha
Si la grabadora no está en funcionamiento, pulse p
24-E
Precauciones
Para evitar el borrado accidental
Cintas
Auriculares
Condensación de humedad
Limpieza del aparato
Mantenimiento
26-E
Limpieza del cabezal de cinta
Síntoma Causa y solución
Guía de solución de problemas
27-E
28-E
Especificaciones
General Accesorios Suministrados
29-E
Accesorios que Pueden adquirirse en tiendas del ramo
30-E
Especificaciones
Preparación de una cinta NT
¿Qué es el formato NT sin pistas?
31-E
Cintas de tamaño de sello
¿Qué es el formato NT sin pistas?
32-E
Formato sin pistas
33-E
Función de memoria de reproducción inversa
34-E
Método sin carga
Botón p
Ubicación de los controles
35-E
La grabadora
Ubicación de los controles
36-E
Parte posterior de la grabadora
El mando a distancia
37-E
El visor
38-E
Indicación BB Elevación de graves
Indicación REC Mode modo de grabación
39-E
Indicación REC grabación