080-134-112
2000 Sony Corporation
For the customers in the USA
Class II Laser Product
Voor de klanten in Nederland
For the customers in Canada
For the customers in the United Kingdom
Page
Table of Contents
Specifications 36 GB Index 42 GB
Maintenance
Troubleshooting
Precautions
Features
Rear/Right Side/Bottom
Location and Function of Controls
Front/Left Side
How to use the adjuster
Clean the air filter every 300 hours to ensure
Ql Adjuster buttons Connector panel
To adjust the height
Control panel
Connector panel
Input a connectors
Control S IN/PLUG in Power DC 5V output jack
Video in jacks
Remote Commander
Installing the Projector
Battery installation
Connecting with a Computer
When connecting with an IBM PC/AT compatible computer
Boot up the computer
When making connections, be sure to
When connecting with a Macintosh computer
Using the Digital RGB Tmds connector
On the USB function
Connecting with a VCR/15k RGB/ Component Equipment
Using USB equipment e.g., USB mouse
Connecting to a Hdtv 1035/60i
To clear the menu display
Projecting
To get the clearest picture
To turn off the power
About the air filter cleaning
When you cannot confirm the on-screen message
To correct the trapezoid
Effective tools for your presentation
To enlarge the image Digital Zoom function
To use the Laser Pointer function
To return the image back to its original size
Using the Menu
Picture Ctrl Menu
Gamma Mode
Contrast
Bright
Color
Input Setting Menu
DOT Phase
Size H
Shift
Preset signals
About the preset memory No
Input signal Video or 15k RGB
RGB 1 B&W
SET Setting Menu
INPUT-A
Auto Input SEL
Language
Install Setting Menu
To calculate the installation measurement unit mm
Installation Examples
Floor Installation
Ceiling Installation
Unsuitable Installation
Unsuitable Conditions for Use
Poorly ventilated Very dusty
Toppling of the unit
Blocking the ventilation holes
Maintenance
When replacing the lamp after using the projector
Replacing the Lamp
If the lamp breaks, consult with qualified Sony personnel
Cleaning the Air Filter
Air filter should be cleaned every 300 hours
Disposal of used projector lamp
Notch
Troubleshooting
Power
Symptom Cause Remedy
Image
Troubleshooting
Sound
Others
Message Meaning Remedy
Specifications
Optical characteristics
Electrical characteristics
Input/Output
Laser beam
General
Optional accessories
RGB input connector HD D-sub 15-pin, female
Mouse connector 13-pin, female
RS-232C connector D-sub 9-pin, female
Mouse cable pin assignment
Digital RGB input connector DFP 20-pin, female
USB connector
Dimensions
Front
Top
Center of the unit
Center of the unit Unit mm inches
Side
Bottom
Index
X, Y, Z
Page
Cette étiquette est apposée au dos de la télécommande
Avertissement sur la connexion é lectrique
Pour les utilisateurs au Canada
Remarques
Table des matiè res
Spé cifications
Entretien
Dé pannage
Pré cautions
Caracté ristiques
Avant/Cô té gauche
Arriè re/Cô té droit/Dessous
Pour ré gler la hauteur
Panneau de commande
Utilisation du support ré glable
Touche Reset
Indicateurs
Touche I / 1 marche / veille
Touche Input
Panneau des connecteurs
Té lé commande
Remarques sur le faisceau laser
Remarques sur les piles
Installation des piles
Remarques sur le fonctionnement de la té lé commande
Installation du projecteur Raccordement
Raccordement à un ordinateur
Lors de l’é tablissement des connexions
Raccordement à un ordinateur Macintosh
Raccordement à un ordinateur IBM PC/AT compatible
Systè me d’exploitation recommandé
Utilisation du connecteur Digital RGB Tmds
Utilisation d’un appareil USB p.ex., souris USB
Propos de la fonction USB
Câble BNC Câble de Non fourni Connexion
Câble S Câble audio Vidéo
Vidéo fourni
Projection
Pour faire disparaître le menu
Pour obtenir l’image la plus claire
Pour ré gler le trapè ze
Mettez la valeur sur négatif
Mettez la valeur sur positif
Pour mettre le projecteur hors tension
Sur le nettoyage du filtre à air
Pour agrandir l’image fonction de zoom numé rique
Pour utiliser la fonction de pointeur laser
Utilisation du Menu
Le menu Ctrl Image
Mode Gamma
Contraste
Lumiere
Couleur
Le menu Regl Entree
Standard Systè me couleur
Signaux d’entré e et paramè tres de ré glage/ajustables
Paramè tre
Phase
Conv Freq convertisseur de balayage
Ampl H
Depl
Signal présélectionné Sync
Signal De mé moire
Signaux pré sé lectionné s
KHz
Le menu Reglage
Mode Lampe
Le menu REGL. Instal
Memoire Trapez
Trapeze Numer
Pour calculer les distances d’installation unité mm
Exemples d’installation
Installation au sol
Installation au plafond
Installation dé conseillé e
Conditions d’utilisation dé conseillé es
Inclinaison vers l’avant/l’arriè re et la droite/la gauche
’obstruez pas les orifices de ventilation
Remplacement de la lampe
Remplacement de la lampe aprè s avoir utilisé le projecteur
Entretien
Si la lampe se brise, consultez le personnel Sony qualifié
Encoche
Nettoyage du filtre à air
Elimination de la lampe pour projecteur usagé e
Dé pannage
Alimentation
Symptô me Cause Remè de
Désactiver la fonction de suppression voir
Son
Divers
Messages d’avertissement
Messages de mise en garde
Spé cifications
Caracté ristiques optiques
Caracté ristiques é lectriques
Entré es/sorties
Faisceau laser
Caracté ristiques gé né rales
Accessoires en option
Assignation des broches
Connecteur d’entré e RGB HD D-sub à 15 broches, femelle
Connecteur Mouse 13 broches, femelle
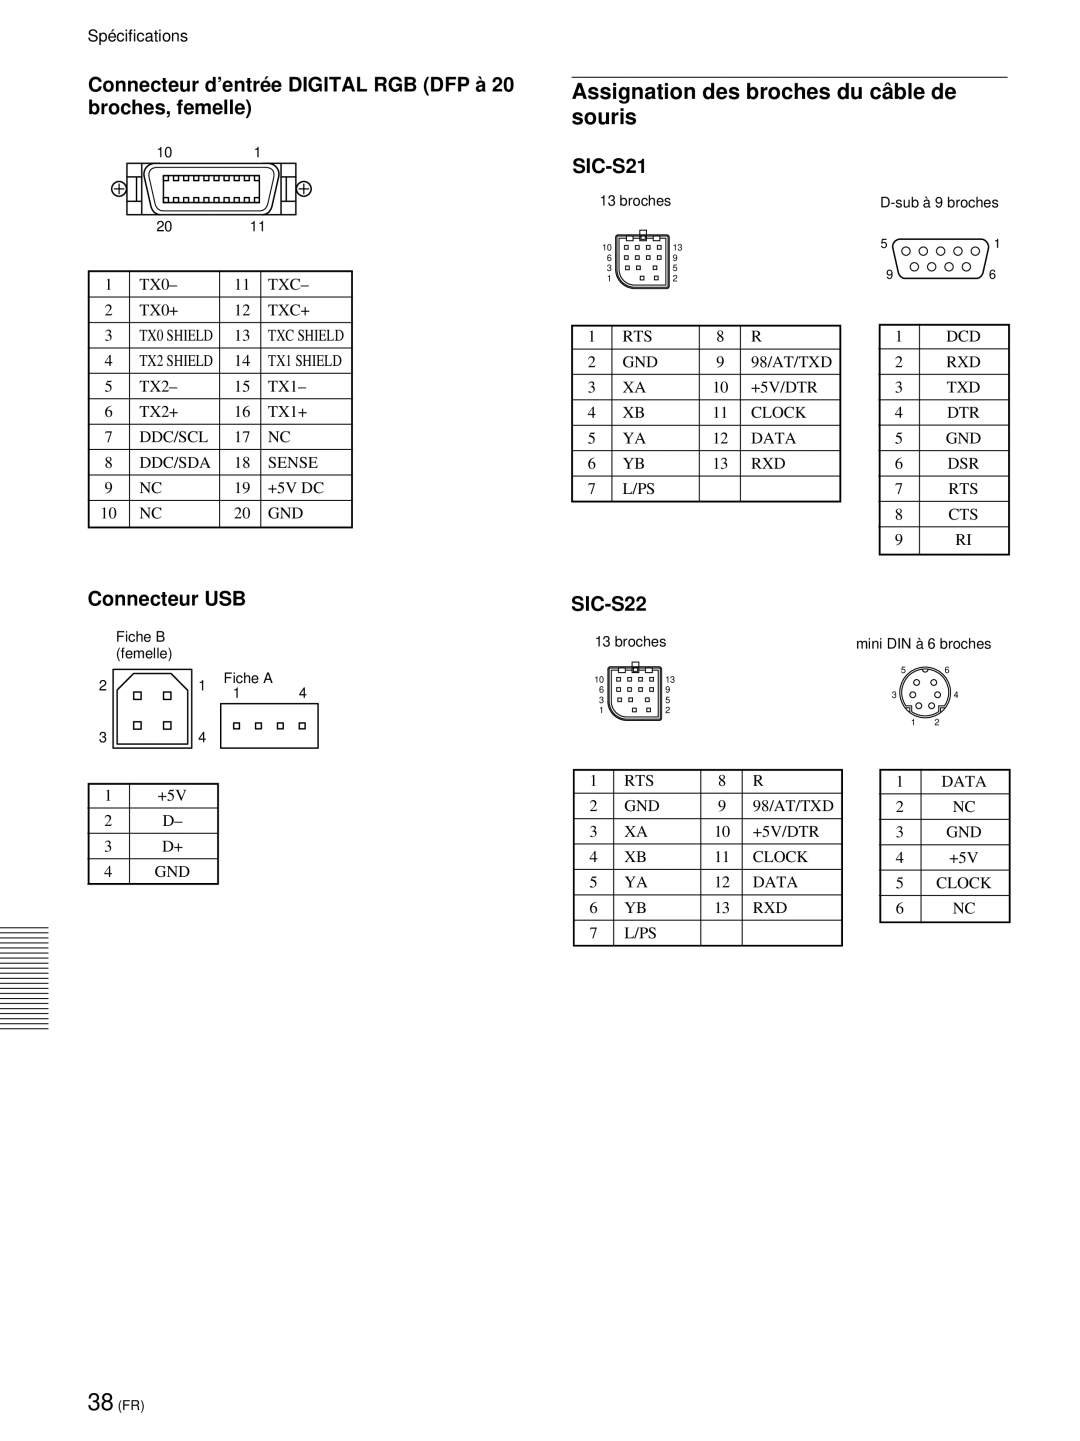
Assignation des broches du câ ble de souris
Connecteur d’entré e Digital RGB DFP à 20 broches, femelle
Connecteur USB
Fiche B Femelle Fiche a
Centre de l’appareil
Avant
Dessus
Centre de l’appareil Unité mm pouces
Cô té
Bas
V, W, X, Y, Z
Contraste 21 FR
Advertencia sobre la conexió n de alimentació n
Notas
Corriente y tensión nominal
Homologación de seguridad
Índice
Solució n de problemas
Mantenimiento
Especificaciones
Índice alfabé tico
Precauciones
Características
Parte posterior/derecha/inferior
Ubicació n y funció n de los controles
Parte frontal/izquierda
Có mo utilizar el ajustador
Qk Botón de la cubierta del filtro de aire
Ql Botones del ajustador Panel de conectores
Para ajustar la altura
Panel de control
Panel de conectores
Conectores Input a
Conector Mouse 13 pines Se conecta al
Tomas Video
Mando a distancia
Notas sobre el haz lá ser
Notas sobre el funcionamiento del mando a distancia
Instalació n de las pilas
Notas sobre las pilas
Instalació n del proyector Conexió n
Conexió n con un ordenador
Al realizar conexiones, asegú rese de
Si se conecta con un ordenador Macintosh
Si se conecta con un ordenador IBM PC/ AT compatible
Uso del conector Digital RGB Tmds
Empleo de un equipo USB p. ej., un rató n USB
Sobre la funció n USB
Entorno operativo recomendado
Componente Audio Equipo 15k RGB/componente
Conexión de un dispositivo de alta definición 1035/60i
Cable de Vídeo S no Audio/vídeo Suministrado
Para que desaparezca el menú
Para obtener imá genes con la mayor nitidez posible
Para corregir la distorsió n trapezoidal
Ajuste el valor en negativo
Ajuste el valor en positivo
Herramientas efectivas para la presentació n
Para desactivar la alimentació n
Limpieza del filtro de aire
Para aumentar la imagen funció n de zoom digital
Uso del Menu
Menú Ctrl Imagen
Para que la pantalla de menú desaparezca
Acerca de la memoria de los ajustes
Modo Gamma
Temp Color
Brillo
Tonalidad
Menú Ajus Entrad
Fase Punto
Tamano H
Desplaz
Señ ales de entrada y elementos de ajuste/ ajustables
Señ ales predeterminadas
Acerca del nú mero de memoria predeterminada
Elemento Señ al de entrada Vídeo o 15k RGB
Menú Ajuste
Entrad a
BÚ SQ Entr Auto
Idioma
Menú Ajuste Inst
Para calcular las medidas de la instalació n unidad mm
Ejemplos de instalació n
Instalació n en el suelo
Instalació n en el techo
Condiciones de uso inadecuadas
Notas para la instalació n
Instalació n inadecuada
Bloqueo de los orificios de ventilació n
Al sustituir la lá mpara despué s de utilizar el proyector
Mantenimiento
Sustitució n de la lá mpara
Muesca
Limpieza del filtro de aire
Para deshacerse de una lá mpara para proyector usada
Solució n de problemas
Alimentació n
Imagen
Síntoma Causa Solució n
Sonido
Otros
Mensajes de aviso
Mensajes de precaució n
Especificaciones
Características ó pticas
Características elé ctricas
Entrada/salida
Haz de lá ser
Generales
Asignació n de pines
Accesorios opcionales
Conector de entrada RGB HD D-sub de 15 pines, hembra
Conector Mouse 13 pines, hembra
Conector de entrada Digital RGB DFP de 20 pines, hembra
Asignació n de pines del cable de rató n SIC-S21
Enchufe B Hembra Enchufe a
Pines Sub de 9 pines
Dimensiones
Parte frontal
Parte superior
Centro de la unidad
Centro de la unidad Unidad mm plugadas
Parte lateral
Parte inferior
W, X, Y, Z
Índice alfabé tico
K, L