|
|
| SLEU063 | |
|
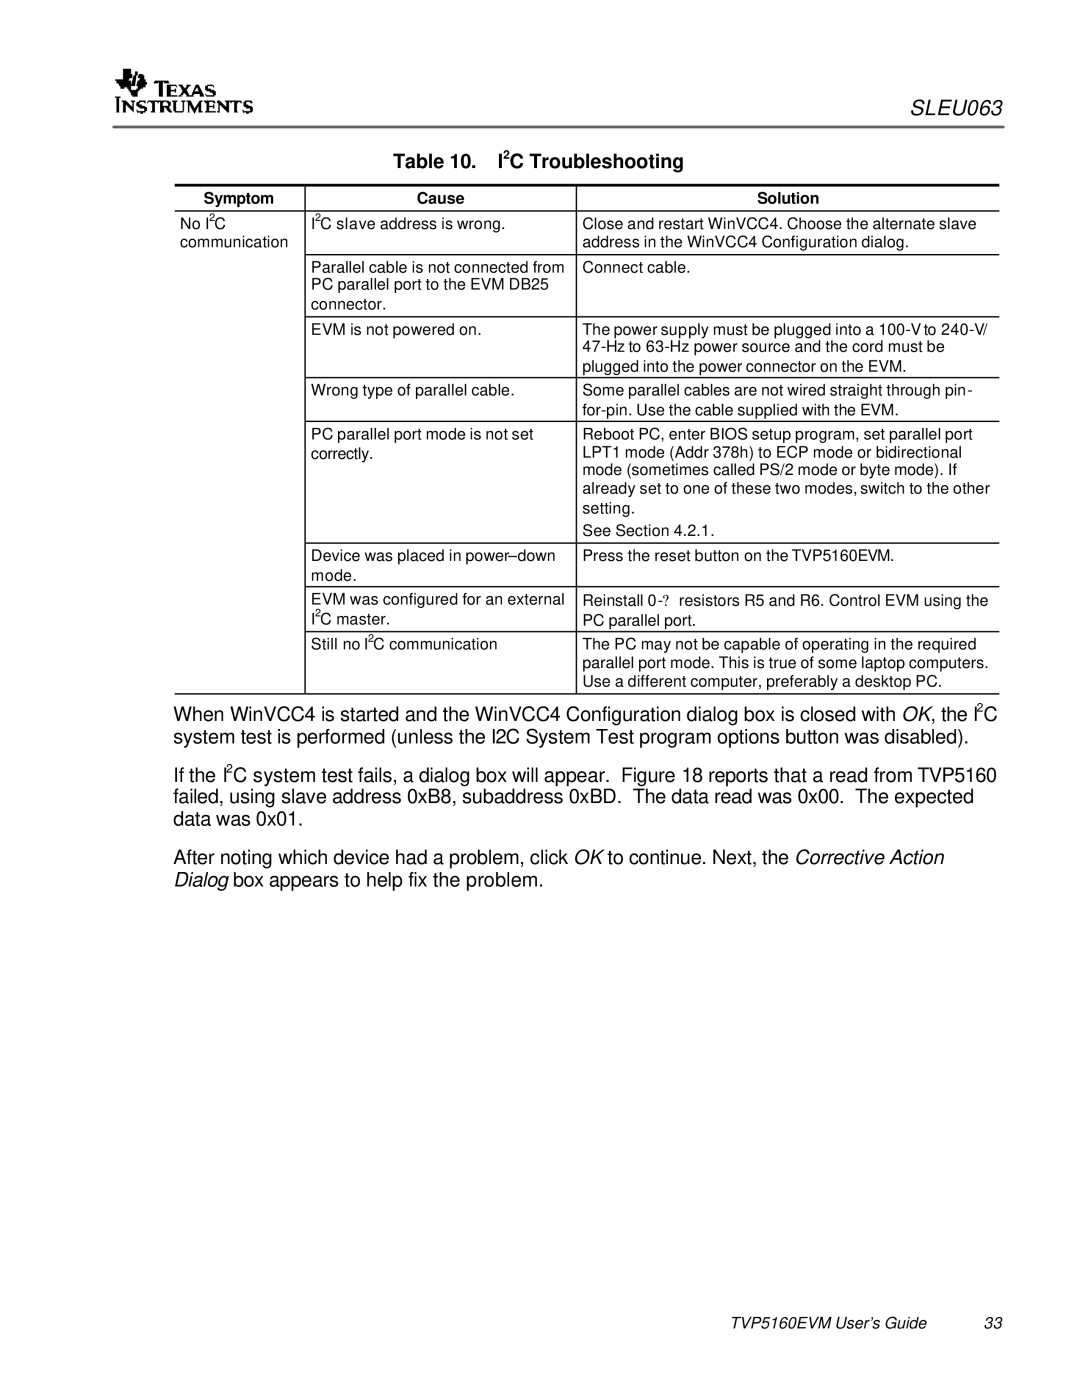
| Table 10. I2C Troubleshooting | ||
|
|
|
|
|
| Symptom | Cause | Solution | |
|
|
|
|
|
| No I2C | I2C slave address is wrong. | Close and restart WinVCC4. Choose the alternate slave | |
| communication |
| address in the WinVCC4 Configuration dialog. | |
|
|
|
|
|
|
| Parallel cable is not connected from | Connect cable. | |
|
| PC parallel port to the EVM DB25 |
|
|
|
| connector. |
|
|
|
|
|
|
|
|
| EVM is not powered on. | The power supply must be plugged into a | |
|
|
| ||
|
|
| plugged into the power connector on the EVM. |
|
|
| Wrong type of parallel cable. | Some parallel cables are not wired straight through pin- | |
|
|
|
| |
|
| PC parallel port mode is not set | Reboot PC, enter BIOS setup program, set parallel port | |
|
| correctly. | LPT1 mode (Addr 378h) to ECP mode or bidirectional | |
|
|
| mode (sometimes called PS/2 mode or byte mode). If | |
|
|
| already set to one of these two modes, switch to the other | |
|
|
| setting. | |
|
|
| See Section 4.2.1. | |
|
|
|
|
|
|
| Device was placed in | Press the reset button on the TVP5160EVM. | |
|
| mode. |
|
|
|
| EVM was configured for an external | Reinstall | |
|
| I2C master. | PC parallel port. |
|
|
| Still no I2C communication | The PC may not be capable of operating in the required | |
|
|
| parallel port mode. This is true of some laptop computers. | |
|
|
| Use a different computer, preferably a desktop PC. | |
|
|
|
|
|
When WinVCC4 is started and the WinVCC4 Configuration dialog box is closed with OK, the I2C system test is performed (unless the I2C System Test program options button was disabled).
If the I2C system test fails, a dialog box will appear. Figure 18 reports that a read from TVP5160 failed, using slave address 0xB8, subaddress 0xBD. The data read was 0x00. The expected data was 0x01.
After noting which device had a problem, click OK to continue. Next, the Corrective Action Dialog box appears to help fix the problem.
TVP5160EVM User’s Guide | 33 |