Step 7: Backguard Installation

6” or 9” LOW BACK:

6” Low Back – included with 30” Pro Harmony Gas Range.

Model GP36LB, 9” tall – for 36” Pro Harmony Gas Ranges.

22” High POT-and-PAN SHELF:

Model GP30HS – for 30” Pro Harmony Gas Range. Model GP36HS – for 36” Pro Harmony Gas Ranges. 3” ISLAND TRIM:

Model GP30IT – for 30” Pro Harmony Gas Range. Model GP36IT – for 36” Pro Harmony Gas Ranges.

·The backguard must be attached before sliding the range into the final, installed position. A Low Back or Pot-and-Pan Shelf must be installed when there is less than 12” clearance from a combustible back wall and the back of the range above the cooking surface. SEE RANGE INSTALLATION MANUAL.

·An Island Trim is available for covering the backguard area of the range for island installations; however, the Island Trim can only be used where there is a minimum of 12” horizontal clearance between a combustible back wall and the back of the range.

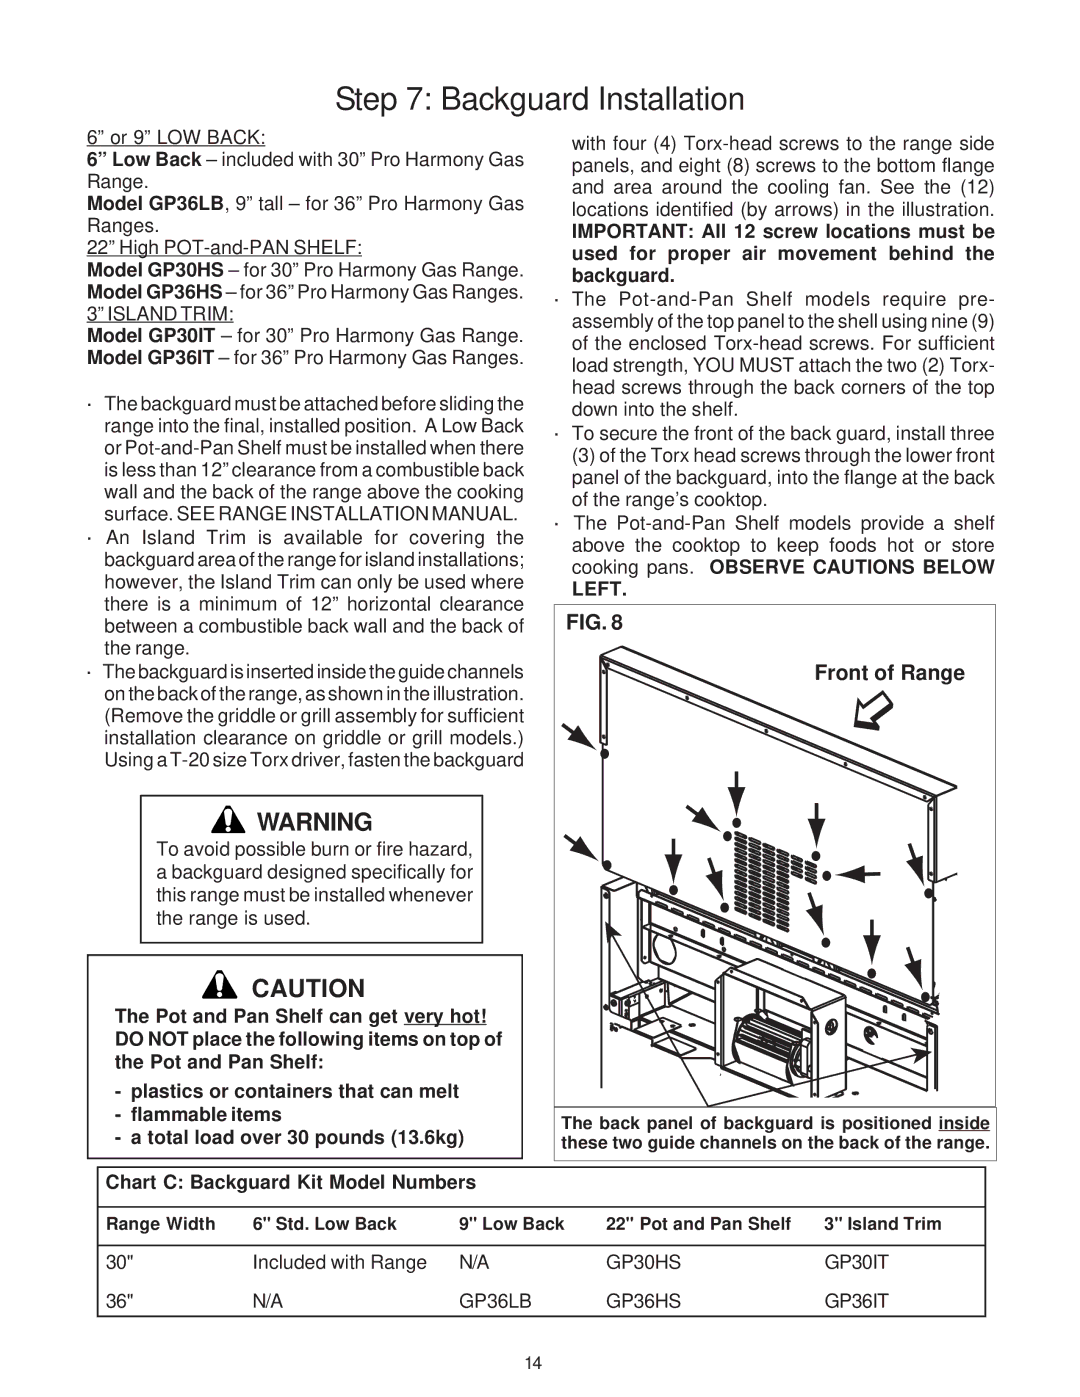
·The backguard is inserted inside the guide channels on the back of the range, as shown in the illustration. (Remove the griddle or grill assembly for sufficient installation clearance on griddle or grill models.) Using a T-20 size Torx driver, fasten the backguard

WARNING

To avoid possible burn or fire hazard, a backguard designed specifically for this range must be installed whenever the range is used.

CAUTION

The Pot and Pan Shelf can get very hot! DO NOT place the following items on top of the Pot and Pan Shelf:

-plastics or containers that can melt

-flammable items

-a total load over 30 pounds (13.6kg)

with four (4) Torx-head screws to the range side panels, and eight (8) screws to the bottom flange and area around the cooling fan. See the (12) locations identified (by arrows) in the illustration.

IMPORTANT: All 12 screw locations must be used for proper air movement behind the backguard.

·The Pot-and-Pan Shelf models require pre- assembly of the top panel to the shell using nine (9) of the enclosed Torx-head screws. For sufficient load strength, YOU MUST attach the two (2) Torx- head screws through the back corners of the top down into the shelf.

·To secure the front of the back guard, install three

(3) of the Torx head screws through the lower front panel of the backguard, into the flange at the back of the range’s cooktop.

·The Pot-and-Pan Shelf models provide a shelf above the cooktop to keep foods hot or store cooking pans. OBSERVE CAUTIONS BELOW

LEFT.

FIG. 8

Front of Range

￿

The back panel of backguard is positioned inside these two guide channels on the back of the range.

Chart C: Backguard Kit Model Numbers

Range Width

6" Std. Low Back

9" Low Back

22" Pot and Pan Shelf

3" Island Trim


30"

Included with Range

N/A

GP30HS

GP30IT

36"

N/A

GP36LB

GP36HS

GP36IT

14

Page 17
Image 17
Thermador P30 installation instructions Backguard Installation, Front of Range, Chart C Backguard Kit Model Numbers

P30 specifications

The Thermador P30 is a premium wall oven designed for culinary enthusiasts who demand precision, performance, and luxury in their kitchen. This standout appliance exemplifies Thermador’s commitment to innovation, offering a host of features and technologies that elevate the cooking experience.

One of the key features of the Thermador P30 is its powerful convection cooking system. This technology uses a fan and a third heating element to circulate hot air evenly throughout the oven, ensuring that every dish is cooked uniformly. This method not only enhances cooking efficiency but also significantly reduces cooking times, allowing users to prepare meals faster without compromising on quality.

The P30 also boasts a 10 culinary modes feature, which grants home cooks the ability to choose from various cooking settings specifically designed for specific types of dishes. Whether it’s baking, broiling, or roasting, each mode optimizes the oven’s performance to deliver perfect results. The precise temperature control ensures that even the most delicate recipes achieve professional-level outcomes.

Another highlight is the Wi-Fi connectivity that the Thermador P30 offers. Users can control and monitor their oven remotely through a smartphone app, allowing for seamless multitasking in the kitchen. This feature also includes voice control compatibility with smart home systems, providing added convenience for busy cooks.

The P30 is equipped with an elegant, touch-sensitive control panel that provides an intuitive interface, making navigation simple and straightforward. Its sleek design embodies modern kitchen aesthetics, with a tempered glass door that allows users to monitor cooking progress without losing heat.

Furthermore, ease of cleaning is a significant characteristic of the Thermador P30. The self-cleaning mode simplifies maintenance by using high temperatures to burn away food residue, allowing for a spotless interior without labor-intensive scrubbing.

Space optimization is another consideration. With a generous capacity, the Thermador P30 can accommodate multiple dishes simultaneously, making it ideal for entertaining or family meals. The oven is designed to be installed in various kitchen configurations, enhancing flexibility in layout.

Overall, the Thermador P30 is a sophisticated appliance that combines cutting-edge technology with user-friendly features and elegant design. It meets the demands of modern home chefs while providing the reliability and performance expected from a luxury brand. Whether baking a cake or roasting a turkey, the P30 ensures every culinary endeavor is executed to perfection, making it a valuable addition to any kitchen.