SLOW COOKING | 6 |
|
|
| |
|
|
|
|
|
|
The food is first brought to a near boiling state, and then it is lowered to about 207°F/97°C and left to simmer. The temperature is then lowered even further to about 198°F/92°C and simmering continues. By gradually lowering the heat, flavors will seep into the foods well. The temperature will remain at a constant temperature regardless if heating for an extended amount of time.
This process is ideal for slowly simmering large quantities of food that requires a longer time, such as stews.
Sample Menu
Beef Stew with Vegetables, Oden
For “Beef Stew with Vegetables” or “Oden” recipes, see page 23 of the Menu Guide.
NOTE/ Cooking tip:
●Foods other than those described in the Menu Guide may boil over, therefore use with caution.
●Stir foods well to prevent seasonings from settling on the bottom of the inner pan.
●To simmer foods in broth, do not add hot broth.
●To thicken with starch, add it toward the last stage of the cooking process.
●Kneaded foods such as fish sausage and fish cake, or any other processed fish product. Will swell up when heated, therefore use with moderation.
❙Basic cooking procedure
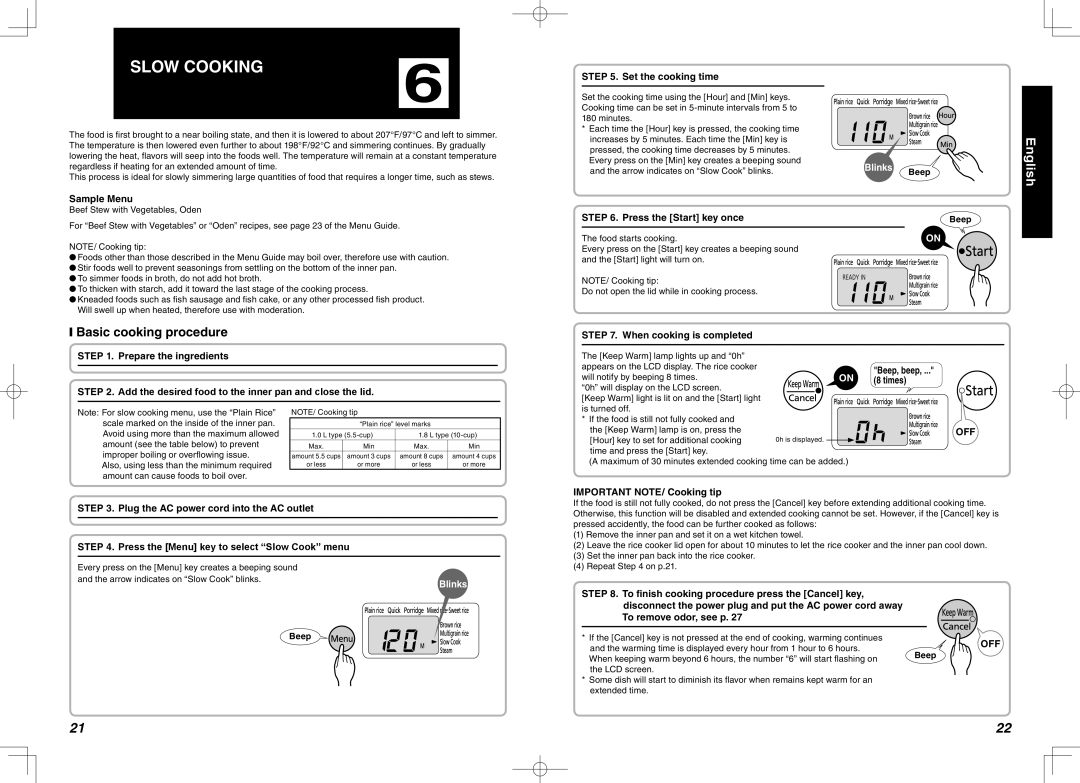
STEP 5. Set the cooking time
Set the cooking time using the [Hour] and [Min] keys. Cooking time can be set in
* Each time the [Hour] key is pressed, the cooking time
increases by 5 minutes. Each time the [Min] key is |
|
| |
pressed, the cooking time decreases by 5 minutes. |
|
| |
Every press on the [Min] key creates a beeping sound | Blinks |
| |
and the arrow indicates on “Slow Cook” blinks. | Beep | ||
| |||
STEP 6. Press the [Start] key once |
| Beep | |
|
| ON | |
The food starts cooking. |
| ||
Every press on the [Start] key creates a beeping sound |
|
| |
and the [Start] light will turn on. |
|
| |
NOTE/ Cooking tip: |
|
| |
Do not open the lid while in cooking process. |
|
|
STEP 7. When cooking is completed
English
STEP 1. Prepare the ingredients
STEP 2. Add the desired food to the inner pan and close the lid.
The [Keep Warm] lamp lights up and “0h” |
|
appears on the LCD display. The rice cooker |
|
will notify by beeping 8 times. | ON |
“0h” will display on the LCD screen. |
|
[Keep Warm] light is lit on and the [Start] light |
|
"Beep, beep, ..." (8 times)
Note: For slow cooking menu, use the “Plain Rice” scale marked on the inside of the inner pan. Avoid using more than the maximum allowed amount (see the table below) to prevent improper boiling or overflowing issue.
Also, using less than the minimum required amount can cause foods to boil over.
NOTE/ Cooking tip
“Plain rice” level marks
1.0 L type | 1.8 L type | ||
Max. | Min | Max. | Min |
amount 5.5 cups | amount 3 cups | amount 8 cups | amount 4 cups |
or less | or more | or less | or more |
is turned off. |
|
* If the food is still not fully cooked and |
|
the [Keep Warm] lamp is on, press the |
|
[Hour] key to set for additional cooking | 0h is displayed. |
time and press the [Start] key.
(A maximum of 30 minutes extended cooking time can be added.)
OFF
IMPORTANT NOTE/ Cooking tip
STEP 3. Plug the AC power cord into the AC outlet
STEP 4. Press the [Menu] key to select “Slow Cook” menu
Every press on the [Menu] key creates a beeping sound |
|
and the arrow indicates on “Slow Cook” blinks. | Blinks |
|
Beep
If the food is still not fully cooked, do not press the [Cancel] key before extending additional cooking time. Otherwise, this function will be disabled and extended cooking cannot be set. However, if the [Cancel] key is pressed accidently, the food can be further cooked as follows:
(1)Remove the inner pan and set it on a wet kitchen towel.
(2)Leave the rice cooker lid open for about 10 minutes to let the rice cooker and the inner pan cool down.
(3)Set the inner pan back into the rice cooker.
(4)Repeat Step 4 on p.21.
STEP 8. To finish cooking procedure press the [Cancel] key, disconnect the power plug and put the AC power cord away To remove odor, see p. 27
* If the [Cancel] key is not pressed at the end of cooking, warming continues | OFF | |
and the warming time is displayed every hour from 1 hour to 6 hours. | ||
Beep | ||
When keeping warm beyond 6 hours, the number “6” will start flashing on | ||
| ||
the LCD screen. |
|
*Some dish will start to diminish its flavor when remains kept warm for an extended time.
21 | 22 |