Introduction

Components (continued)

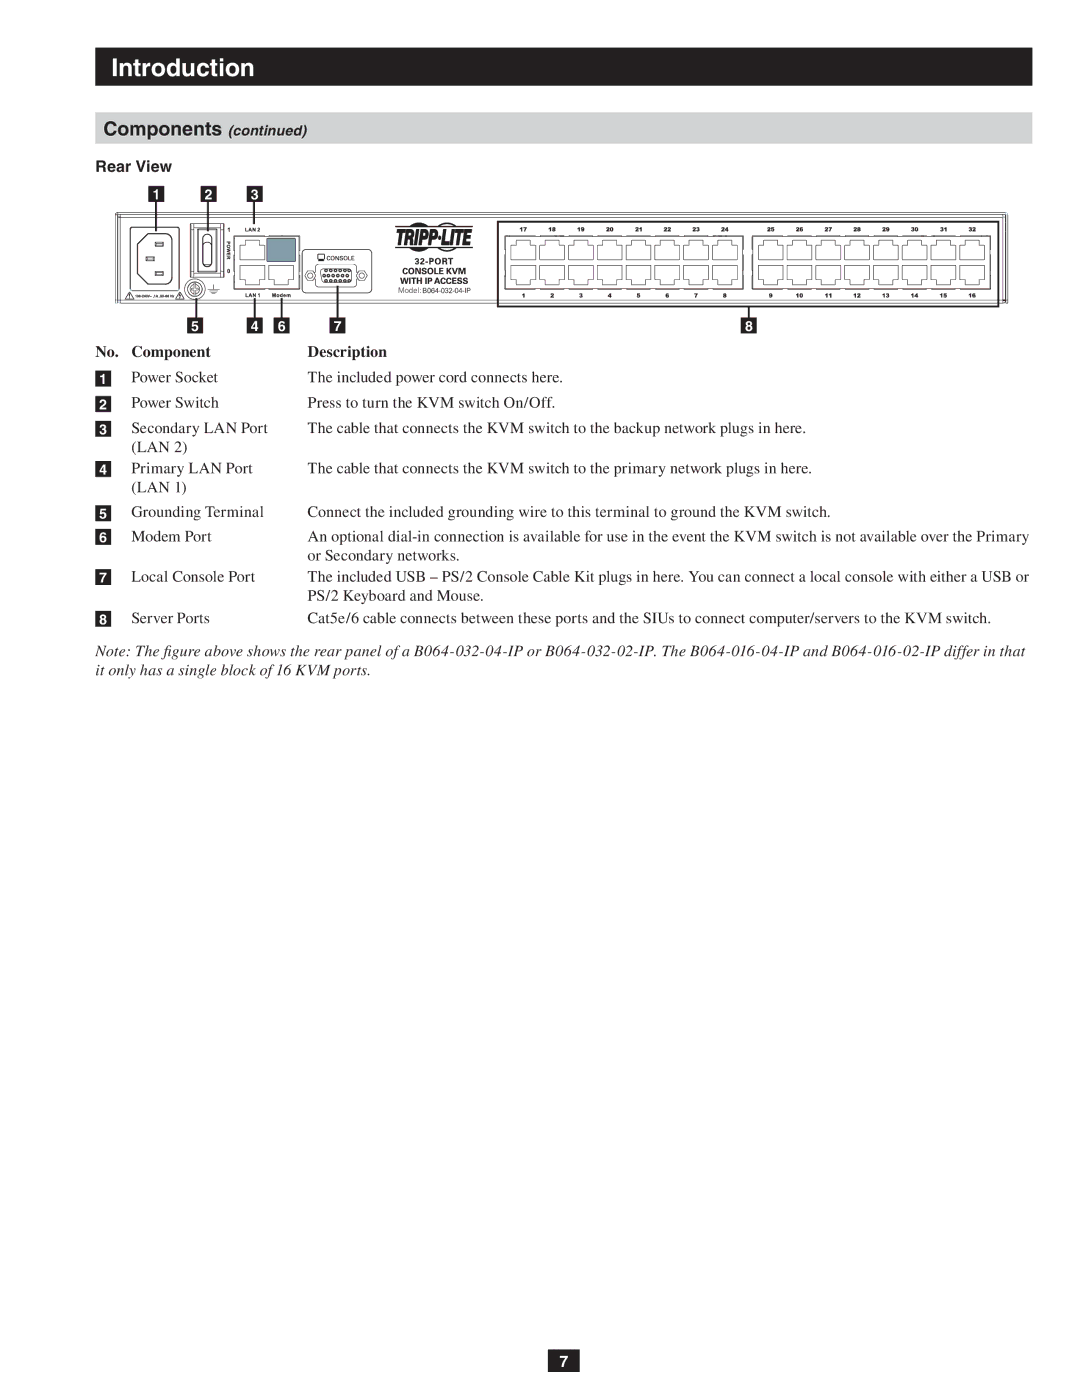
Rear View

1 2 3


5

4


6

7

8

No..

Component


Description


Power Socket


The included power cord connects here.


1


Power Switch


Press to turn the KVM switch On/Off.


2


Secondary LAN Port


The cable that connects the KVM switch to the backup network plugs in here.

3


(LAN 2)


Primary LAN Port


The cable that connects the KVM switch to the primary network plugs in here.

4


(LAN 1)


Grounding Terminal


Connect the included grounding wire to this terminal to ground the KVM switch.

5


Modem Port


An optional dial-in connection is available for use in the event the KVM switch is not available over the Primary

6


or Secondary networks.


Local Console Port


The included USB – PS/2 Console Cable Kit plugs in here. You can connect a local console with either a USB or

7


PS/2 Keyboard and Mouse.


Server Ports


Cat5e/6 cable connects between these ports and the SIUs to connect computer/servers to the KVM switch.

8


Note: The figure above shows the rear panel of a B064-032-04-IP or B064-032-02-IP. The B064-016-04-IP and B064-016-02-IP differ in that it only has a single block of 16 KVM ports.

7

Page 7
Image 7
Tripp Lite B064-016-02-IP, B064-032-02-IP, B064-032-04-IP owner manual Rear View

B064-032-02-IP, B064-016-02-IP, B064-032-04-IP specifications

Tripp Lite is renowned for its high-quality connectivity solutions, and their line of IP-based KVM switches, including models B064-032-04-IP, B064-016-02-IP, and B064-032-02-IP, showcases exceptional features designed for professional environments. These devices are specifically engineered to facilitate seamless control and management of multiple servers or computers through a single console.

The Tripp Lite B064-032-04-IP provides comprehensive KVM switching capabilities, supporting up to 32 servers over IP. This model is perfect for large data centers or IT environments where remote access to multiple systems is necessary. It features a user-friendly web interface that simplifies management, allowing administrators to switch between and control connected systems with ease. Additionally, it includes robust security measures, such as HTTPS and SSH protocols, ensuring that unauthorized access is prevented.

On a smaller scale, the B064-016-02-IP and B064-032-02-IP models cater to different user needs. The B064-016-02-IP manages up to 16 servers and offers similar IP-based access, making it ideal for medium-sized businesses. It includes a built-in Cat5e/6 KVM switch that allows users to control multiple computers using a single keyboard, mouse, and monitor, significantly reducing the clutter of cables.

The B064-032-02-IP strikes a balance between the two, supporting 32 devices while maintaining a streamlined design. This model is particularly appealing for small to midsize organizations that require flexibility to grow without unnecessary complexity.

All three models are compatible with various operating systems and provide multiple connectivity options, including VGA and HDMI, to cater to diverse setups. They also support high-definition video resolutions, ensuring that users experience clear, crisp visuals.

In terms of reliability, these KVM switches are crafted using advanced components and adhere to stringent quality standards, enabling them to perform efficiently in demanding environments. With features like hot-plugging capability, users can add or remove servers without shutting down, ensuring minimal disruption to operations.

Collectively, the Tripp Lite B064 models offer a powerful and flexible solution for managing computers and servers in various settings, combining technology, security, and ease of use to meet the needs of modern IT infrastructures.