![](/images/new-backgrounds/1264676/26467663x1.webp)
Voice mail functions only work when the DIDS/Voice mail board is set and in Auto- Attendant Mode.
27
ATTENDANT SELECTION
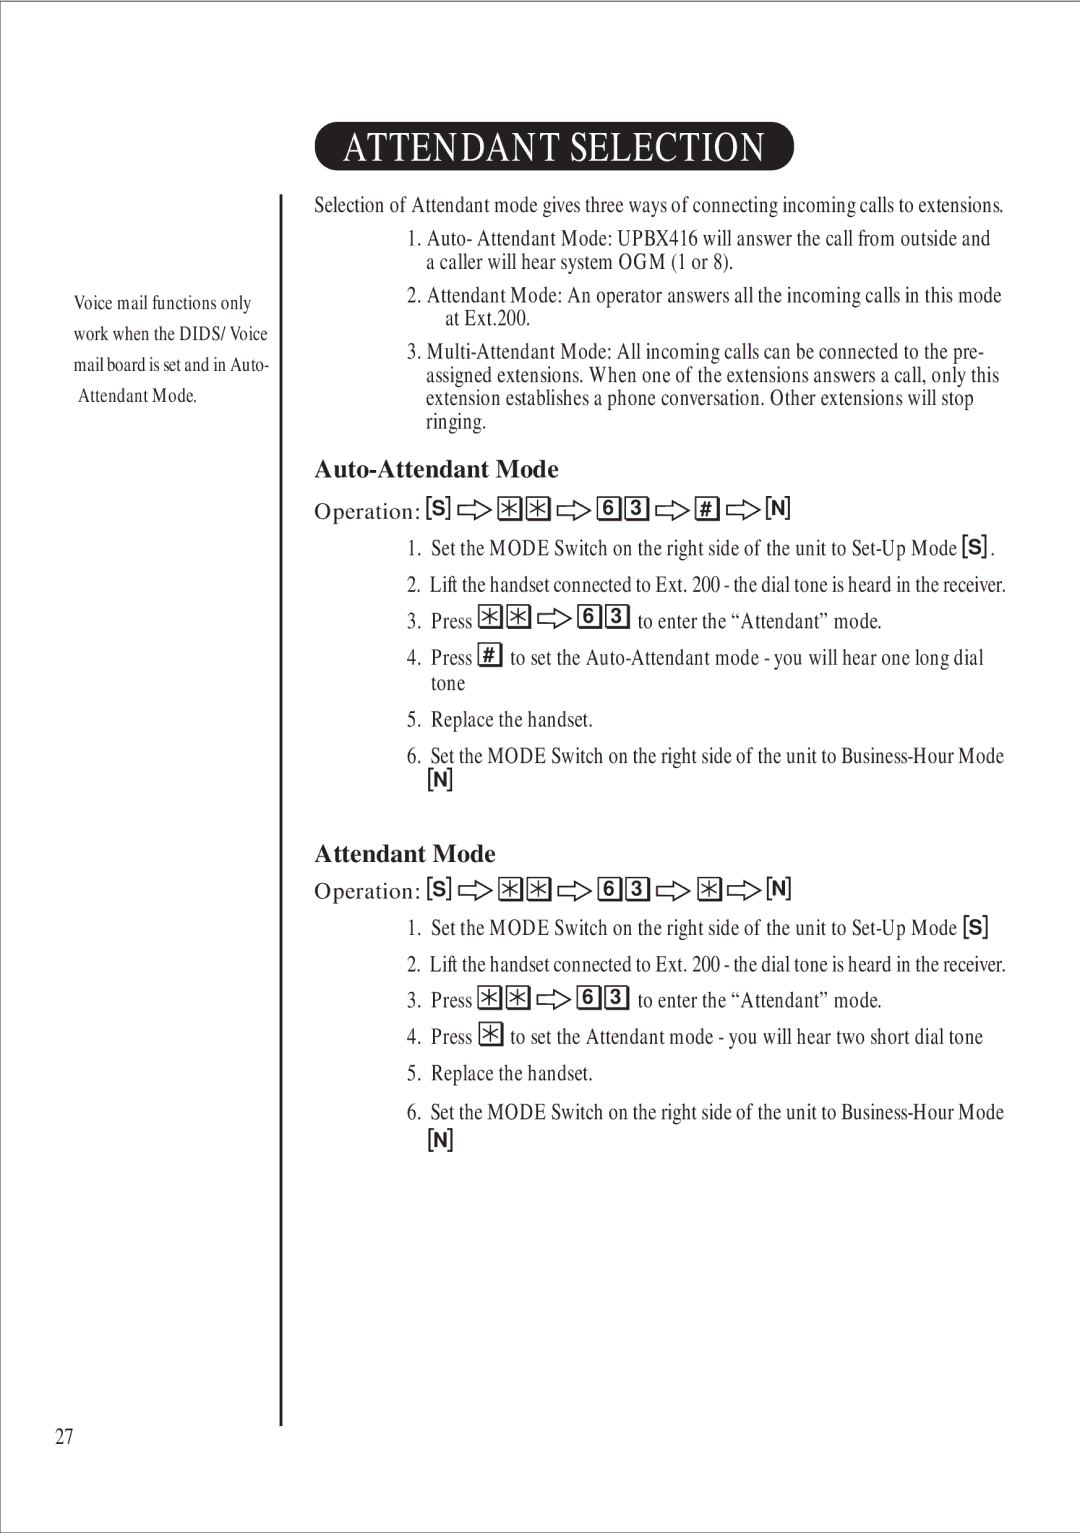
Selection of Attendant mode gives three ways of connecting incoming calls to extensions.
1.Auto- Attendant Mode: UPBX416 will answer the call from outside and a caller will hear system OGM (1 or 8).
2.Attendant Mode: An operator answers all the incoming calls in this mode at Ext.200.
3.
Auto-Attendant Mode
Operation:
S![](/images/new-backgrounds/1264676/26467663xi3.webp)
![](/images/new-backgrounds/1264676/26467663xi4.webp)
![](/images/new-backgrounds/1264676/26467663xi5.webp)
![](/images/new-backgrounds/1264676/26467663xi6.webp)
![](/images/new-backgrounds/1264676/26467663xi7.webp)
![](/images/new-backgrounds/1264676/26467663xi8.webp)
![](/images/new-backgrounds/1264676/26467663xi9.webp)
![](/images/new-backgrounds/1264676/26467663xi10.webp)
6 ![](/images/new-backgrounds/1264676/26467663xi12.webp)
![](/images/new-backgrounds/1264676/26467663xi13.webp)
![](/images/new-backgrounds/1264676/26467663xi14.webp)
3 ![](/images/new-backgrounds/1264676/26467663xi16.webp)
![](/images/new-backgrounds/1264676/26467663xi17.webp)
![](/images/new-backgrounds/1264676/26467663xi18.webp)
![](/images/new-backgrounds/1264676/26467663xi19.webp)
![](/images/new-backgrounds/1264676/26467663xi20.webp)
# ![](/images/new-backgrounds/1264676/26467663xi22.webp)
![](/images/new-backgrounds/1264676/26467663xi23.webp)
![](/images/new-backgrounds/1264676/26467663xi24.webp)
N
1.Set the MODE Switch on the right side of the unit to S
.
2.Lift the handset connected to Ext. 200 - the dial tone is heard in the receiver.
3.Press 6
3
to enter the “Attendant” mode.
4.Press #
to set the
5.Replace the handset.
6.Set the MODE Switch on the right side of the unit to
N
Attendant Mode
Operation:
S![](/images/new-backgrounds/1264676/26467663xi45.webp)
![](/images/new-backgrounds/1264676/26467663xi46.webp)
![](/images/new-backgrounds/1264676/26467663xi47.webp)
![](/images/new-backgrounds/1264676/26467663xi48.webp)
![](/images/new-backgrounds/1264676/26467663xi49.webp)
![](/images/new-backgrounds/1264676/26467663xi50.webp)
![](/images/new-backgrounds/1264676/26467663xi51.webp)
![](/images/new-backgrounds/1264676/26467663xi52.webp)
![](/images/new-backgrounds/1264676/26467663xi53.webp)
![](/images/new-backgrounds/1264676/26467663xi54.webp)
6 ![](/images/new-backgrounds/1264676/26467663xi56.webp)
![](/images/new-backgrounds/1264676/26467663xi57.webp)
![](/images/new-backgrounds/1264676/26467663xi58.webp)
3 ![](/images/new-backgrounds/1264676/26467663xi60.webp)
![](/images/new-backgrounds/1264676/26467663xi61.webp)
![](/images/new-backgrounds/1264676/26467663xi62.webp)
![](/images/new-backgrounds/1264676/26467663xi63.webp)
![](/images/new-backgrounds/1264676/26467663xi64.webp)
![](/images/new-backgrounds/1264676/26467663xi65.webp)
N
1.Set the MODE Switch on the right side of the unit to S
2.Lift the handset connected to Ext. 200 - the dial tone is heard in the receiver.
3.Press ![](/images/new-backgrounds/1264676/26467663xi69.webp)
![](/images/new-backgrounds/1264676/26467663xi70.webp)
![](/images/new-backgrounds/1264676/26467663xi71.webp)
![](/images/new-backgrounds/1264676/26467663xi72.webp)
![](/images/new-backgrounds/1264676/26467663xi73.webp)
6 ![](/images/new-backgrounds/1264676/26467663xi75.webp)
![](/images/new-backgrounds/1264676/26467663xi76.webp)
![](/images/new-backgrounds/1264676/26467663xi77.webp)
3 ![](/images/new-backgrounds/1264676/26467663xi79.webp)
to enter the “Attendant” mode.
4.Press to set the Attendant mode - you will hear two short dial tone
5.Replace the handset.
6.Set the MODE Switch on the right side of the unit to
N