Digital Light Processing DLP Projectors
I N S T A L L A T I O N / O P E R A T I O N M A N U A L
Vision Vision 15ET Vision 15ET/CineWide
VERSION
Page
TWO YEAR LIMITED WARRANTY
WHAT IS COVERED UNDER THE TERMS OF THIS LIMITED WARRANTY
WHAT IS NOT COVERED UNDER THE TERMS OF THIS LIMITED WARRANTY
For Projectors, Video Processors and Controllers
EFFECTIVE WARRANTY DATE
IMPORTANT - WARRANTY REGISTRATION
CONTACT AN AUTHORIZED SERVICE CENTER TO OBTAIN SERVICE
COPYRIGHT AND TRADEMARKS
ADDITIONAL INFORMATION
PRODUCT INFORMATION RETAIN FOR YOUR RECORDS
PLANAR SYSTEMS, INC 1195 NW Compton Drive Beaverton, OR Ph 503
Fax 503 Toll Free 866 PLANAR1
Important Safety Instructions
Compliance Information
DECLARATION OF CONFORMITY
FCC PART
INDUSTRY CANADA ICES-003
IMPORTANT RECYCLE INSTRUCTIONS
1Table of Contents
TWO YEAR LIMITED WARRANTY
Important Safety Instructions
Installation
Table of Contents
Connecting Source Components to the Vision
Connecting 12-Volt Trigger Output to External Theater Equipment
Picture Adjust
Vidikron Vision Model 15 Installation/Operation Manual
Vision 15 Specifications
Vision 15 Dimensions
Vision 15ET Dimensions
Table of Contents
Vidikron Vision Model 15 Installation/Operation Manual
1List of Figures
Vidikron Vision Model 15 Installation/Operation Manual
Vidikron Vision Model 15 Installation/Operation Manual
List of Figures
1Introduction
1.1 About This Manual
This Manual
Textual and Graphic
1.2 Using This Manual
DANGER
1.3 Description, Features and Benefits
Note screen
Optional Accessories
3. INTAKE VENT 4. ADJUSTABLE FEET
2Controls and Functions
2.1 Vision 15 at a Glance
Figure 2-1. Vision 15 Front/Side/Top View 1. TOP IR SENSOR
10. TEMPERATURE INDICATOR
2.2 Vision 15 Rear Panel
6. FRONT IR SENSOR 7. ZOOM/FOCUS RING
8. EXHAUST VENT
7. COMPONENT VIDEO RCA connectors
2. RS-232 CONTROL PORT
3. COMPOSITE VIDEO INPUT
4. S-VIDEO
2.3 Vision 15 Remote Control
Figure 2-3. Vision 15 Remote Control
Controls and Functions
1 2 15 4 5 7 8
2. IR OUTPUT INDICATOR
1. ON / OFF
3. Source Selection Buttons VIDEO
S-VIDEO
8. MENU
10. LIGHT
11. CUST
12. ISF NT
3Installation
3.1 Remote Control
Figure 3-1. Available Range of the Remote Control
Operation
3.2 Quick Setup
Table 3-1. Installation Overview
Installation
Procedure
3.3 Installation Considerations
Table 3-2. Projector Installation Options
Installation Type
Table 3-3. Throw Ratios for the Vision 15 Series
Figure 3-2. Estimating Throw Distance
Ceiling Installation
Floor Installation
Figure 3-3. Projector Placement
Position
Shift
Figure 3-4. Vertical Lens Shift Example only
Figure 3-5. Horizontal Lens Shift Example only
Installation
projector is shown in this example
Screen Center 0%
Table 3-4. Vertical and Horizontal Lens Shift Limits
Figure 3-6. Folded Optics
Installing the Optional CineWide Lens Base Plate
Installation
Vidikron Vision Model 15 Installation/Operation Manual
Screw Phillips Pan-Head, M4 x 0.7 x 14mm
Ceiling Mount Plate part of optional Ceiling Mount Kit
Adjusting the Projector
Figure 3-8. Adjusting the Feet
Mounting the Vision
Floor Mounting Upright
Connector Panel Access
3.6 Connections to the Vision
HDMI/DVI Connections See Figure
HDMI or DVI Source
Figure 3-9. HDMI/DVI Source Connections
Installation
BD/HD-DVD/DVD Player, HD Set Top Box, Game Console etc
DVI to VGA Adapter VGA to VGA Cable
DVI to DVI Cable
Figure 3-10. RGB Connections
Installation
Figure 3-11. Component Video Connections
Installation
Component Video Source
DVD Player
DVD Player, VCR LaserDisc, Camcorder etc
Figure 3-12. Composite and S-Video Connections
Installation
Vidikron Vision Model 15 Installation/Operation Manual
Connection
To PC or Automation Control System
Figure 3-13. RS-232 Control System Connection
Installation
3.7 Turning on the Power
Figure 3-14. Connecting the 12-Volt Trigger Output to Other Equipment
3.8 Changing the OSD Language 3.9 Adjusting the Picture Orientation
3.10 Primary Lens Adjustments
Focus and Zoom
Focus Ring
Zoom Ring
cause the projector to malfunction
Figure 3-16. Vertical and Horizontal Lens Shift Controls
Installation
3.11 Installing and Adjusting the CineWide Anamorphic Lens
Figure 3-17. Anamorphic Lens Mounting Assembly - Exploded View
the primary lens is perfectly centered on the screen
3 Height/Pitch Adjustment Screw 4-40 x 1/4 4x
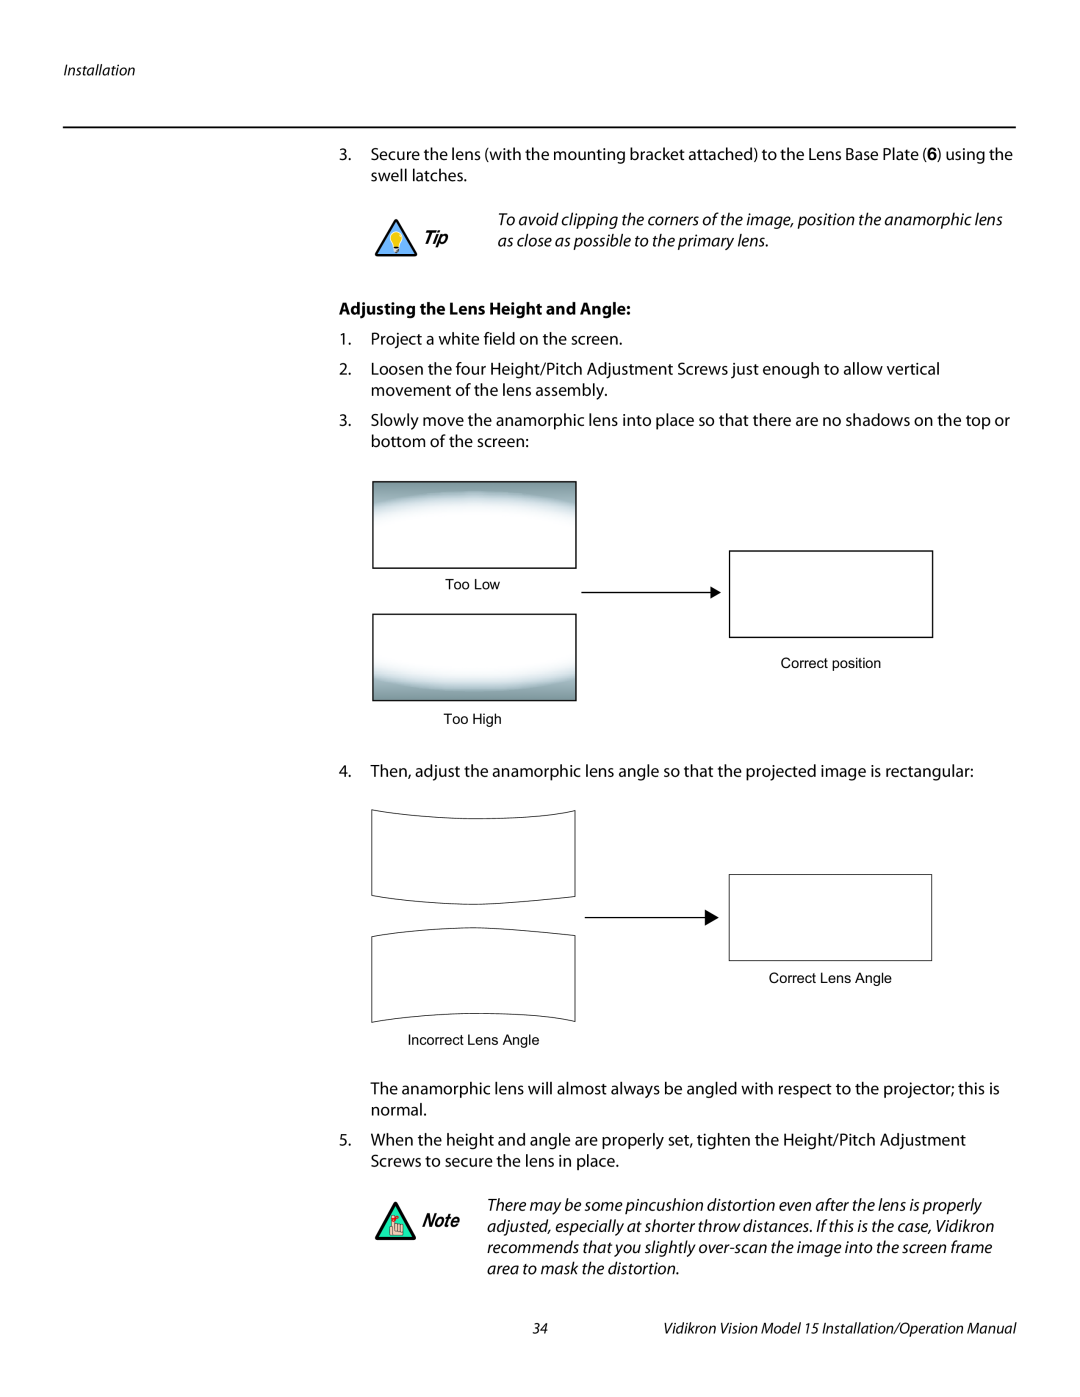
Adjusting the Lens Height and Angle
4.1 Using the On-Screen Menus
4Operation
Picture Adjust
Installation
Setup
Source Select
Perform the adjustments in the order listed here
Picture Adjust
Source Select
ENTER
Figure 4-2. Typical PLUGE Pattern for Adjusting Brightness
Figure 4-3. Typical Gray Bar Pattern for Adjusting Contrast
Brightness and Contrast controls are interactive. A change to one may
Figure 4-5. Typical Test Pattern for Adjusting Sharpness
The default setting, Auto, functions as follows
Table 4-1. Aspect Ratio Settings
Aspect Ratio
Operation
Geometry of Projected Image
Table 4-1. Aspect Ratio Settings continued
Vidikron Vision Model 15 Installation/Operation Manual
Operation
Geometry of Projected Image
Table 4-1. Aspect Ratio Settings continued
Operation
Aspect
Aspect
Installation
Horizontal Keystone Correction
Vertical Keystone Correction
Figure 4-6. Keystone Correction
Operation
Figure 4-7. Overscan Examples
Information
Picture Memory
VIP015VM0803001
Setup
reported “Lamp Hours” will be inaccurate
becomes increasingly fragile and prone to sudden failure
DNR Refer to Digital Noise Reduction DNR on page
Reset to Defaults Refer to Reset to Defaults on page
Vidikron Vision Model 15 Installation/Operation Manual
Operation
5Maintenance and Troubleshooting
5.1 Cleaning the Projector 5.2 Cleaning the Lens
5.3 Cleaning the Intake and Exhaust Vents
To clean the intake and exhaust vents
2. Unplug the power cord
Power OFF button
5.4 Lamp Maintenance
5.5 Lamp Cautions
5.6 Lamp Replacement
5.7 Troubleshooting Tips
Table 5-1. Troubleshooting Chart
Maintenance and Troubleshooting
Symptom
Maintenance and Troubleshooting
Vidikron Vision Model 15 Installation/Operation Manual
6.2 Serial Command Syntax
RS-232 Connection and Port Configuration
Table 6-1. Serial Commands
6Serial Communications
Table 6-1. Serial Commands continued
Command
Serial Communications
Description
7Specifications
Table 7-1. Vision 15 Specifications
Vision 15 Specifications
Native Resolution
Table 7-1. Vision 15 Specifications continued
Specifications
Limited Warranty
Specifications are subject to change without notice
7.2 Vision 15 Dimensions
Figure 7-1. Vision 15 Dimensions
Specifications
Vidikron Vision Model 15 Installation/Operation Manual
7.3 Vision 15ET Dimensions
Figure 7-2. Vision 15ET Dimensions
Specifications
Table 7-2. Computer Signal Compatibility Chart
Computer Signal Compatibility
Resolution
PC/MAC
7.5 Video Signal Compatibility
Table 7-3. Video Signal Compatibility Chart
Specifications
Resolution
Page
020-0863-00 Rev. A January
SERIAL NUMBER