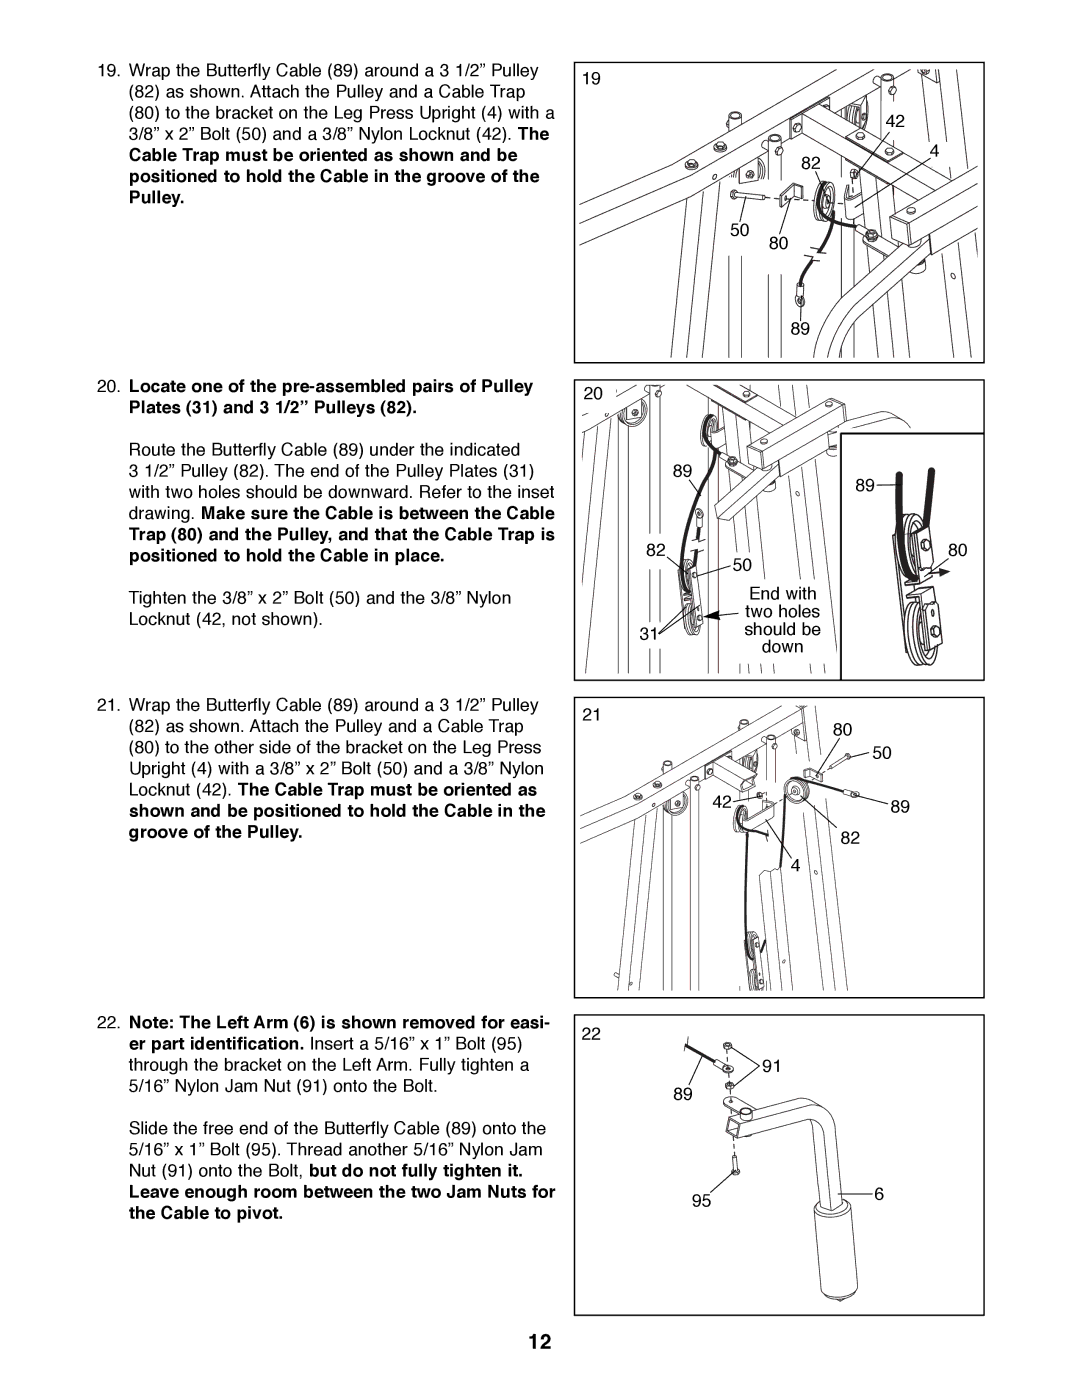
19. Wrap the Butterfly Cable (89) around a 3 1/2Ó Pulley | 19 |
|
(82) as shown. Attach the Pulley and a Cable Trap |
| |
|
| |
(80) to the bracket on the Leg Press Upright (4) with a |
| 42 |
3/8Ó x 2Ó Bolt (50) and a 3/8Ó Nylon Locknut (42). The |
| |
| 4 | |
Cable Trap must be oriented as shown and be |
| |
positioned to hold the Cable in the groove of the |
| 82 |
|
| |
Pulley. |
|
|
|
| 50 |
|
| 80 |
|
| 89 |
20. Locate one of the | 20 |
|
Plates (31) and 3 1/2Ó Pulleys (82). |
| |
|
| |
Route the Butterfly Cable (89) under the indicated |
|
|
3 1/2Ó Pulley (82). The end of the Pulley Plates (31) |
| 89 |
with two holes should be downward. Refer to the inset |
| 89 |
|
| |
drawing. Make sure the Cable is between the Cable |
|
|
Trap (80) and the Pulley, and that the Cable Trap is | 82 | 80 |
positioned to hold the Cable in place. | ||
|
| 50 |
Tighten the 3/8Ó x 2Ó Bolt (50) and the 3/8Ó Nylon | End with | |
Locknut (42, not shown). | two holes | |
should be | ||
31 | ||
| down |
21.Wrap the Butterfly Cable (89) around a 3 1/2Ó Pulley
(82)as shown. Attach the Pulley and a Cable Trap
(80)to the other side of the bracket on the Leg Press Upright (4) with a 3/8Ó x 2Ó Bolt (50) and a 3/8Ó Nylon Locknut (42). The Cable Trap must be oriented as shown and be positioned to hold the Cable in the groove of the Pulley.
22.Note: The Left Arm (6) is shown removed for easi- er part identification. Insert a 5/16Ó x 1Ó Bolt (95) through the bracket on the Left Arm. Fully tighten a 5/16Ó Nylon Jam Nut (91) onto the Bolt.
Slide the free end of the Butterfly Cable (89) onto the 5/16Ó x 1Ó Bolt (95). Thread another 5/16Ó Nylon Jam Nut (91) onto the Bolt, but do not fully tighten it.
Leave enough room between the two Jam Nuts for the Cable to pivot.
21 | 80 |
| |
| 50 |
42 | 89 |
| 82 |
| 4 |
22 |
|
| 91 |
89 |
|
95 | 6 |
|
12
