W O L F PRO WALL VENTILATION H O O D S
LOW- PROFILE A N D 24" (610) H O O D S |
| |||
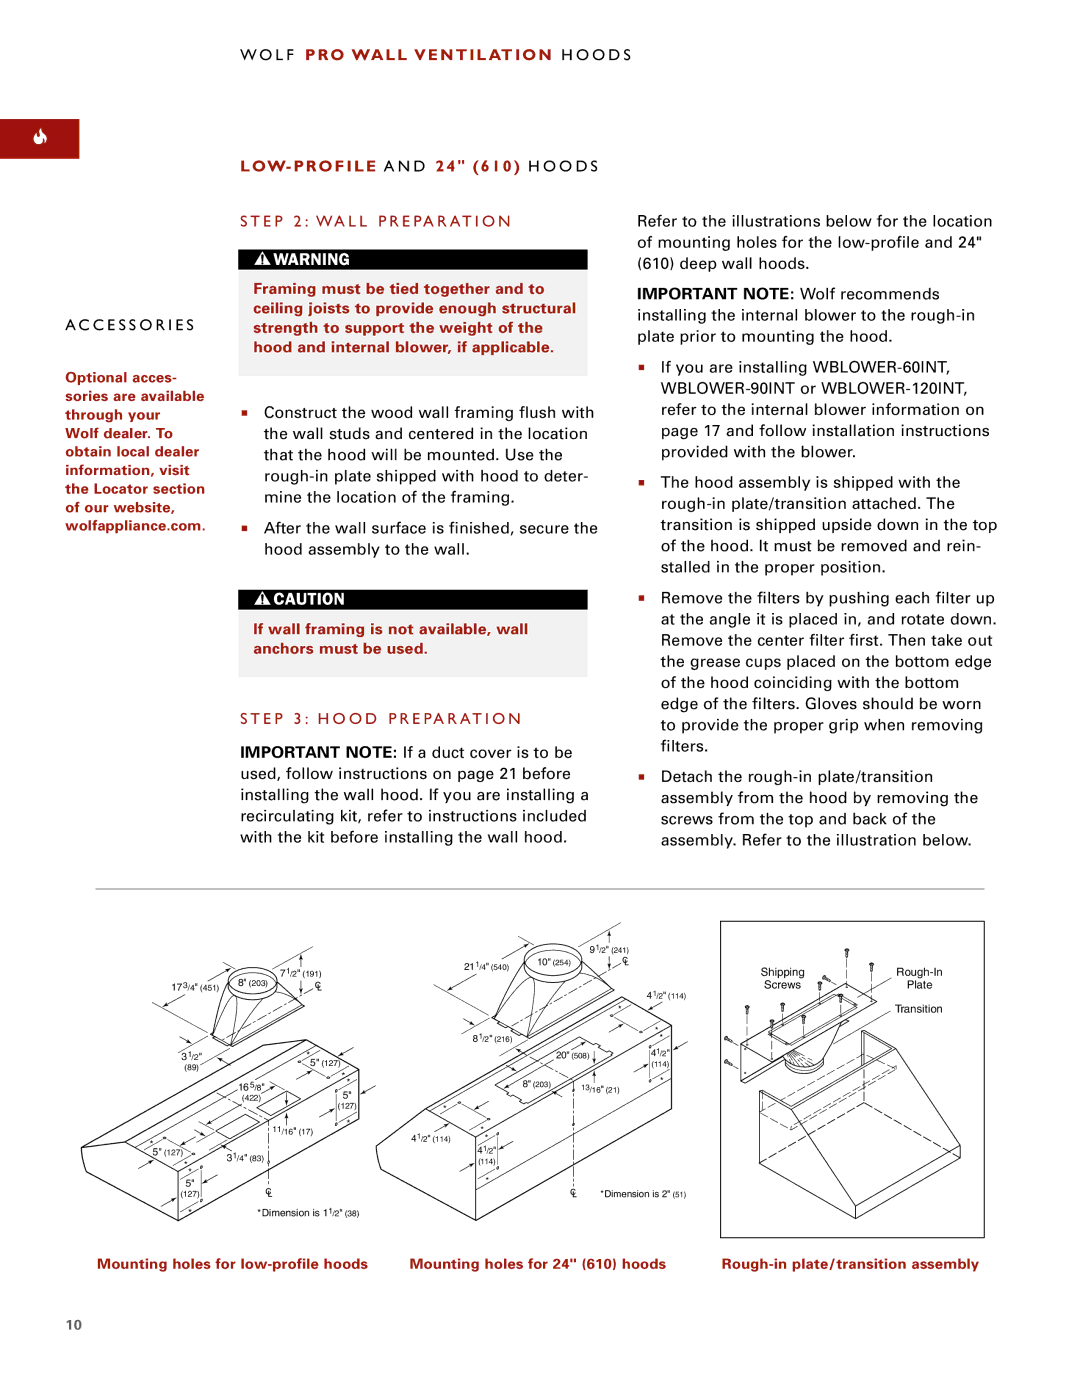
S T E P 2 : WA L L P R E PA R AT I O N | Refer to the illustrations below for the location | |||
|
|
|
| of mounting holes for the |
|
|
|
| (610) deep wall hoods. |
A C C E S S O R I E S
Optional acces- sories are available through your Wolf dealer. To obtain local dealer information, visit the Locator section of our website, wolfappliance.com.
Framing must be tied together and to ceiling joists to provide enough structural strength to support the weight of the hood and internal blower, if applicable.
Construct the wood wall framing flush with the wall studs and centered in the location that the hood will be mounted. Use the
After the wall surface is finished, secure the hood assembly to the wall.
If wall framing is not available, wall anchors must be used.
S T E P 3 : H O O D P R E PA R AT I O N
IMPORTANT NOTE: If a duct cover is to be used, follow instructions on page 21 before installing the wall hood. If you are installing a recirculating kit, refer to instructions included with the kit before installing the wall hood.
IMPORTANT NOTE: Wolf recommends installing the internal blower to the
If you are installing
The hood assembly is shipped with the
Remove the filters by pushing each filter up at the angle it is placed in, and rotate down. Remove the center filter first. Then take out the grease cups placed on the bottom edge of the hood coinciding with the bottom edge of the filters. Gloves should be worn to provide the proper grip when removing filters.
Detach the
|
|
|
|
|
|
|
|
| 91/2" (241) |
|
|
| 71/2" (191) |
|
| 211/4" (540) | 10" (254) |
| |
|
| 8" (203) |
|
|
|
|
|
| |
173/4" (451) |
|
|
|
|
|
|
|
| |
|
|
|
|
|
|
|
| 41/2" (114) | |
|
|
|
|
|
|
|
|
| |
|
|
|
|
|
|
|
|
| * |
|
|
|
|
|
| 81/2" (216) |
|
| * |
|
|
|
|
|
|
|
| * | |
31/2" |
|
| * |
|
|
|
| 20" (508) | 41/2" |
(89) |
|
| 5" (127) |
|
|
|
|
| (114) |
|
| * |
|
|
|
|
|
| |
|
| 165/8" | * |
| 8" | (203) |
| * | |
|
|
|
|
| |||||
|
|
|
| 13/16" (21) | |||||
|
| (422) | 5" |
|
|
|
|
| |
|
|
| (127) | * |
|
|
|
| |
|
|
| 11/16" (17) | * |
| * |
|
|
|
|
|
|
| 41/2" (114) |
|
|
| ||
* |
|
|
|
| * |
|
|
| |
|
|
|
|
| 41/2" |
|
|
| |
5" (127) | 3 | 1/4" (83) |
|
|
|
|
|
| |
** |
|
|
| (114) |
|
|
| ||
|
|
|
|
|
|
|
| ||
|
|
|
|
| * |
|
|
| |
5" |
|
|
|
|
|
|
| *Dimension is 2" (51) | |
(127) |
|
|
|
|
|
|
|
| |
**Dimension is 11/2" (38)
Mounting holes for | Mounting holes for 24" (610) hoods |
Shipping | |
Screws | Plate |
| Transition |
Rough-in plate/transition assembly
10