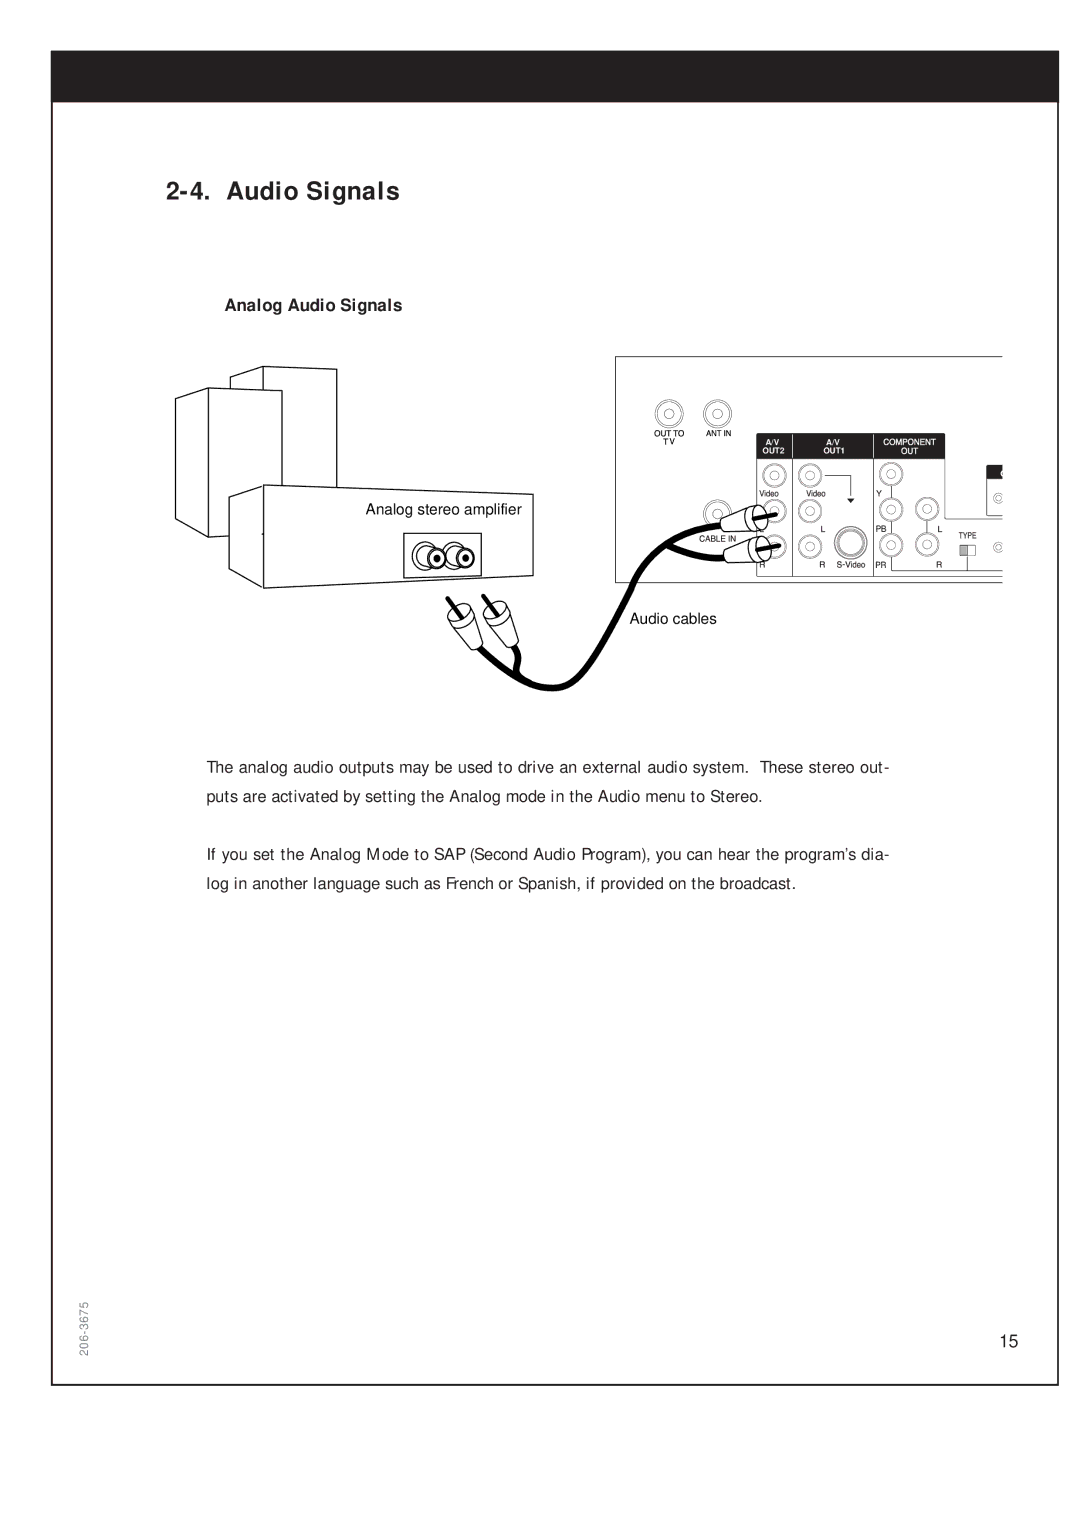
and Warranty
DTV1080
Operating Guide
NOTE TO CABLE/TV/SATELLITE DISH INSTALLER
POWER CORD POLARIZATION
206-3675
DO NOT OPEN
IMPORTANT SAFETY INSTRUCTIONS
13. Power-Cord Protection
Ground Clamp Electric Service Equipment
Antenna Lead-in Wire Antenna Discharge Unit NEC Section
Power Service Grounding Electrode System NEC Art 250, Part H
IMPORTANT SAFETY INSTRUCTIONS
16. Power Lines
22. Damage Requiring Service
23. Replacement Parts
IMPORTANT INFORMATION
TABLE OF CONTENTS
Remote Control
Initial Setup
Introduction
9. EZ Help
8. Customization
Reference
1. INTRODUCTION
1-1. A New World of Digital Entertainment
1-2. Main Features
2-1. Sending Signals
2. IMPORTANT OVERVIEW
2-2. TV Signal Formats
Standards Comparison Table
WHEN YOU SET THE DISPLAY FORMAT SWITCH TO SDTV 480I/480P
2-3. Normal and Wide Format Signals
2. IMPORTANT OVERVIEW
WHEN YOU SET THE DISAPLY SWITCH TO HDTV 1080I/720P
2-3. Normal and Wide Format Signals
No Adjustment Required
Normal
2-4. Audio Signals
Digital Audio Signals
2. IMPORTANT OVERVIEW
GLOSSARY
2-4. Audio Signals
Analog stereo amplifier
Audio cables
206-3675
2-5. On-Screen Display
2. IMPORTANT OVERVIEW
2-5. On-Screen Display
This is, in fact, an on-line version of this Operating Guide
3. SETUP AND CONNECTIONS
Unpacking
Batteries
3675
3-1. Unpacking
3. SETUP AND CONNECTIONS
3-2. Back Panel of the Zenith HD Satellite Receiver
Zenith HD Satellite Receiver Model DTV1080 Rear Panel
3675
3-2. Back Panel of the Zenith HD Satellite Receiver
3-3. General Recommendations
3. SETUP AND CONNECTIONS
Connection
Component
3-4. Connecting to Antennas - No Dish
Receiving Signals
3-4. Connecting to Antennas - Round Dish Satellite A
3. SETUP AND CONNECTIONS
Dish
Phone wall jack
Antenna LNB Sat A Cable TV wall jack
3-4. Connecting to Antennas - Oval Dish Satellite A, B
LNB Sat B
3-4. Connecting to Antennas - Oval Dish Satellite A, B, C
3. SETUP AND CONNECTIONS
Dish Multi switch
Phone wall jack
3-5. TV Connection - Analog TV
Multi-switch
Analog TV
Phone wall jack
3-5. TV Connection - HD Monitor Y/PB/PR type
3. SETUP AND CONNECTIONS
Antenna Cable TV wall jack
IN Y Pb Pr L R
3-5. TV Connection - HD Monitor RGB type
TV Viewing
3-6. VCR Connection
3. SETUP AND CONNECTIONS
3-7. Audio Connection - Digital Audio System
SPDIF IN
206-3675
PB PR
3-7. Audio connection - Analog Hi-Fi System
3. SETUP AND CONNECTIONS
206-3675
Analog stereo amplifier
4-1. Using the Front Panel of the HD satellite receiver
4. ZENITH HD SATELLITE RECEIVER OPERATION
4-2. Using the Remote Control
3 1 2 4 5 7 8
1 POWER
4. ZENITH HD SATELLITE RECEIVER OPERATION
1 2 4 5 7 8
4-2. Using the Remote Control
10 Signal
6 Mute
4-2. Using the Remote Control
also change the Audio language, when available, by pressing “FG”
4. ZENITH HD SATELLITE RECEIVER OPERATION
1 2 4 5 7 8
4-3. Programming the Remote Control
4-4. Remote Control Codes for Other Components
4. ZENITH HD SATELLITE RECEIVER OPERATION
206-3675
Brands
4-4. Remote Control Codes for Other Components
Code
960 Zenith 961 Toshiba 962 Sony 963 Pioneer 964 Mitsubishi 965 JVC
206-3675
4-4. Remote Control Codes for Other Components
4. ZENITH HD SATELLITE RECEIVER OPERATION
AUX AUDIO
AUX CD
5. INITIAL SETUP
6. BASIC OPERATION
6-1. Viewing the Channel Banner
Input Source Icon
6-2. Channel Surfing
6. BASIC OPERATION
Page
7. ADVANCED PROGRAM GUIDE
7-1. About the Advanced Program Guide
7-2. Layout of the Advanced Program Guide Screen
7-3. Moving through the Advanced Program Guide
7. ADVANCED PROGRAM GUIDE
Line Scrolling
Page Scrolling
7-4. Selecting a Program
Current / Free-of-Charge
Future / Free-of-charge
Current / Pay Per View
7. ADVANCED PROGRAM GUIDE
7-5. Getting More Information
To display program details
7-6. Referring to EZ Help
7. ADVANCED PROGRAM GUIDE
7-7. Making a Remind List for Future Viewing
To schedule a future viewing
7-8. Purchasing Pay Per View Programs
To purchase PPV programs
7-9. Searching Programs by Category
7. ADVANCED PROGRAM GUIDE
To search programs by Category
206-3675
7-10. Searching Programs by Keyword
To search programs by keyword
8. CUSTOMIZATION
8-1. The Structure of the On-screen Menus
AUDIO
SYSTEM
To cancel a program in the Remind List
8-3. Previewing the Remind List
8. CUSTOMIZATION
To cancel a newly purchased program
8-4. Managing Program Purchases
New Purchase
8. CUSTOMIZATION
8-4. Managing Program Purchases
Purchase List
To review programs in the Purchase List
8-5. Checking the Mail Box
To check the Mail Box
8-6. Initializing the System
About Initial Setup
8. CUSTOMIZATION
Select Dish
Your Location
8-6. Initializing the System
To enter your location
Signal Strength
To see the signal strength
8. CUSTOMIZATION
8-6. Initializing the System
Channel Setup
To scan the channels from the satellites
8-7. Managing Channels
8. CUSTOMIZATION
EZ Channel Scan Channel Search
To scan the channels with the antenna
Manual Ch. Add
8-7. Managing Channels
To add the channels missed in your channel list
8. CUSTOMIZATION
8-7. Managing Channels
Edit Channel
To create a custom list
8-7. Managing Channels
206-3675
8. CUSTOMIZATION
8.8 EZ Hook Up
To see EZ Hook-up
Clock Auto
8-9. Setting the Clock
To set auto clock
8-9. Setting the Clock
8. CUSTOMIZATION
Clock Manual
To set manual clock
8-10. Setting the Audio
To set the digital audio mode
8-10. Setting the Audio
8. CUSTOMIZATION
PCMDigital
Dolby Digital
Audio Mode
8-10. Setting the Audio
To Set the Analog Audio Mode
8-10. Setting the Audio
8. CUSTOMIZATION
Audio Language
To set the digital audio language
Variable Audio
8-10. Setting the Audio
To set Variable Audio
8. CUSTOMIZATION
8-11. Choosing the Aspect Ratio
Choosing the screen format of your TV
Modes for viewing wide IMAGE 169 on a normal TV 43 DISPLAY FORMAT SWITCH IN 480i OR 480p POSITION
8-11. Choosing the Aspect Ratio
8. CUSTOMIZATION
8-12. Setting Closed Caption
To set Closed Caption
8-12. Setting Closed Caption
Caption1 CC1
Caption2 CC2
Caption3 CC3
8-13. Setting Default Signal Out
8. CUSTOMIZATION
Output Channel
To set the channel number of the HD satellite receiver
Out to TV -- Default Connection
8-13. Setting Default Signal Out
To set the standby mode default signal source
8-14. Setting the Digital TV Input
To set the standby mode as a default signal source
8. CUSTOMIZATION
Digital TV Input
8-15. Running EZ Demo
To run EZ Demo
8-16. Setting Locks
To set the password
8. CUSTOMIZATION
Lock System
Block Channel
8-16. Setting Locks
To block channels
8-16. Setting Locks
8. CUSTOMIZATION
Movie Rating
To block movie programs
TV Rating for Children’s Programs
8-16. Setting Locks
To block TV programs
8-16. Setting Locks
8. CUSTOMIZATION
Spending Limit
8-16. Setting Locks
To set the spending limit of each PPV program
8. CUSTOMIZATION
8-17. Testing the System
To test the HD satellite receiver
8-18. Upgrading Software
To upgrade the software in your Zenith HD Satellite Receiver
8. CUSTOMIZATION
8-19. Replace Card
To replace the card
9. EZ HELP
9-1. EZ Help
9. EZ HELP
The see the EZ Help feature
9-1. EZ Help
PRODUCT SPECIFICATIONS
VIDEO FEATURES
SYSTEM/CUSTOM INTERFACE FEATURE
INPUT
PRODUCT SPECIFICATIONS
AUDIO FEATURES
GENERAL
3.82 inches H, 16.99 inches W, 11.81 inches D/97H x 431.6W x 300D
TROUBLESHOOTING
TROUBLESHOOTING
Make sure the batteries are fresh and installed properly
Point the remote control unit at the remote control sensor
Check if a mode on the remote control is selected properly
ZENITH ELECTRONICS CORPORATION
HD SATELLITE RECEIVER LIMITED WARRANTY-USA
Repair Parts and Replacement Units are warrant
days. For further instructions please see below
h h 6owz7 oenwnw
P/NO 3828VA0220B ND00QA, SH-011S