Primera Technology 510212 manual Digital Label Press 3 User’s Manual

Page 76

Digital Label Press 3 User’s Manual

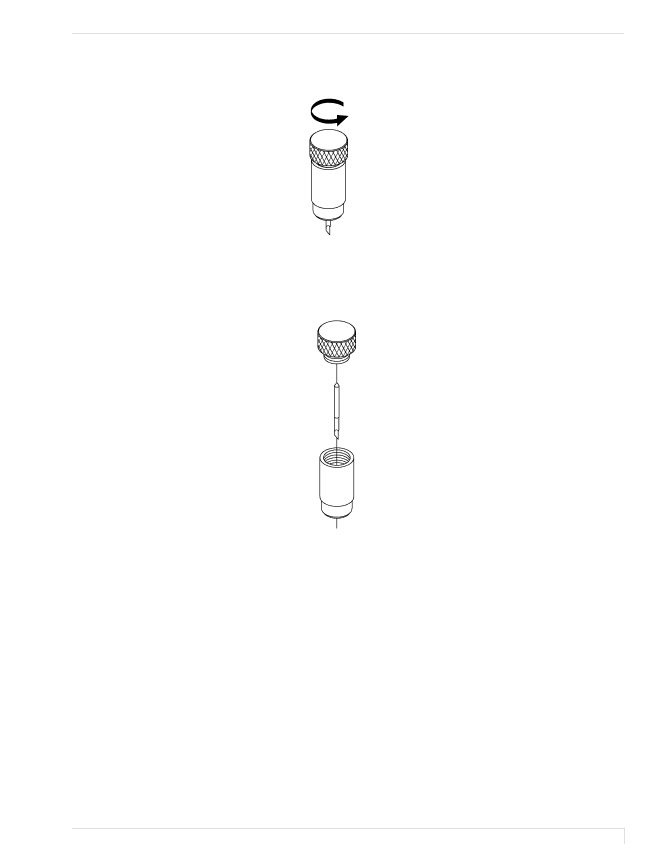
5.Unscrew and remove the top of the Blade Holder.

6.Tip the base of the holder upside down and remove the blade.

7.Insert the new blade into the base of the holder and replace the holder's screw- on top.

8.Place the Blade Holder back into the Cutter Arm and retighten the gold-colored Securing Knob by turning it toward the front of the printer. Tighten only until the Blade Holder fits securely within the Cutter Arm. To verify proper tightness, try rotating the Blade Holder clockwise within the Cutter Arm. If it rotates, the Securing Knob needs to be further tightened. Do not over-tighten!

Section 8: Maintenance

71

Image 76
Contents Digital label and decal press Trademark Acknowledgements For Users in the United States Table of Contents Index Introduction HOW Your Press WorksSpecial Features Dye-SublimationSafety Precautions Digital Label Press 3 User’s Manual Digital Label Press 3 User’s Manual Digital Label Press 3 User’s Manual Digital Label Press 3 User’s Manual Digital Label Press 3 User’s Manual Choosing a Good Location Getting StartedAbout Moisture Condensation Unpacking and Inspection Identifying the PartsControl Panel LCD Display Cancel Cutting Pressure Removing the Ribbon Cartridge and Blade Holder Installing the Blade Holder Installing the Media Input Assembly Installing the Media Output Assembly Applying Power Introduction Ribbon and Print MediaAbout Ribbons Loading Ribbon Into the Ribbon Cartridge Placing the Ribbon Cartridge Into the Printer About Print Media Loading the Print Media Roll Into the Press Open the Media Input Assembly Cover Cover Release Button Print Pressure Bracket Digital Label Press 3 User’s Manual Digital Label Press 3 User’s Manual ??? Digital Label Press 3 User’s Manual Ribbons Digital Label Press 3 User’s Manual Connecting the Press Running the Self TestSelf Test Example Connecting the USB-TO-PARALLEL Interface Cable Select CD-ROM Drive and click Next Digital Label Press 3 User’s Manual Digital Label Press 3 User’s Manual Installing and Setting Up the Printer Driver For Windows Installing the Windows Printer DriverDigital Label Press 3 User’s Manual Digital Label Press 3 User’s Manual Setting UP the Windows 98/ ME Printer Driver Paper Size Dither Mode Write Direct to Port Digital Label Press 3 User’s Manual Installing Pressprint Installing and Using the PressPrint Software for WindowsAbout Pressprint Using Pressprint Digital Label Press 3 User’s Manual Digital Label Press 3 User’s Manual Digital Label Press 3 User’s Manual Printing to Your Press Digital Label Press 3 User’s Manual Helpful Pressprint Hints Importing Vector vs. Bitmap Files Aligning Objects Anti-Aliasing Creating Serialized Labels Digital Label Press 3 User’s Manual Digital Label Press 3 User’s Manual Printing Multiple Spot Color Labels Digital Label Press 3 User’s Manual Digital Label Press 3 User’s Manual Digital Label Press 3 User’s Manual Cleaning the Print Head MaintenanceSupplies Required Cleaning the Presss Case Cleaning the Inside of the PressCleaning the Platen Roller Clearing a Ribbon JAM Clearing a Minor Print Media JAMClearing a Major Print Media JAM Replacing the Cutter BladeBlade Holder Cutter Arm Digital Label Press 3 User’s Manual Digital Label Press 3 User’s Manual Troubleshooting Printer Ribbon JAM Wrong Ribbon Ribbon Type Paper Core Rotation Error Ribbon Sensor Error Cutter Paper Loading Error Cutter Targets Center Biased to the right Print job rasterizes, but the press doesnt print Symptoms Cut line is not centered on the printed object Areas of my prints are scrambled or look like bar codes Digital Label Press 3 User’s Manual Technical Specifications Printing SpeedEMC Appendix a CENTRONICS-TYPE Parallel InterfaceDigital Label Press 3 User’s Manual Index Print pressure bracket 26, 29 Printer cleaning kit 65, 66