Toshiba TDP-T9 Power Supply Cord Selection, Important Precautions, Moisture Condensation

Page 9

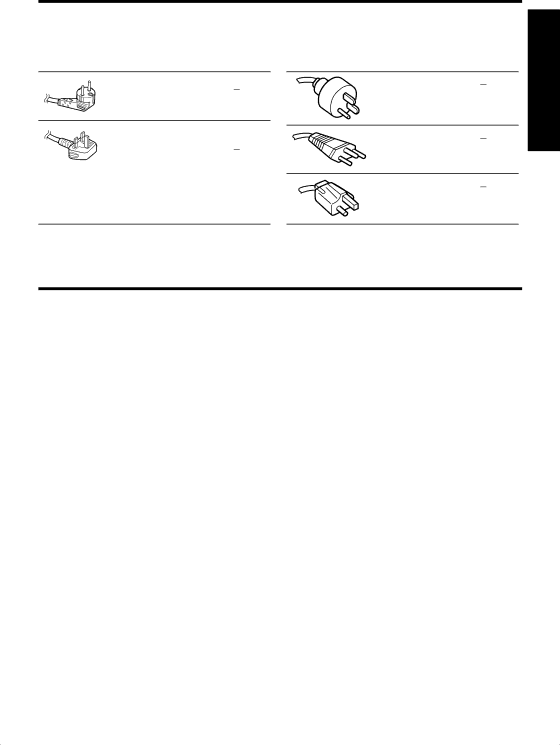
POWER SUPPLY CORD SELECTION

If your line voltage is 220 to 240V, use one of the following types of cable.

Plug


configuration Plug type

Line voltage

EURO

220

240V

UK

220

240V

Use a 5A fuse which is approved by ASTA or BSI to BSI362.

Always replace the fuse cover after changing the fuse.

Plug


configuration Plug type

Line voltage

Australian

200 240V

240V


10A


Switzerland 200 240V 240V

6A

North American 200 240V 240V

15A

Before Using

IMPORTANT PRECAUTIONS

Save Original Packing Materials

The original shipping carton and packing materials will come in handy if you ever have to ship your projector. For maximum protection, repack the set as it was originally packed at the factory.

Moisture Condensation

Never operate this unit immediately after moving it from a cold location to a warm location. When the unit is exposed to such a change in temperature, moisture may condense on the lens and the crucial internal parts. To prevent the unit from possible damage, do not use the unit for at least 2 hours when there is an extreme or sudden change in tempera- ture.

Place and Manner of Installation

Do not place in hot locations, such as near heating equipment. Doing so could cause malfunction, and shorten the life of the projector.

Avoid locations with oil or cigarette smoke. Doing so will dirty the optical parts, shortening their lives, and darkening the screen.

Do not use this product in the upright position or tilt it up or down by more than 20° from level. Doing so may cause a failure or shorten the life of the product.

Using this instrument near a TV or radio may cause interference to the images or audio sound. If this happens, move it away from the TV or radio.

Moving the projector from a low-temperature room to a high-temperature room may cause condensation on the lens or internal parts in the instrument. If you continue to use it in that situation, the malfunction may result. Ensure to wait until the condensation natu- rally disappears.

In a high altitude location where air is thin, cooling efficiency is reduced so use the pro- jector with [Fan mode] set to [High].

9

Image 9
Contents Data Projector TDP-T9 USA only Safety PrecautionsBefore Using Important Safety Instructions Power Sources VentilationSource of Light Cleaning Power-Cord ProtectionHeat Water and Moisture Do not place the product vertically Lightning storms Object and Liquid Entry Stack InhibitedAccessories Damage Requiring ServiceServicing Replacement Parts Important Safety InstructionsSafety Check Do not use the product in a closed installation stateImportant Precautions Power Supply Cord SelectionPlace and Manner of Installation Save Original Packing MaterialsImportant Precautions Exemption ClausesAvoid Volatile Liquid Copyrights Other Cautions and InformationsDisposal TrademarksRemote Control Batteries Contents Page Checking the package contents Names of each part on the main unit Names of each part on the control panel and remote control Label locations Parts on the rear panel Loading dry-cell batteries Into the remote control Preparing and using the remote controlOperating the remote control  Remove the battery cover  Insert the dry-cell batteriesOperating a computer Connecting a computerPlacement Placement StylesFloor-mounted front projection Screen As seen from above As seen from the side Projection Distance and SizeBefore connection ConnectionTurning the power on Press the ON/STANDBY button Turning the power on and offPress the ON/STANDBY button again Turning the power off Press the ON/STANDBY buttonSelect the language When using the first time Turn on the powerBasic operations Activate the connected deviceAdjusting the screen size and focus Projector placement angle adjustments To adjust the horizontal angle, use Tilt adjuster To stow the foot adjuster, hold up the projectorUsing auto setting Only for analog input from computer Using handy featuresPress the remote control’s Auto SET button Correcting the keystone distortionCutting off the picture and sound temporarily Mute Password functionFreezing the image Freeze Key LockUsing handy features If you forgot the password, please inquire your dealerRe-enter the same password for confirmation How to use the menus Using the menusImage adjustment menu Display setting menu Detailed description Screen sizeBackground Default setting menu Using the menusDetailed description Fan mode Lamp powerB/P R Displaying Information Status displayLamp replacement When the lamp is brokenAbout lamp Lamp replacement Used Lamps Reset the lamp timerLens and main unit cleaning Lens cleaningMain unit cleaning Power went out during use No powerTrouble indications Lamp went out during use, or won’t come onBefore calling service personnel List of general specifications SpecificationsSeparately sold product SpecificationSpecifications List of supported signals RGB signalsList of supported signals Y/PB/PR signals List of supported signals Video, S-Video signalsPin assignment of Computer in & Monitor terminals Pin assignment Control terminalOthers