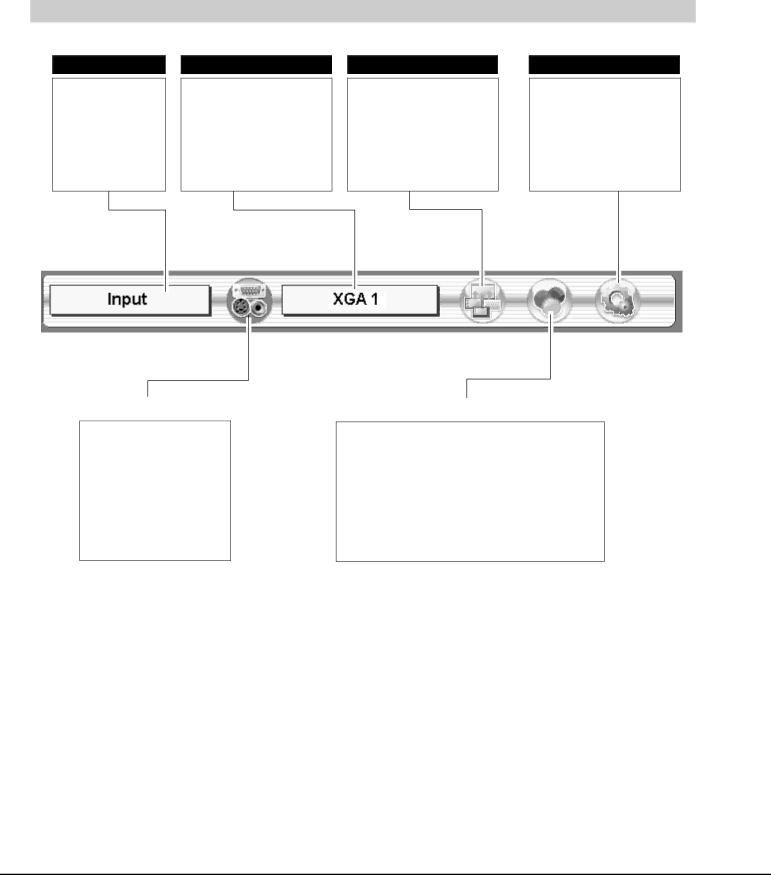
Sanyo PLV-HD2000N, PLV-HD2000E owner manual Before Operation Menu BAR, System BOX

Page 22

BEFORE OPERATION

MENU BAR

GUIDE WINDOW

Shows selected item of ON-

SCREEN MENU.

SYSTEM BOX

Used to select computer system or video system. Shows selected system on this box.

(Refer to P27-28)

DISPLAY ADJUST MENU

Used to adjust size of image. {Full/Normal/Anamorphic} (Refer to P29)

Used to adjust parameters to match with input signal format. (Refer to P31-32)

SETTING MENU

Used to change settings of projector or reset Lamp Replace Counter.

(Refer to P38-41)

INPUT MENU


IMAGE ADJUST MENU

Used to select input source (Input 1, Input 2, Input 3 or Input 4). Refer to P25.

Used to select image level among Standard (AV), Cinema, Standard (PC), Real and Image 1 ~ 10. (Refer to P33)

Used to adjust image. [Contrast/Brightness/Color/Tint/Color Temp. /White Balance (R/G/B)/Sharpness/Gamma /Noise Reduction/Progressive/Auto picture control/Auto Lamp Control/Color management/Gamma balance] (Refer to P34-37)

22

Image 22
Contents Model PLV-HD2000N/E To the Owner Risk of Electric Shock Do not OpenSafety Instructions Voor de klanten in NederlandCompliances Federal Communication Commission NoticeTable of Contents Features and Design CompatibilityPreparation Name of Each Part of ProjectorSETTING-UP Projector Connecting AC Power CordLens Shift Adjustment Preparation Lens InstallationPositioning Projector Preparation Picture Level and Tilt Adjustment Installing Projector in Proper PositionPreparation Moving Projector Replacement of Terminal Connecting ProjectorTerminals of Projector Connecting Projector INPUT/OUTPUT Terminals and Jacks Input Input 2Connecting Projector Serial Port TerminalConnecting to Computer Cables used for connectionExternal Audio Equipment Connecting to Video EquipmentAudio Amplifier Audio Speaker stereo Side Controls and Indicators Before OperationIndicators Front IndicatorsOperation of Remote Control 0WIRED Remote JackRemote Control Batteries Installation Code ChangeOperating ON-SCREEN Menu HOW to Operate ON-SCREEN MenuFlow of ON-SCREEN Menu Operation Before Operation Menu BAR System BOXTurning on Projector Basic OperationTurning on / OFF Projector Turning OFF ProjectorPicture Freeze Function Adjusting ScreenNo Show Function Menu Operation Selecting Input SourceDirect Operation InputWhen Select Input 2 5 BNC Terminal System Menu System SelectAutomatic MULTI-SCAN System System Select Menu PCSystem Select Menu SDI Basic Operation Select Video SystemAuto Screen Adjustments Display AdjustDisplay Adjustments Screen Adjustment DirectDisplay Adjust Auto PC Adjustment Auto PC AdjDisplay Adjust Manual Display Adjustments Current mode ClampImage Level Select Direct Image AdjustmentsImage Adjust Menu Image Level Select MenuDisplay Adjust Image Level Adjustments Auto picture control Noise reductionProgressive Auto lamp controlList COLOR.M Menu COLOR.MMenu Color Palette DELCloses Image Adjust Menu Gamma balanceSetting Menu SettingSetting Menu Ceiling Menu positionLogo RearRemote control Power managementOn start Key lock Lamp counter resetFactory default QuitAIR Filter Care and Cleaning MaintenanceAppendix Yellow Lamp Dim Lamp Red Lamp Appendix Lamp ManagementMark on Lamp Appendix Lamp Replacement Front Indicators Rear IndicatorsCleaning Projection Lens Order Replacement LampTroubleshooting Problem Try these SolutionsService Indicators Projector Condition Appendix Indicators and Projector ConditionDisplay adjust Menu TreeImage adjust Technical Specifications Remote Control TransmitterAppendix Configurations of Terminals DVI-I Terminal DIGITAL/ANALOGAppendix Compatible Computer Specifications ResolutionOptional Parts Dimensions LCD Projector Lens Replacement and Installation Procedure Fig-4 Fig-8 Fig-9 Focus Adjustment For Model LNS-W03 Correcting the focus Model No Zoom 100 120 150 180 200 250 300 350 400 500 600 MAX Side MAXPart No 327 3082 1AA6P1P5055-- MA4A