JVC HR-E249E specifications Basic, Playback

Page 12

12EN

PLAYBACK


The easiest, most basic operation possible with your video

Basic


recorder is tape playback. Already-recorded signals on a video


tape are read by your video recorder and displayed on your TV


Playback


just like a TV programme.


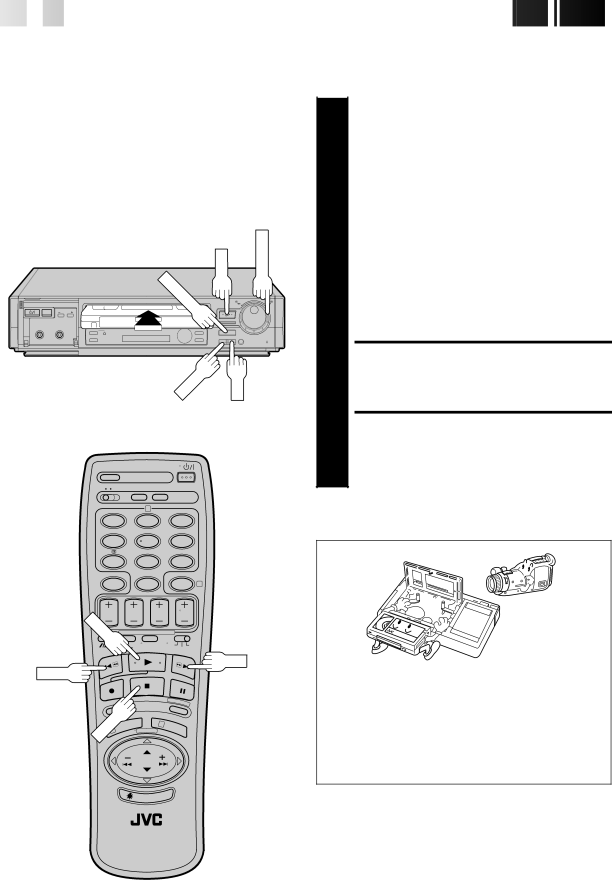
Make sure the window side is up, the rear label side is


LOAD A CASSETTE


facing you and the arrow on the front of the cassette is


1 point toward the recorder. Don’t apply too much

Turn on the TV and select the VIDEO channel (or AV mode).


pressure when inserting.


The recorder power comes on automatically and the


counter is reset to 0:00:00.


If the record safety tab has been removed, playback


begins automatically.

PLAY

SHUTTLE


FIND PROGRAMME START


POINT

TOP/EJECT


2

If the tape is advanced past the start point, press REW or


turn the SHUTTLE ring to the left.


To go forward, press FF or turn the SHUTTLE ring to the

6


5/8

right.

q

1

Á


START PLAYBACK


REW

FF

3

4

Press PLAY. “BEST” appears blinking in the recorder's display panel during automatic tracking. (pg. 20)

STOP PLAYBACK

Press STOP on the remote or STOP/EJECT on the recorder’s front panel. Then press STOP/EJECT to remove the cassette.

2

1 2 3

4

5

6

7 8 9

04

LAY

FF

REW

STOP

3

1


Usable cassettes

Compact VHS camcorder recordings can be played on this video recorder. Simply place the recorded cassette into a VHS Cassette Adapter and it can be used just like any full-sized VHS cassette.

This video recorder can record on regular VHS and Super VHS cassettes. However, it will record and play back regular VHS signals only. It is not possible to play back a recorded Super VHS tape.

Image 12
Contents HR-E249E Safety Precautions For ItalyDo not place the recorder Check Contents Installing Your NEW Record ER ENBasic Connections Situate RecorderAuto Set Up Turn on the RecorderSelect Country EN I Nitial Sett IngsPerform Auto SET UP Select LanguageIf you are referring to On-screen displayInitial Settings If both auto channel set and auto clock set have failedLanguage for the on-screen display Just ClockLanguage Access Video Channel SET Mode Exit Video Channel SET ModeEN Initial Settings Video Channel SetAccess Video Channel SET ModeMode With AV ConnectionSetup Make List of Stored Station Names Channel PositionsGuide Program Number Set When Using a Satellite Tuner Enter Showview NumberConfirm Channel Position Number Close MenuBasic PlaybackPlayback Features Pause During PlaybackStill Picture/Frame-By-Frame Playback Variable-Speed SearchAdjust Tracking Activate HIGH-SPEED SearchOverride Automatic Tracking ManuallyActivate 3R Picture Activate RepeatPlayback Tape Position Indicator Activate Index SearchActivate Instant Review Index SearchSET A/B Code Switch RE-SUPPLY PowerActivate Scene Finder Stop Scene FinderBasic Recording Access Main Menu ENABLE/DISABLE ON-SCREEN DisplayOn-Screen Displays ScreenS.T. Picture System EN RecordingRecording Display Panel IndicationPlayback AuseRecording Features Reset CounterSelect Channel to Watch SET Counter DisplayEngage ITR Mode Instant Timer Recording ITRSET Recording Duration Timer Recording EN Timer RECORDINGcontWhen Using The Illumi-Guide Feature Press ProgProgram Screen Satellite Tuner UsersPressing PROG. Check Regular Timer Programming Stop +/-,DATE +/-,TV PROG. +/-,MENUTV PROG. +/- and Menu Press TV PROG. +Access Programme Access Main Menu ScreenEN Timer Recording Revise ProgrammeTimer Warning PDC/VPS RecordingSET Recording DECK’S Input Mode Edit To Or From Another Video RecorderMake Connections Start Source PlayerPlayer RecorderEdit From a Camcorder SET RECORDER’S InputStart Camcorder Start RecorderConnecting Using a Decoder Select Input ModeConnect Decoder SET TunerTV Multi Brand Remote Control Control Your TV Using Additional ButtonsSET TV Brand Code TRY Operating TVSatellite Tuner Multi SET Satellite Tuner Brand CodeTRY Operating Satellite Tuner Tuner SET Auto Channel SetPointer to your countrys Name, then press OK.SET Select Item Delete ChannelClose Confirmation Select NEW PositionSwitch Stations Access Manual CH. SETPerform Tuning Select NEW StationTV Station And ID List Station NameClock SET PreparationMove the highlight bar pointer to Clock SET by Screen appearsSET Clock Automatically Return to Normal ScreenSET Date and Time SET Just ClockTroubleshooting E N PowerTimer again OubleshootingÄ remain lit on the display panel. Is there a problem? Questions and Answer S E NIndex Front ViewRear View Installing Batteries How To UseEN Index Specifications GeneralEMO Memo HR-E249E International Telephone Country CodeLanguage Code