EN
Auto Set Up – referring to the display panel
The Auto Set Up function sets the tuner channels, clock and Guide Program numbers automatically.
BEFORE YOU START PLEASE MAKE SURE THAT:
■The TV aerial cable is connected to the ANT.IN jack on the rear panel of the video recorder.
■The video recorder's mains power cord is connected to a mains outlet.
■The video recorder is turned off.
■Load batteries into the remote control.
1 Press |
|
|
| (recorder/remote). |
|
|
|
|
|
|
|
|
|
|
|
|
|
|
|
|
|
|
|
|
|
|
|
|
|
|
|
|
| |||||||||||||||||||||||||||||||||||
|
|
|
|
|
|
|
|
|
|
|
|
|
|
|
|
|
|
|
|
|
|
|
|
|
|
|
|
|
|
|
| |||||||||||||||||||||||||||||||||||||
|
|
|
|
|
|
|
|
|
|
|
|
|
|
|
|
|
|
|
|
|
|
|
|
|
|
|
|
|
| |||||||||||||||||||||||||||||||||||||||
|
|
|
|
|
|
|
|
|
|
|
|
|
|
|
|
|
|
|
|
|
|
|
|
|
|
|
|
|
|
|
| |||||||||||||||||||||||||||||||||||||
|
|
|
|
|
|
|
|
|
|
|
|
|
|
|
|
|
|
|
|
|
|
|
|
|
|
|
|
|
|
|
|
|
|
|
|
|
|
|
|
|
|
|
|
|
|
|
|
|
|
|
|
|
|
|
|
|
|
|
|
|
|
|
|
|
|
|
|
|
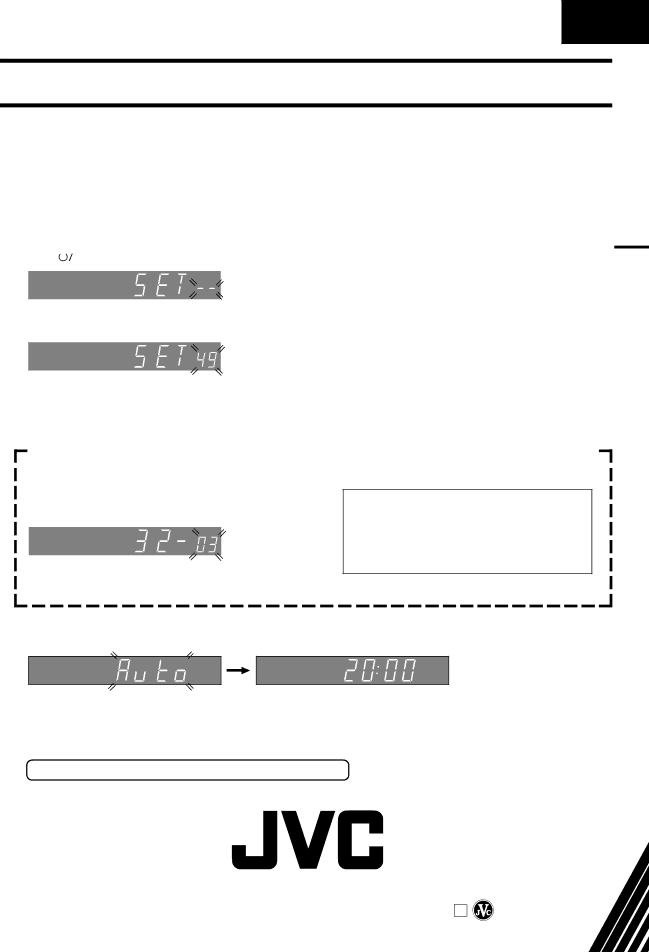
2 Press PUSH JOG %Þ (remote) to select the international telephone country code. |
|
|
|
|
|
| ||||||||||||||||||||||||||||||||||||||||||||||||||||||||||||||
(Ex.) DEUTSCHLAND is selected. |
| International Telephone Country Code | ||||||||||||||||||||||||||||||||||||||||||||||||||||||||||||||||||
|
|
|
|
|
|
|
|
|
|
|
|
|
|
|
|
|
|
|
|
|
|
|
|
|
|
|
|
|
|
|
|
|
|
|
|
|
|
|
|
| ||||||||||||||||||||||||||||
|
|
|
|
|
|
|
|
|
|
|
|
|
|
|
|
|
|
|
|
|
|
|
|
|
|
|
|
|
|
|
|
|
|
|
|
|
|
|
|
| SUOMI | : 358 |
| SUISSE | : 41 |
|
| |||||||||||||||||||||
|
|
|
|
|
|
|
|
|
|
|
|
|
|
|
|
|
|
|
|
|
|
|
|
|
|
|
|
|
|
|
|
|
|
|
|
|
|
|
|
| PORTUGAL | : 351 |
| ITALIA | : 39 |
|
| |||||||||||||||||||||
|
|
|
|
|
|
|
|
|
|
|
|
|
|
|
|
|
|
|
|
|
|
|
|
|
|
|
|
|
|
|
|
|
|
|
|
|
|
|
| |||||||||||||||||||||||||||||
● If you have selected a country code other than 32 |
| DEUTSCHLAND | : 49 |
| ESPAÑA | : 34 |
|
| ||||||||||||||||||||||||||||||||||||||||||||||||||||||||||||
|
| (BELGIUM) or 41 (SUISSE), go to step 3. |
| NORGE | : 47 |
| BELGIUM | : 32 |
|
| ||||||||||||||||||||||||||||||||||||||||||||||||||||||||||
|
|
| SVERIGE | : 46 |
| NEDERLAND | : 31 |
|
| |||||||||||||||||||||||||||||||||||||||||||||||||||||||||||
|
|
|
|
|
|
|
|
|
|
|
|
|
|
|
|
|
|
|
|
|
|
|
|
|
|
|
|
|
|
|
|
|
|
|
|
|
|
|
|
| DANMARK | : 45 |
| GREECE | : 30 |
|
| |||||||||||||||||||||
|
|
|
|
|
|
|
|
|
|
|
|
|
|
|
|
|
|
|
|
|
|
|
|
|
|
|
|
|
|
|
|
|
|
|
|
|
|
|
|
| ÖSTERREICH | : 43 |
| OTHERS | : - - |
|
| |||||||||||||||||||||
|
|
|
|
|
|
|
|
|
|
|
|
|
|
|
|
|
|
|
|
|
|
|
|
|
|
|
|
|
|
|
|
|
|
|
|
|
|
|
|
|
|
|
|
|
|
|
|
|
|
|
|
|
|
|
|
|
|
|
|
|
|
|
|
|
|
|
|
|
|
|
|
|
|
|
|
|
|
|
|
|
|
|
|
|
|
|
|
|
|
|
|
|
|
|
|
|
|
|
|
|
|
|
|
|
|
|
|
|
|
|
|
|
|
|
|
|
|
|
|
|
|
|
|
|
|
|
|
|
|
|
|
|
|
|
|
|
|
HR-E249E
●If you have selected 32 (BELGIUM) or 41 (SUISSE), press OK (remote) and select the language code by pressing PUSH JOG %Þ (remote), then go to step 3.
(Ex.) FRANCAIS is selected for BELGIUM
|
|
|
|
|
|
|
|
|
|
|
|
|
|
|
International Telephone | Language Code | |||
Country Code |
|
|
| |
Language Code
ENGLISH | : 01 | NEDERLANDS | : 06 |
DEUTSCH | : 02 | SVENSKA | : 07 |
FRANCAIS | : 03 | NORSK | : 08 |
ITALIANO | : 04 | SUOMI | : 09 |
CASTELLANO | : 05 | DANSK | : 10 |
3 Press OK (remote). Do NOT press any button on the video recorder or remote control until the current time appears.
During Auto Set Up | Auto Set Up completed |
*Once you have performed Auto Set Up, even if the recorder's memory backup has expired, the recorder will not perform Auto Set Up again.
FOR MORE INFORMATION SEE INSTRUCTIONS/P4
VICTOR COMPANY OF JAPAN, LIMITED
COPYRIGHT © 1997 VICTOR COMPANY OF JAPAN, LTD.
E
Printed in Japan 0397HOV*UN*VP