JVC HR-E249E specifications S.T. Picture System, EN Recording, Display Panel Indication

Page 20

20ENRECORDING(cont.)

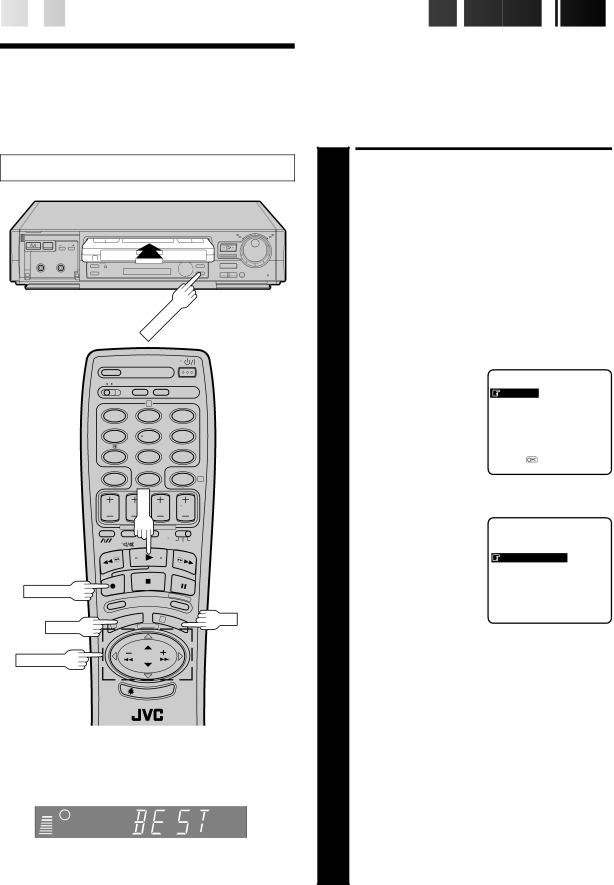
B.E.S.T. Picture System

Turn on the TV and select the VIDEO channel (or AV mode).

6


5/8

q

1

Á

RECORD


2


1

2

3

4

5

6

7

8

9


0

4


PLAY


RECORD

3

OK

MENU

1

PUSH JOG

Display Panel Indication

As the tape check progresses, the “– –” marks on the display panel increase upward. Once the "BEST" indicator starts blinking, the check is complete.

The B.E.S.T. (Biconditional Equalised Signal Tracking) system checks the condition of the tape in use during recording and playback, and compensates to provide the highest-possible recording and playback pictures. The default setting for both recording and playback is “ON”.

Recording

1

LOAD A CASSETTE


Insert a cassette with the record safety tab intact.


The recorder power comes on automatically.


ACCESS MAIN MENU


SCREEN


2 Press MENU twice.


ACCESS MODE SET


SCREEN


Move the highlight bar

MAIN MENU


(pointer) to "MODE SET"


MODE SET


3 by pressing PUSH JOG


AUTO CH SET


%Þ, then press OK.

MANUAL CH SET


GUIDE PROG SET


CLOCK SET


[] =


[MENU] : EXIT


CONFIRM B.E.S.T. STATUS


The default setting is

MODE SET


“ON”. If this is the case, go


4 to step 5. If not, press

AUTO TIMER

: OFF

O. S. D.

: ON


PUSH JOG to move the

B. E. S. T.

: ON


Þ


highlight bar (pointer) to

AV2 SELECT

: AV2


“B.E.S.T.”, then press


PUSH JOG%to set to


“ON”.


[] =[5] : ON/OFF


[MENU] : EXIT


RETURN TO NORMAL


SCREEN


5 Press MENU.


6

START RECORDING


Press and hold RECORD and PLAY on the remote, or

press RECORD on the recorder.


The recorder spends approximately 7 seconds assessing the condition of the tape, then begins recording.

When the "BEST" indicator begins blinking, that means adjustment is complete.

Pressing the recorder's RECORD button while "BEST" is displayed does not start Instant Timer Recording (pg. 23).

Image 20
Contents HR-E249E Do not place the recorder Safety PrecautionsFor Italy Check Contents Installing Your NEW Record ER ENBasic Connections Situate RecorderAuto Set Up Turn on the RecorderSelect Country EN I Nitial Sett IngsPerform Auto SET UP Select LanguageIf you are referring to On-screen displayInitial Settings If both auto channel set and auto clock set have failedLanguage for the on-screen display Just ClockLanguage Access Video Channel SET Mode Exit Video Channel SET ModeEN Initial Settings Video Channel SetAccess Video Channel SET ModeMode With AV ConnectionGuide Program Number Set SetupMake List of Stored Station Names Channel Positions When Using a Satellite Tuner Enter Showview NumberConfirm Channel Position Number Close MenuBasic PlaybackPlayback Features Pause During PlaybackStill Picture/Frame-By-Frame Playback Variable-Speed SearchAdjust Tracking Activate HIGH-SPEED SearchOverride Automatic Tracking ManuallyPlayback Activate 3R PictureActivate Repeat Tape Position Indicator Activate Index SearchActivate Instant Review Index Search SET A/B Code Switch RE-SUPPLY Power Activate Scene Finder Stop Scene FinderBasic Recording Access Main Menu ENABLE/DISABLE ON-SCREEN DisplayOn-Screen Displays ScreenS.T. Picture System EN RecordingRecording Display Panel IndicationPlayback AuseRecording Features Reset CounterSelect Channel to Watch SET Counter DisplaySET Recording Duration Engage ITR ModeInstant Timer Recording ITR Timer Recording EN Timer RECORDINGcontWhen Using The Illumi-Guide Feature Press ProgPressing PROG. Check Program ScreenSatellite Tuner Users Regular Timer Programming Stop +/-,DATE +/-,TV PROG. +/-,MENUTV PROG. +/- and Menu Press TV PROG. +Access Programme Access Main Menu ScreenEN Timer Recording Revise ProgrammeTimer Warning PDC/VPS RecordingSET Recording DECK’S Input Mode Edit To Or From Another Video RecorderMake Connections Start Source PlayerPlayer RecorderEdit From a Camcorder SET RECORDER’S InputStart Camcorder Start RecorderConnecting Using a Decoder Select Input ModeConnect Decoder SET TunerTV Multi Brand Remote Control Control Your TV Using Additional ButtonsSET TV Brand Code TRY Operating TVTRY Operating Satellite Tuner Satellite Tuner MultiSET Satellite Tuner Brand Code Tuner SET Auto Channel SetPointer to your countrys Name, then press OK.SET Select Item Delete ChannelClose Confirmation Select NEW PositionSwitch Stations Access Manual CH. SETPerform Tuning Select NEW StationTV Station And ID List Station NameClock SET PreparationMove the highlight bar pointer to Clock SET by Screen appearsSET Clock Automatically Return to Normal ScreenSET Date and Time SET Just ClockTroubleshooting E N PowerTimer again OubleshootingÄ remain lit on the display panel. Is there a problem? Questions and Answer S E NIndex Front ViewRear View EN Index Installing BatteriesHow To Use Specifications GeneralEMO Memo Language Code HR-E249EInternational Telephone Country Code